Since the introduction of SwiftUI, I have seen many developers write all their code inside views. Unfortunately, the simplicity of the framework seems to encourage a return of many poor practices.
But you do not build robust, maintainable apps by gluing together random pieces of code.
Sure, you can search on Google for specific tasks, copy and paste some code into your project and make it work, somehow.
That works if your app is small and simple. But as soon as you go beyond basic tutorials, you inevitably get serious problems.
That’s why the MVC and MVVM patterns exist. In this article, we will see how they apply to SwiftUI.

FREE GUIDE - SwiftUI App Architecture: Design Patterns and Best Practices
MVC, MVVM, and MV in SwiftUI, plus practical lessons on code encapsulation and data flow.
DOWNLOAD THE FREE GUIDEContents
- The Model-View-Controller pattern guides you in structuring the code of your iOS apps
- Why the Model-View-ViewModel pattern is nothing else than MVC with a different name
- Model types contain the domain business logic and data transformation code
- SwiftUI views should be independent from the rest of your app’s code
- Replacing massive view controllers with massive views
- Keeping views modular for a more readable and reusable code
- Passing data inputs to the ancestors in a view hierarchy
- Keeping logic out of views by propagating user actions up the view tree
- The controller layer takes care of all the code that does not fit in views and model types
- The controller layer holds the single source of truth for the entire app
- Why we still need view controllers in SwiftUI
- Bringing the view controller idea to SwiftUI’s root views
- Adding navigation and connecting the app’s screens to the shared global state
The Model-View-Controller pattern guides you in structuring the code of your iOS apps
It might be of some comfort to know that the problems you have when structuring your apps are not unique only to you. In fact, they are so pervasive that developers create several design patterns to solve them.
A design pattern is a generic solution to a common problem you find in software development.
There are many design patterns you can learn, but they are not all equally useful. Some can even be counterproductive like the singleton pattern (although that depends a lot on personal opinion).
By far, the most useful design pattern for iOS apps is the Model-View-Controller pattern or MVC in short. This is the first one you should learn. It’s so fundamental that it survived decades of software development practices and spread to many platforms. It also spawned many derivative patterns like MVVM, MVP, and others.
The MVC pattern is crucial because it helps answer the most recurring question you get when creating any iOS app:
Where should I put this new piece of code?
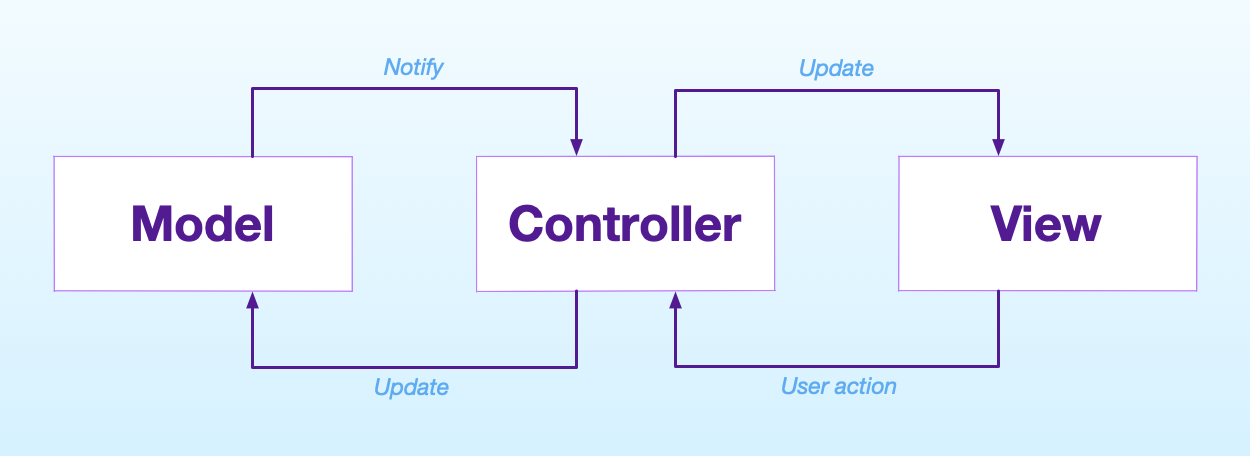
MVC is an architectural pattern. It gives you a full map of the structure of an entire app. As its name implies, the pattern consists of three layers:
- The model layer manages the data and the domain business logic of an app, independently from its visual representation.
- The view layer shows information to the user and allows interaction, independently from the underlying data.
- The controller layer acts as a bridge between the other two layers. It stores and manipulates the central state of the app, it provided data to views, and it interprets user actions according to the app-specific business logic.
Why the Model-View-ViewModel pattern is nothing else than MVC with a different name
How the three layers of the MVC pattern interact mostly depends on several factors:
- the platform;
- a developer’s interpretation and experience;
- the fashion of the day (yes, developers follow trends too).
Below you can see the traditionally most accepted graph for the MVC pattern in iOS and other Apple platforms.
To tell the truth, it is a bit more nuanced than this, but we will get there in a moment.
If you frequent some internet forums on SwiftUI (I’m looking at you, r/SwiftUI), you might think that MVC is obsolete. Nowadays, the Model-View-ViewModel pattern, or MVVM in short, is all the rage for apps made with SwiftUI.
Is that true, though?
As I detail in my guide to the five most common misconceptions about SwiftUI, MVVM is noting else than MVC with another name. That becomes evident when you look at its diagram.
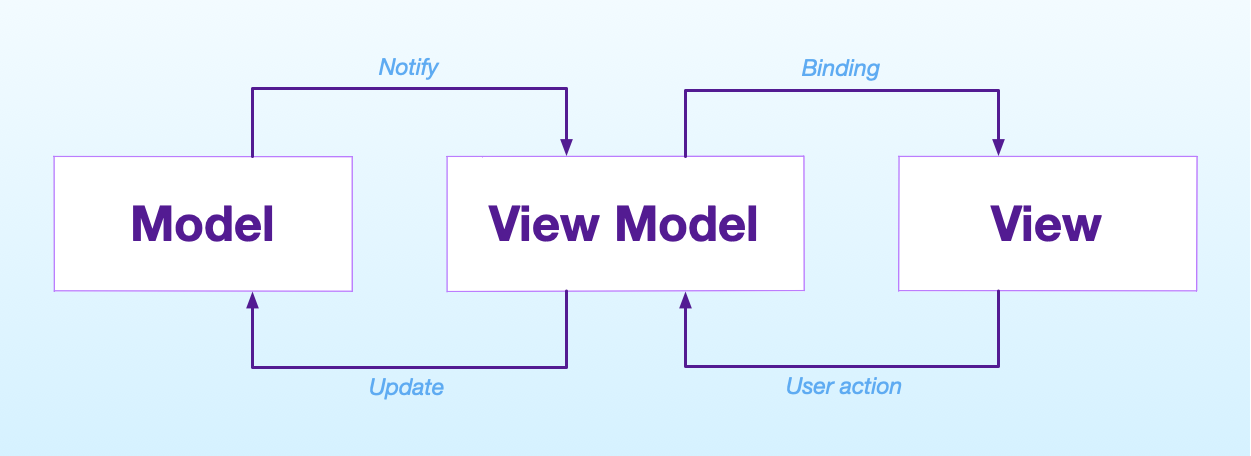
You don’t need to be an expert in graph theory to see that it matches the diagram of the MVC pattern.
That is true also for other design patterns, like Model-View-Presenter, Model-View-Adapter pattern, or whatever flavor seems to be popular at a specific time. Unfortunately, we developers like to reinvent the wheel constantly. (Don’t worry. You’ll get the same disease soon enough).
You could argue that, in UIKit apps, the two patterns were somewhat different because of view controllers, but I never bought that either.
I prefer to stick to the original name. So, in this article, all I say about MVC also applies to MVVM and other patterns derived from it.
Model types contain the domain business logic and data transformation code
We will build a small budgeting app. Even if our app has only two screens, it is complex enough to show how the MVC pattern works in SwiftUI. You can get the full Xcode project on GitHub.
We will start implementing the model layer of our app, which is usually the simplest one to build. The primary duties of the model layer are:
- representing the data of an app;
- implementing its domain business logic.
The latter is especially important. Many developers make the mistake of creating model types that only contain data.
struct Transaction: Identifiable {
	enum Category: String, CaseIterable, Identifiable {
		case income, groceries, utilities
		var id: String { rawValue }
	}

	let id = UUID()
	let amount: Int
	let date: Date
	let description: String
	let category: Category
}

struct Account {
	private (set) var transactions: [Transaction]

	var balance: Int {
		var balance = 0
		for transaction in transactions {
			balance += transaction.amount
		}
		return balance
	}

	mutating func add(_ transaction: Transaction) {
		transactions.append(transaction)
	}
}
The Transaction structure does not need any logic in our app. Notice, though, that the balance property of the Account structure is a computed property. Our type also sports an add(_:) method to add new transactions.
That’s the domain business logic of our app. It includes the code that implements the rules of our domain, which, in our case, is budgeting. Putting the domain business logic in the model layers makes it more reusable and more straightforward to test than putting it elsewhere.
The model layer must also include any code that transforms data from one format to another. We don’t have any on our app, but a typical example is JSON decoding using the Codable protocols.
While we are at it, we can already create some test data that we will use in our Xcode previews and, later, to test the finished app.
struct TestData {
	static let transactions: [Transaction] = [
		Transaction(amount: 200000, date: Date(), description: "Salary", category: .income),
		Transaction(amount: -1999, date: Date(), description: "Cellphone", category: .utilities),
		Transaction(amount: -5687, date: Date(), description: "Supermarket", category: .groceries)
	]

	static let account = Account(transactions: transactions)
}
SwiftUI views should be independent from the rest of your app’s code
On the other side of the MVC pattern, we find the view layer, where we find, unsurprisingly, the SwiftUI views.
The only responsibilities of the view layer are:
- Presenting data to the user;
- Enabling user interaction and navigation.
Notice that there is no mention of tasks like storing data on disk or performing network requests. I often see these end up inside views in many SwiftUI apps, but that’s not their correct location. Coupling all this code together makes it hard to test and reuse, along with the containing views.
The view layer should be, at least in theory, completely independent from the other two layers. This practice makes views more reusable and easier to preview.
In UIKit, views came from Xcode storyboards, so the separation was clear-cut. In SwiftUI, though, that’s easier said than done because SwiftUI offers several data flow mechanisms. The full reasoning will be evident at the end of the article.
As a first example, let’s implement the colored circles representing the transaction categories.
struct CategoryView: View {
	let category: Transaction.Category
	var highlighted: Bool = true

    var body: some View {
		ZStack {
			Circle()
				.frame(width: 56.0, height: 56.0)
				.foregroundColor(highlighted ? Color(.systemTeal) : Color(.quaternarySystemFill))
			Image(systemName: category.imageName)
				.font(.headline)
				.foregroundColor(highlighted ? .white : .primary)
		}
    }
}

struct CategoryView_Previews: PreviewProvider {
    static var previews: some View {
		HStack {
			ForEach(Transaction.Category.allCases, id: \.rawValue) { category in
				VStack {
					CategoryView(category: category)
					CategoryView(category: category, highlighted: false)
				}
			}
		}.previewLayout(.sizeThatFits)
    }
}
As you can see, the code in the CategoryView is only concerned about the visual appearance of the view. It does not know where its data comes from.
I won’t cover the details of the SwiftUI code I present here. This article is about the MVC pattern and not a SwiftUI tutorial. I am assuming that you know the basics of the framework already. If you need a quick-start, you can check Apple’s tutorials.
Replacing massive view controllers with massive views
In UIKit apps, there was the pervasive problem of massive view controllers. You can search that term on Google and find blog post after blog post showing how to keep your view controllers light (nothing wrong with that, I wrote one too).
Then came SwiftUI and, all a sudden, we seem to have thrown all the best practices out of the window.
Removing view controllers from SwiftUI did not make the problem go away. Yes, SwiftUI removed a lot of boilerplate code, and thanks for that. But much of the code that resided in view controllers in UIKit apps must go somewhere. So, in SwiftUI, we now have massive views instead.
I have seen countless SwiftUI apps where all code is inside view types. View controllers, at least, forced you to follow the three layers of MVC.
That’s why design patterns are even more critical in SwiftUI and not less than they were in UIKit.
Keeping views modular for a more readable and reusable code
First of all, we need to format dates and money amounts. Since model types only represent data, they do not deal with its representation. So, our Transaction type uses simple Int and Date types.
extension Int {
	var currencyFormat: String {
		let formatter = NumberFormatter()
		formatter.numberStyle = .currency
		return formatter.string(from: NSNumber(value: Float(self) / 100 )) ?? ""
	}
}

extension Date {
	var transactionFormat: String {
		let formatter = DateFormatter()
		formatter.dateStyle = .medium
		return formatter.string(from: self)
	}
}
Putting such code inside extensions allows us to keep our view code lighter while making these methods available to all our views.
To keep views manageable, it’s a good practice to break interfaces into smaller, reusable components. The CategoryView type we created above is a first example.
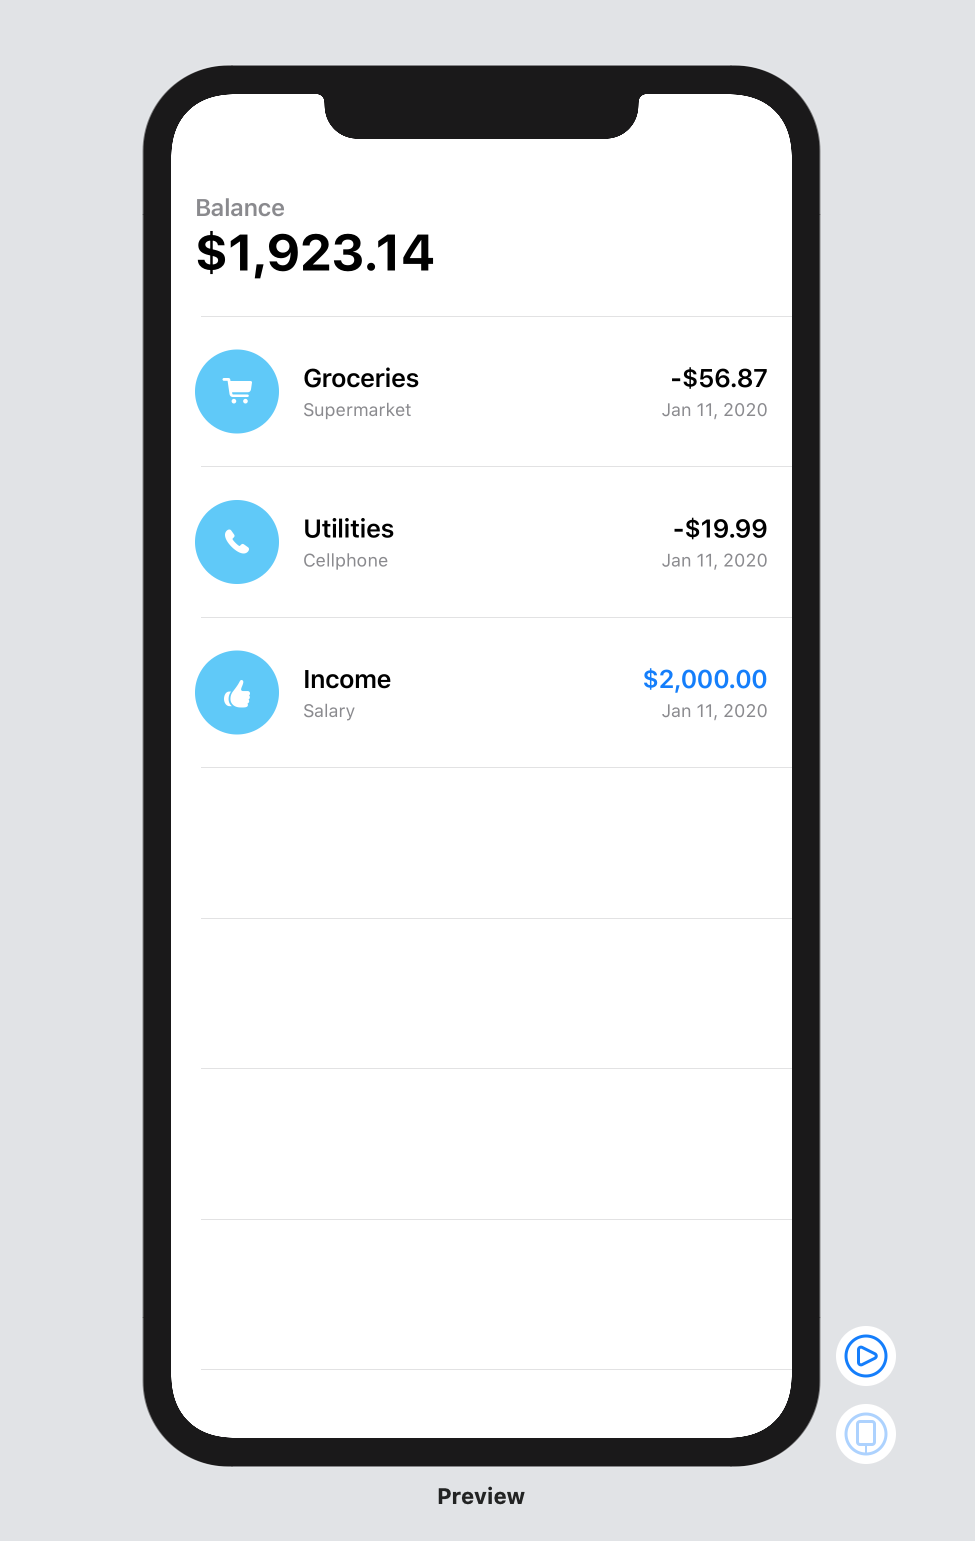
At the top of our Budget screen, before the list of transactions, we display the balance of the account. That can be another one of our view components.
struct Balance: View {
	var amount: Int

	var body: some View {
		VStack(alignment: .leading) {
			Text("Balance")
				.font(.callout)
				.bold()
				.foregroundColor(.secondary)
			Text(amount.currencyFormat)
				.font(.largeTitle)
				.bold()
		}
		.padding(.vertical)
	}
}
The rows in the transactions list all look the same, so that’s the next, obvious candidate for a modular view.
struct Row: View {
let transaction: Transaction
var body: some View {
HStack(spacing: 16.0) {
CategoryView(category: transaction.category)
VStack(alignment: .leading, spacing: 4.0) {
Text(transaction.category.name)
.font(.headline)
Text(transaction.description)
.font(.caption)
.foregroundColor(.secondary)
}
Spacer()
VStack(alignment: .trailing, spacing: 4.0) {
Text(transaction.amount.currencyFormat)
.font(.headline)
.foregroundColor(color(for: transaction.amount))
Text(transaction.date.transactionFormat)
.font(.caption)
.foregroundColor(.secondary)
}
}
.padding(.vertical)
}
func color(for amount: Int) -> Color {
amount > 0 ? .blue : .primary
}
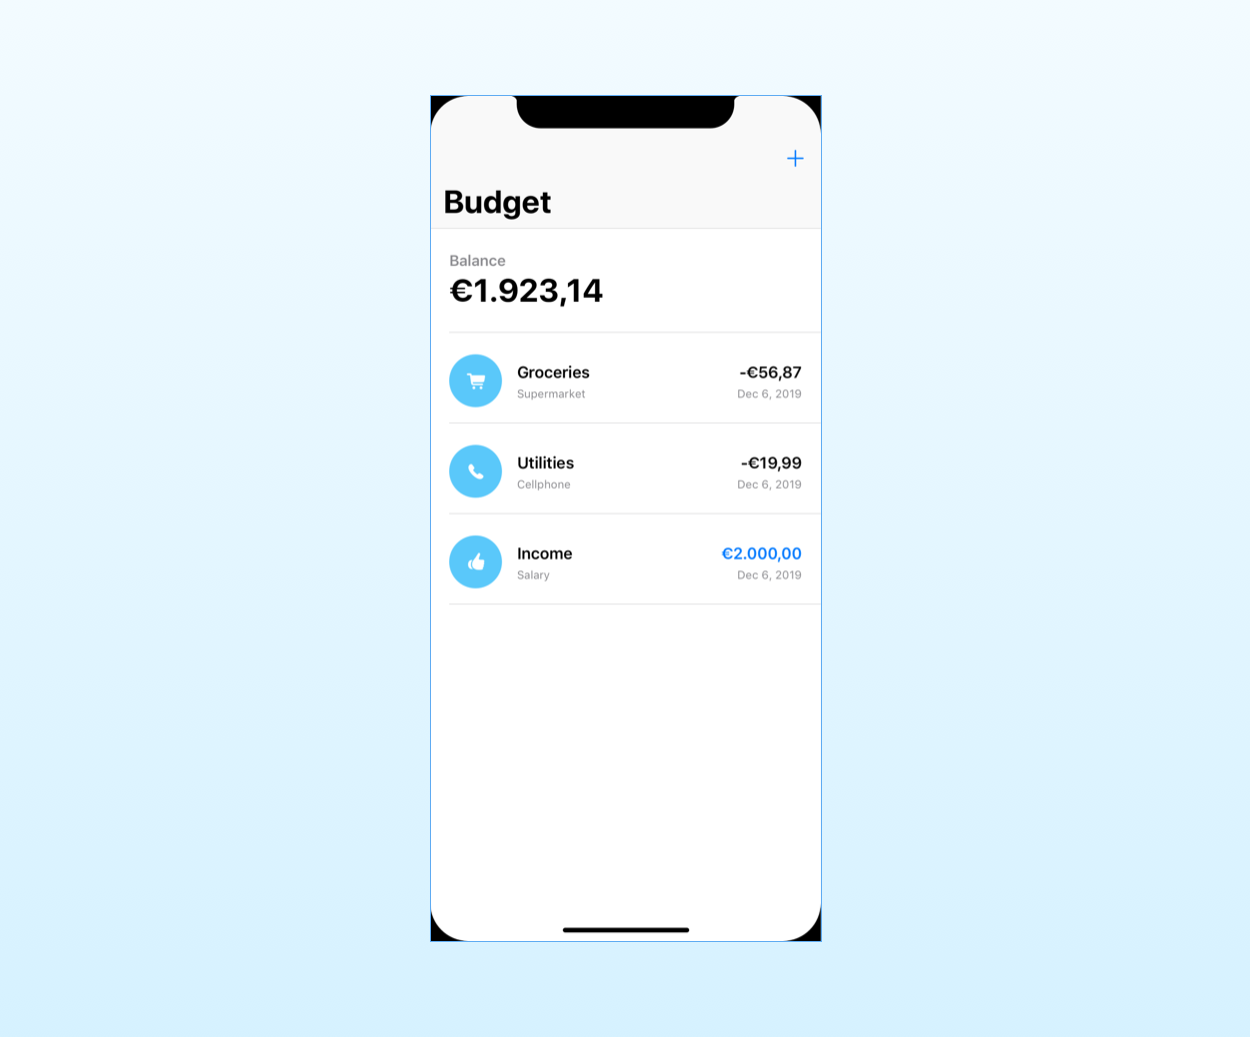
}Then, with these two pieces, we can compose the whole content of the Budget screen.
struct AccountView: View {
	let account: Account

	private var transactions: [Budget.Transaction] {
		return account
			.transactions
			.sorted(by: { $0.date > $1.date })
	}

	var body: some View {
		List {
			Balance(amount: account.balance)
			ForEach(transactions) { transaction in
				Row(transaction: transaction)
			}
		}
	}
}
SwiftUI does not impose any structure to your code. You could put all the code I put in the Balance and Row types directly into the AccountView structure. I’m sure you can see how that code would grow and quickly become hard to read.
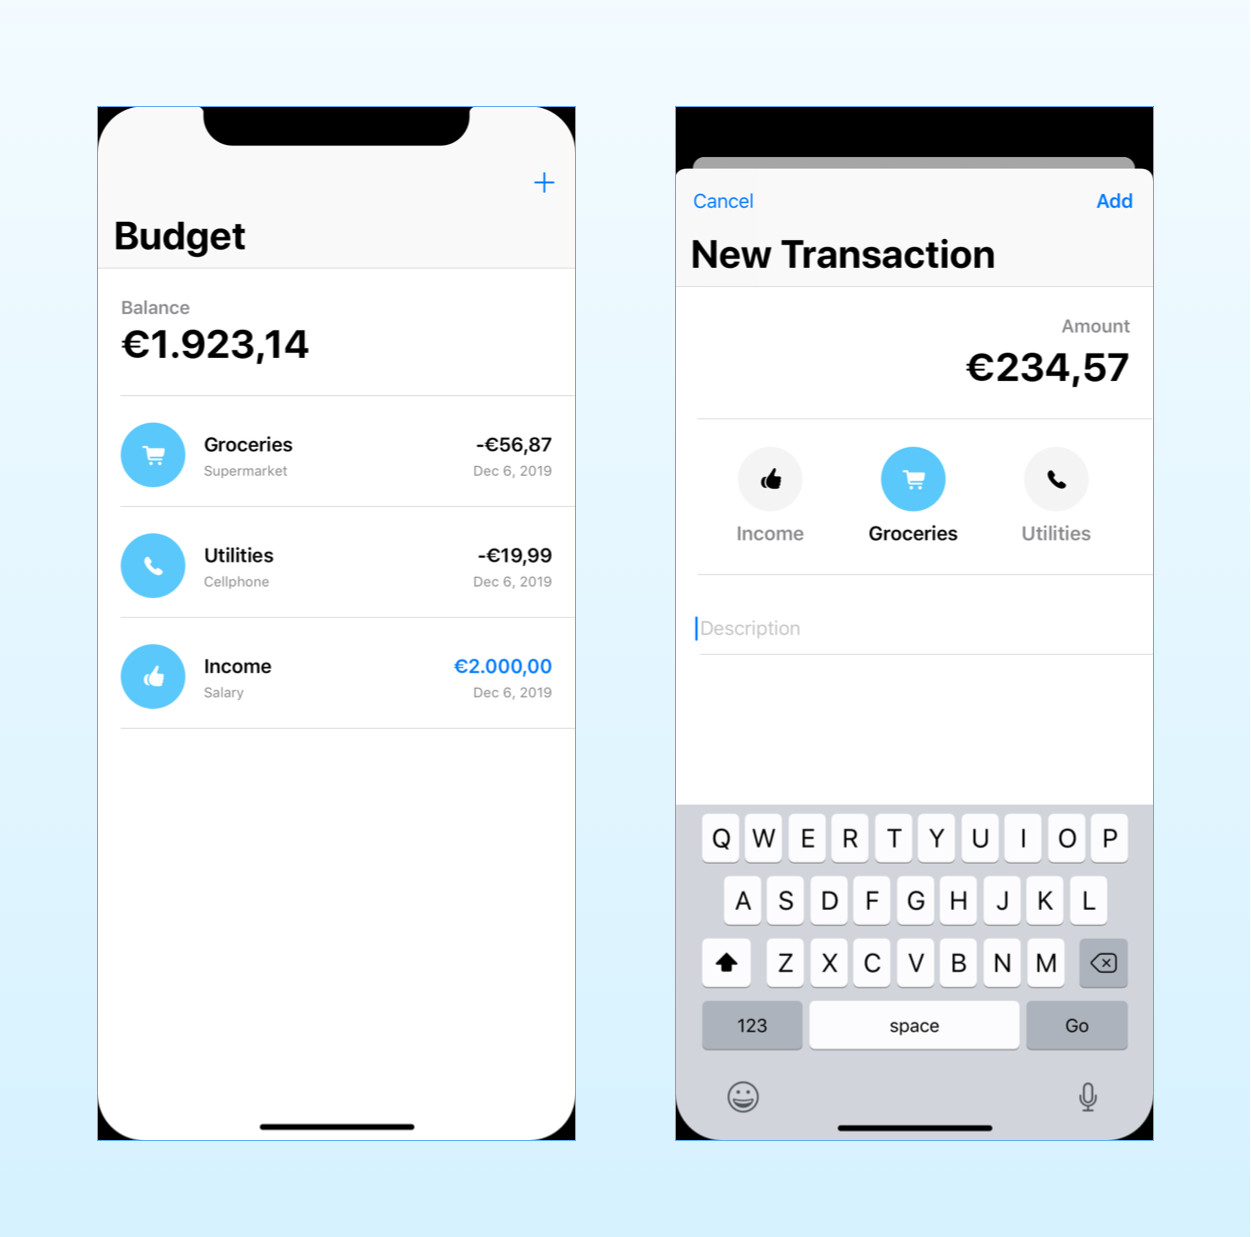
Here is the code to generate the Xcode previews you see in the images above.
struct BudgetView_Previews: PreviewProvider {
	static let account = TestData.account

    static var previews: some View {
		Group {
			AccountView(account: account)
			Group {
				Balance(amount: account.balance)
				Row(transaction: account.transactions[0])
			}
			.previewLayout(.sizeThatFits)
		}
    }
}
Passing data inputs to the ancestors in a view hierarchy
We will follow the same process in building the New Transaction screen. The difference here is that that this screen is interactive and allows the user to enter the data of a transaction.
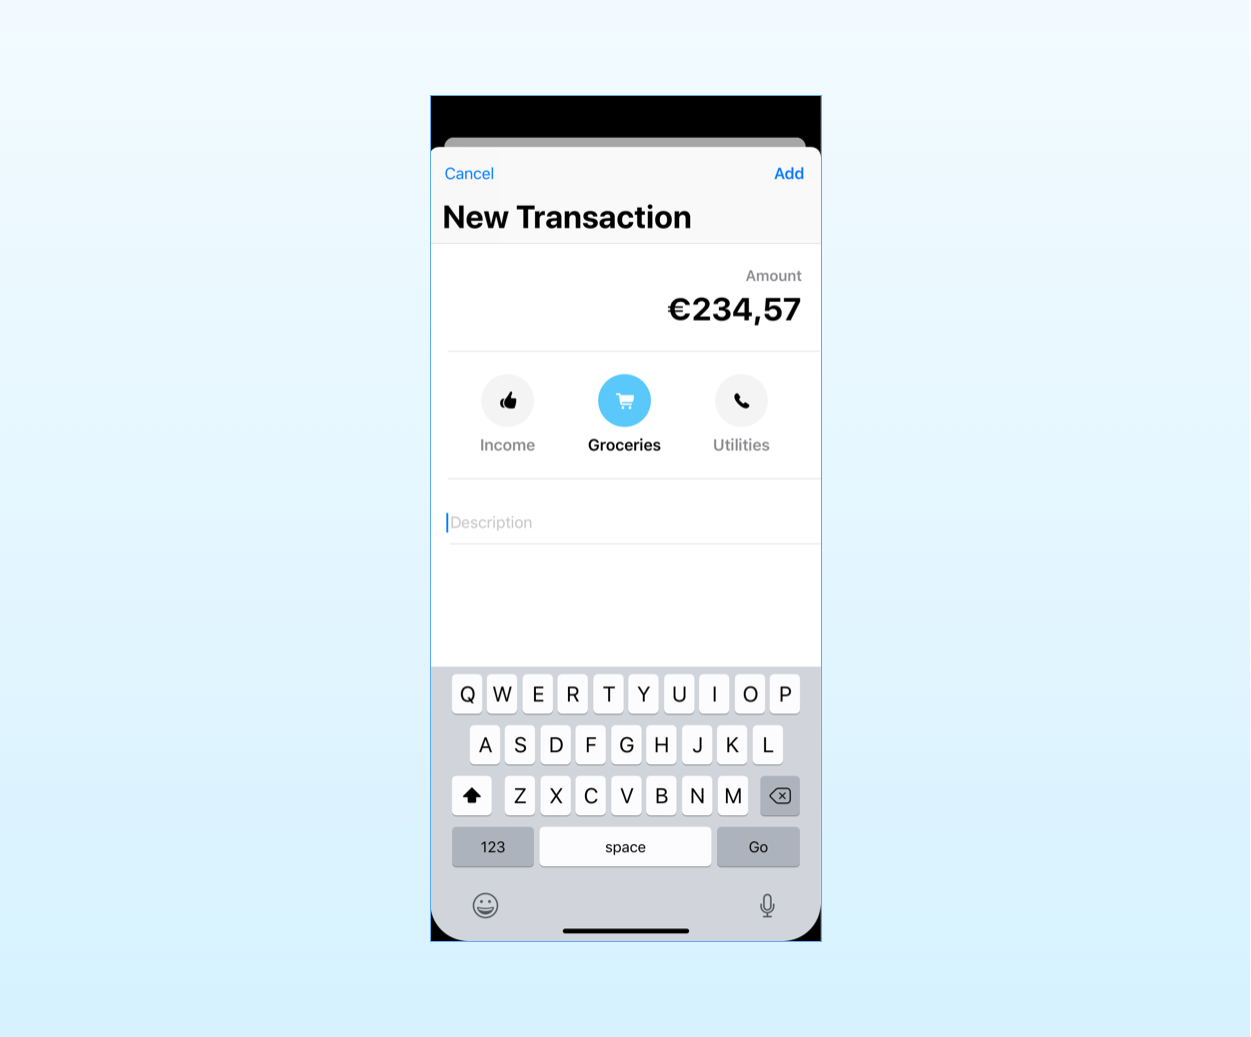
Let’s start with the text field, where the user can enter the transaction amount.
struct Amount: View {
	@Binding var amount: String

	var body: some View {
		VStack(alignment: .trailing) {
			Text("Amount")
				.font(.callout)
				.bold()
				.foregroundColor(.secondary)
			TextField(0.currencyFormat, text: $amount)
				.multilineTextAlignment(.trailing)
				.keyboardType(.decimalPad)
				.font(Font.largeTitle.bold())
		}
		.padding()
	}
}
Recall that, in the MVC pattern, views should only present data and enable interaction.
Views should not store the app’s state. The @State property wrapper of SwiftUI exists only for local state related to the user interface.
The AmountView type only allows the entering of a transaction’s amount. It then transmits the user input up the view hierarchy to its parent using a @Binding. That’s the same as the TextField view inside the AmountView structure.
Keeping logic out of views by propagating user actions up the view tree
We now need to create a view for the category selection.
First of all, we need the buttons that show the category name, the icon, and the selection state, reusing our CategoryView type.
struct CategoryButton: View {
	let category: Transaction.Category
	var selected: Bool = false
	let action: () -> Void

	var body: some View {
		Button(action: action) {
			VStack {
				CategoryView(category: category, highlighted: selected)
				Text(category.name)
					.font(.headline)
					.foregroundColor(selected ? .primary : .secondary)
			}
		}
	}
}

extension Transaction.Category {
	var name: String {
		rawValue.capitalized
	}

	var imageName: String {
		switch self {
		case .groceries: return "cart.fill"
		case .income: return "hand.thumbsup.fill"
		case .utilities: return "phone.fill"
		}
	}
}

A CategoryButton does not decide whether it should be highlighted, nor what happens when the user taps on it. It gets that information through its selected and an action properties.
That code that makes that decision belongs to the view that handles the selection.
struct CategorySelection: View {
	@Binding var selectedCatergory: Transaction.Category

	var body: some View {
		HStack {
			Spacer()
			ForEach(Transaction.Category.allCases) { category in
				CategoryButton(category: category, selected: category == self.selectedCatergory, action: { self.selectedCatergory = category })
				Spacer()
			}
		}
		.padding()
	}
}
While the CategorySelection view manages the selection, it has no say in how that selection is used. So, again, it reports it up the view tree using another binding, as we did in the AmountView.
We then put all the components together and build the entire screen content.
struct TransactionContent: View {
	@Binding var amount: String
	@Binding var selectedCategory: Transaction.Category
	@Binding var description: String

	var body: some View {
		List {
			Amount(amount: $amount)
			CategorySelection(selectedCatergory: $selectedCategory)
				.buttonStyle(PlainButtonStyle())
			TextField("Description", text: $description)
		}
	}
}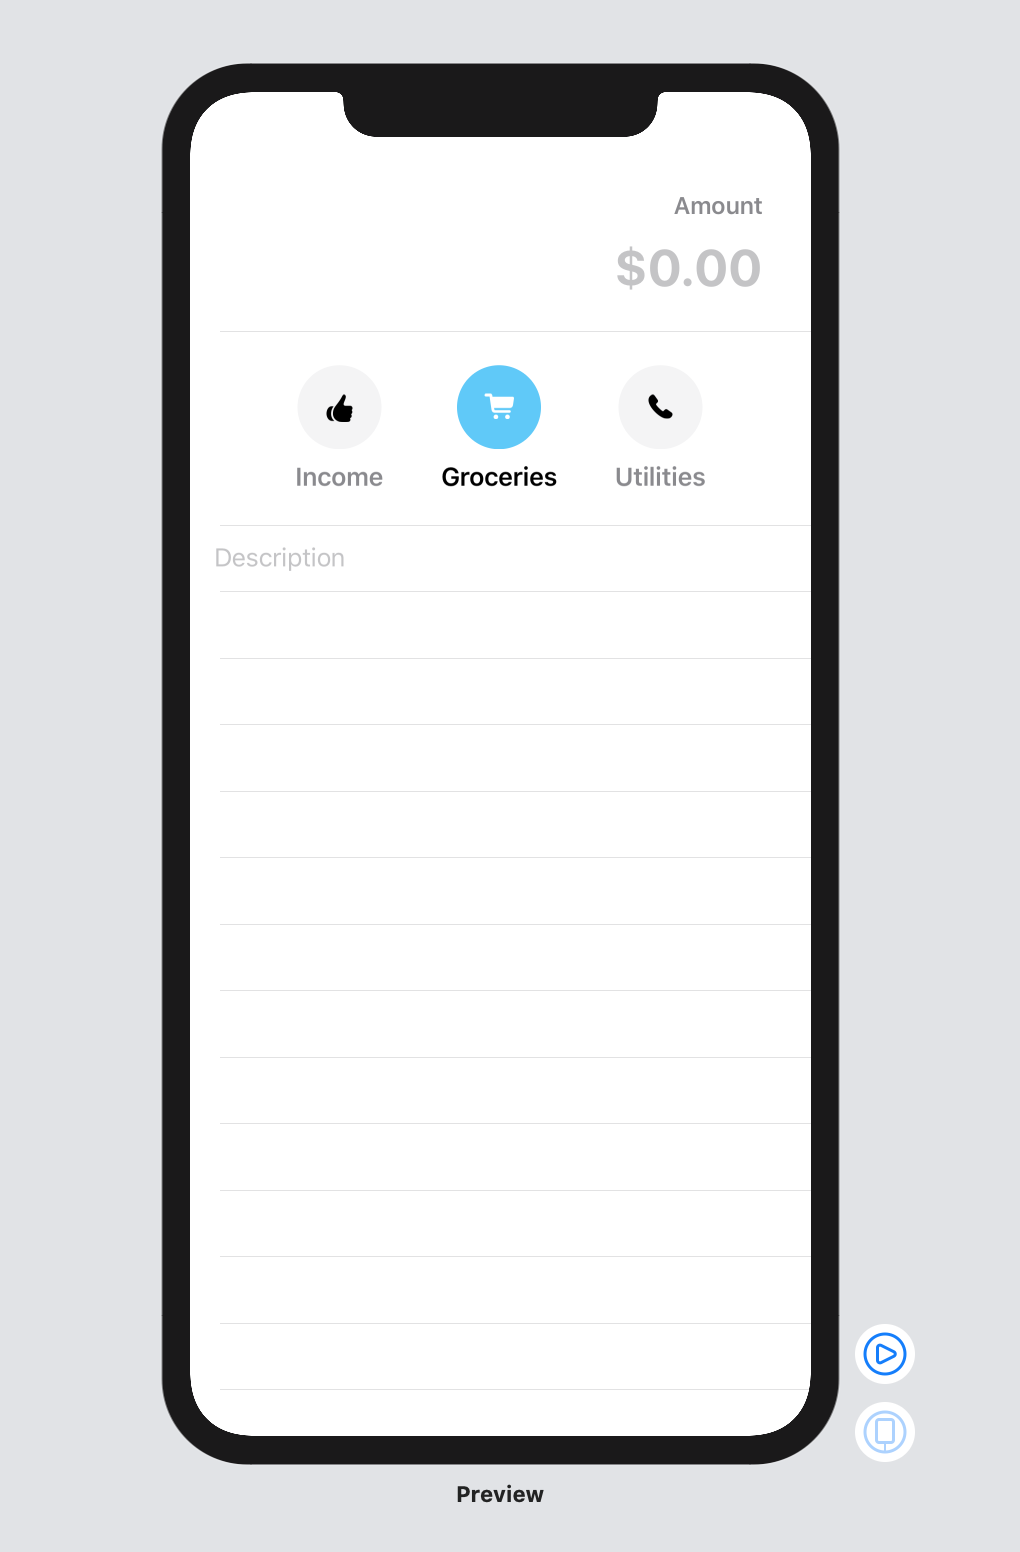
You might be wondering why this view also uses bindings instead of storing the values in a @State property. That will be clearer when we will build the app’s navigation, so bear with me.
Here is the code to generate the previews.
struct TransactionView_Previews: PreviewProvider {
    static var previews: some View {
		Group {
			TransactionContent(amount: .constant(""), selectedCategory: .constant(.groceries), description: .constant(""))
			Group {
				Amount(amount: .constant(""))
				CategorySelection(selectedCatergory: .constant(.groceries))
				HStack {
					CategoryButton(category: .groceries, action: {})
					CategoryButton(category: .groceries, selected: true, action: {})
				}
				.padding()
			}
			.previewLayout(.sizeThatFits)
		}
    }
}
The controller layer takes care of all the code that does not fit in views and model types
We have model types and views, so we are only missing the last layer of the MVC pattern: the controller layer.
Controllers act as a bridge between the model and the view layers. This central role in the pattern means that controllers often bear many responsibilities. That’s one of the reasons why view controllers, in UIKit apps, tended to grow too much.
Here are some of the responsibilities controllers have:
- mapping the user interaction to the app’s specific logic;
- holding the global state of the app;
- populating the views with data;
- persisting data on the disk;
- performing network requests;
- managing concurrency;
- reading the device sensors (location, accelerometers, gyroscope, etc.)
We are building a simple app, so we need to implement only the first to items on the list.
Every app, no matter how simple, needs to store its state somewhere. That is true even if your app has a single screen. So, it becomes crucial when you have more than one.
The controller layer holds the single source of truth for the entire app
SwiftUI is built around the single source of truth concept, which means that the app’s state should live in a single place. Replicating state in many places can lead to inconsistencies that cause bugs or severe data corruption.
This concept is not new. Apps built with UIKit also need to keep a central, global state. But, since UIKit views are objects, the global state is sometimes distributed across views and view controllers, making it hard to manage.
SwiftUI uses structures for views, and not objects, thus eliminating state from views. These are, instead, derived from the single source of truth, i.e., the app’s internal state.
It’s true that SwiftUI also offers the @State property wrapper to store state inside views. But that is meant only meant for local, temporary state. All other data needs to flow up the view hierarchy through bindings until it reaches the single source of truth, which lives in the controller layer.
In our app, the global state is an Account value, containing all past transactions entered by the user.
final class StateController : ObservableObject {
	@Published var account: Account = TestData.account

	func add(_ transaction: Transaction) {
		account.add(transaction)
	}
}
The StateController class conforms to ObservableObject so that we can connect it to our SwiftUI views. Since its account property has the @Published wrapper, every time we change its value, SwiftUI updates the app’s interface.
Notice that the add(_:) method is part of our app business logic. It defines how new transactions are added to the global state of the app.
It is a bit ironic that after the extensive list I wrote above, with so many responsibilities, all we have is a controller that is only seven lines long. Compared to all the UI code we wrote above, that is nothing.
But keep in mind that this is just a simple app to show you the concept. Real apps with more complex state need several controllers, and bigger ones as well.
Why we still need view controllers in SwiftUI
Our app is not yet complete. We still have to add navigation and connect our UI to the StateController. For that, we have to revive an old friend: the view controller.
SwiftUI has no view controller class. In UIKit, subclasses of UIViewController represented the screens of an app, while container view controllers managed navigation.
In SwiftUI, everything is a view. That includes architectural views like TabView and NavigationView. Modal presentation, which was managed by view controllers in UIKit, happens, in SwiftUI, inside the .sheet, actionSheet, and .alert view modifiers. These also produce views.
So, the app’s navigation code seems to belong to the view layer.
But does it, really?
The moment you start structuring the navigation of your app in SwiftUI, you realize that things are not so simple.
When you add observable objects to your views, using the @ObservedObject or the @EnvironmentObject modifiers, you get problems with Xcode previews.
In simple apps, you can get away by creating controller instances in your preview code. That would work in our case too. But in a real app, that is not practical.
- Controllers are usually part of complex object graphs. They often rely on physical storage, networking, and device sensors. Instantiating controller instances for previews can be expensive. Your only solution is to use sophisticated techniques to stub or mock controller dependencies, complicating your preview code.
- Any app contains a certain amount of “plumbing” code related to navigation. This includes code that creates tab and navigation views, adds buttons to navigation bars, presents views modally, and connects the user interface to controllers.
In UIKit, that code lived inside view controllers. And guess what. In SwiftUI, that code does not magically go away. You still have to put it somewhere.
Bringing the view controller idea to SwiftUI’s root views
Despite what many believe, the idea of view controllers is not limited to UIKit. You can already find it in this old Apple guide for macOS development in Objective-C.
UIKit simply adopted the idea by requiring every screen of an app to be managed by a separate UIViewController subclass. Unfortunately, it also “tainted” the idea, making everyone believe that it’s relegated to UIKit apps.
Let me show you how that looks like in SwiftUI.
We need to put together the two app screens we built above, tying them to a shared instance of StateController. Following the idea of view controllers, we can put all the plumbing code into custom types that:
- provides the navigation structure;
- connects views to the shared global state;
- transfer user inputs to the controller layer.
These are, obviously, also SwiftUI views. But they take the role of view controllers. Unfortunately, that name is now associated with UIKit. I don’t see the community adopting it for SwiftUI apps. Using it would only generate confusion, so we will use root views instead.
Adding navigation and connecting the app’s screens to the shared global state
First of all, let’s add the typical navigation chrome to the Budget screen. Navigation bars, in SwiftUI, belong to the NavigationView type.
struct BudgetView: View {
	@EnvironmentObject private var stateController: StateController

	var body: some View {
		NavigationView {
			AccountView(account: stateController.account)
				.navigationBarTitle("Budget")
				.navigationBarItems(trailing: Button(action: { self.addingNewTransaction = true }) {
					Image(systemName: "plus")
						.font(.title)
				})
		}
    }
}
In UIKit apps, passing data between view controllers was an annoying problem that required many different solutions.
Luckily, in SwiftUI, Apple solved the problem with the @EnvironmentObject property wrapper and, more in general, the environment, which is a smart way of simplifying dependency injection.
Next, we need a root view for the New Transaction screen as well.
struct TransactionView: View {
	@State private var amount: String = ""
	@State private var selectedCategory: Transaction.Category = .groceries
	@State private var description: String = ""

	@EnvironmentObject private var stateController: StateController
	@Environment(\.presentationMode) private var presentationMode

	var body: some View {
		NavigationView {
			TransactionContent(amount: $amount, selectedCategory: $selectedCategory, description: $description)
				.navigationBarTitle("New Transaction")
				.navigationBarItems(leading: Button(action: { self.dismiss() }) {
					Text("Cancel")
					}, trailing: Button(action: addTransaction) {
						Text("Add")
							.bold()
				})
		}
	}
}

private extension TransactionView {
	func addTransaction() {
		let sign = selectedCategory == .income ? 1 : -1
		let transaction = Transaction(amount: Int(amount)! * 100 * sign, date: Date(), description: description, category: selectedCategory)
		stateController.add(transaction)
		dismiss()
	}

	func dismiss() {
		presentationMode.wrappedValue.dismiss()
	}
}
Here, we also add a navigation bar using a NavigationView, where we place the Cancel and Add buttons, connected to the dismiss() and addTransaction() methods, respectively.
Like the BudgetView root view, the TransactionView type also gets the shared StateController instance through the @EnvironmentObject property wrapper.
We also store the user input into three @State properties. These represent a transient local state, which keeps track of what the user types. Only when the Add button is tapped we add the new transaction to the StateController.
We can now connect the two screens, presenting the TransactionView in a modal sheet over the BudgetView.
BudgetView: View {
	@EnvironmentObject private var stateController: StateController
	@State private var addingNewTransaction = false

	var body: some View {
		NavigationView {
			AccountView(account: stateController.account)
				.navigationBarTitle("Budget")
				.navigationBarItems(trailing: Button(action: { self.addingNewTransaction = true }) {
					Image(systemName: "plus")
						.font(.title)
				})
				.sheet(isPresented: $addingNewTransaction) {
					TransactionView()
						.environmentObject(self.stateController)
			}
		}
    }
}
And finally, we add a single shares instance of StateController to the environment, which both root views can access, in the SceneDelegate class.
class SceneDelegate: UIResponder, UIWindowSceneDelegate {
	var window: UIWindow?

	func scene(_ scene: UIScene, willConnectTo session: UISceneSession, options connectionOptions: UIScene.ConnectionOptions) {
		guard let windowScene = scene as? UIWindowScene else { return }
		let window = UIWindow(windowScene: windowScene)
		let rootView = BudgetView()
			.environmentObject(StateController())
		window.rootViewController = UIHostingController(rootView: rootView)
		self.window = window
		window.makeKeyAndVisible()
	}
}
Conclusions
SwiftUI does indeed make it easier to build user interfaces than it was in UIKit. It removes all the boilerplate code you needed, for example, to set up data sources for table views.
It also solves, with the concept of single source of truth, many of the problems that the distributed state of UIKit views created.
Nonetheless, we still need to structure our apps as we did before. The Model-View-Controller pattern does not belong to UIKit only. It was created to solve the same problem across many platforms.
Changing the framework we use to build user interfaces does not change that fact. MVC is still relevant in SwiftUI, even if its new declarative syntax is a radical departure from the past.
Unfortunately, the introduction of SwiftUI generated a few misconceptions. This article addresses one of them. You can find the other ones in my free guide below.
SwiftUI App Architecture: Design Patterns and Best Practices
It's easy to make an app by throwing some code together. But without best practices and robust architecture, you soon end up with unmanageable spaghetti code. In this guide I'll show you how to properly structure SwiftUI apps.
Matteo has been developing apps for iOS since 2008. He has been teaching iOS development best practices to hundreds of students since 2015 and he is the developer of Vulcan, a macOS app to generate SwiftUI code. Before that he was a freelance iOS developer for small and big clients, including TomTom, Squla, Siilo, and Layar. Matteo got a master’s degree in computer science and computational logic at the University of Turin. In his spare time he dances and teaches tango.
This is a great article and it really is helping me to wrap my head around how to lay a proper foundation for any app. The literal ui-stuff is pretty understandable, but the foundation is often an overlooked aspect.
Now, one thing I still have trouble with to understand, is how you would scale this approach to a bigger app with more data-types.
In this relatively small example you use one
StateControllerwhich contains all the data, and is globally accessible as anEnvironmentObject. But what would you do if the app had also for example data about Articles, Users, Preferences (which in the end have to be saved in a api or something).Would you still store all that data inside that single
StateController? Though that might be cluttering theStateControllersince all the different functions for various purposes would be in there?Or
Would you split these things up in separate classes?
And if so, then were would these classes live? Inside the
StateController? (like a nested class?)class SceneDelegate: UIResponder, UIWindowSceneDelegate {
var window: UIWindow?
let stateController = StateController()
....
class StateController: ObservableObject {
@Published var accountController = AccountController()
@Published var articleController = ArticleController()
@Published var usersController = UsersController()
@Published var preferencesController = PreferencesController()
Or outside the
StateController(making the StateController a bit unnecessary)class SceneDelegate: UIResponder, UIWindowSceneDelegate {
var window: UIWindow?
let stateController = StateController()
let preferencesController = PreferencesController()
let articleController = ArticleController()
let usersController = UsersController()
...
And then passing all these different classes as seperate
EnvironmentObjects// Create the SwiftUI view that provides the window contents.
let contentView = ContentView()
.environmentObject(stateController)
.environmentObject(articleController)
.environmentObject(preferencesController)
.environmentObject(usersController)
Very much looking forward to answer, since I’m banging my head to the wall around this subject ;-)
Actually, that depends on your app and what you are trying to achieve.
First of all, always keep responsibilities separate. So, the state controller can use other objects but should only contain code relative to the app’s state.
You can find a more in-depth example in this guide: https://matteomanferdini.com/architecting-swiftui-apps-with-mvc-and-mvvm
In other cases, controllers have completely separated logic, in which case I would pass them as environment objects separately. Putting them all inside a container object gives access to parts of your app that shouldn’t have it. Always be explicit in dependencies.
Finally, there are cases where you need a dedicated object for a specific screen of your app which needs some specific values in its initializer. The correct solution for that case is the @StateObject wrapper coming in iOS 14 / macOS 11.
For now, there are other solutions, but they are quite complex.
Matteo,
In your CategoryView code sample at the start of the article you make reference to a category.ImageName
Image(systemName: category.imageName)Where does that come from? I don’t see it in the model you created.
It comes from the extension on Transaction.Category. I put it in a separate extension because it’s code about visual representation, so it does not belong to the model layer, but it’s still useful to add it to the type itself.
You find the code in the section titled “Keeping logic out of views by propagating user actions up the view tree”.
Matteo, of course NOW I see it. Thanks for keeping me straight. https://media4.giphy.com/media/LR6XMAohhwBzOeltF1/giphy.gif