Finding your way in the navigation of a complex iOS app can be quite complicated.
I know this from experience.
During many years of freelancing, I joined many projects at an advanced stage of development.
When you browse the classes in a project, there is a disconnect from what you see in code and what you see in the app.
And when you find a bug in some screen, how do you know in which class to look?
To solve the problem of visualizing the navigation flow of an app, Apple introduced the concept of storyboards in iOS development.

FREE GUIDE - SwiftUI App Architecture: Design Patterns and Best Practices
MVC, MVVM, and MV in SwiftUI, plus practical lessons on code encapsulation and data flow.
DOWNLOAD THE FREE GUIDEIt does not make sense to have storyboards in Xcode if they are not useful
A storyboard outlines the different screens of an app the relationships between them like it happens in storyboards for movies.
Some iOS developers seem to be opposed to storyboard. In my opinion, they are just making their life harder than it should be.
A couple of years ago I worked on a big project for a client together with a 20+ people team.
After four months, I still did not know how to move around their code base. The main reason was that everything was written in code, including the user interface.
No storyboards or even nib files.
Even when I had to fix simple bugs, it took me hours to locate the correct code to change. Granted, it was a big app. But a big part of the code base was UI code, which made the code grow larger than it should have been.
That is why I am surprised when I find iOS developers that still insist on having all the UI in code.
There might sometimes be reasons for doing so. Mostly though, the excuse I hear is “I am used to doing it this way.”
That does not cut it for me.
I have researched at length the pros and cons of using storyboards. While I see many benefits, the few problems storyboards create do not seem to me to be enough to eschew them all together.
Think about it: would Apple put a lot of effort into developing and promoting tools that have no apparent benefits? It makes no sense.
*cough* Especially since Apple does not seem to put much effort in Xcode, to begin with. *cough*
There, I said it.
What’s the point of having something like storyboards if using them is equal to not using them?
So I don’t buy it when developers avoid storyboards. Some of them might have a good reason, but in general, I think that most are wasting more time than they are saving.
The various benefits of using storyboards in your Xcode projects
Since this might look like speculation on my part, let’s see in more detail at the benefits of storyboards.
I have researched many articles and came up with as many points as I could. If you think something is missing, let me know.
- Storyboards make it easy to visualize the UI flow of an app. This is an easy one since this is the purpose of storyboards. Even if you are new to a project that uses storyboards, you can immediately find where navigation starts and follow it to any screen.
- You can divide complex navigation flows into manageable sub-flows. When the number of screens in your app grows, you can use multiple storyboards to break the navigation into discrete parts.
- You can identify a screen and its elements. If you open the code of a view controller, are you sure you are looking at the right code? And when you are, where do you find the code that changes the appearance of an element? If you are lucky, all the code is in a single place. But usually, you are not lucky.
- You immediately see the results of your actions. Every time you change the position, the size, the color or other properties of an element, you can instantly see the result. When you code interfaces instead, you have to run the app often. And sometimes, if the result is not what you expected, you have to guess where the mistake is. And what if there is no easy way to run the app or reach the screen you are working on?
- Interface Builder can show you a preview of all screen sizes at once. If you only write code instead, you have to run the app for any screen size. And again, the screen you want to test might not be so easy to reach.
- You can easily find most properties for a view inside Interface Builder panels. This is useful especially when you don’t know what properties you can change on a UI element. A quick glance at the Inspector panel in Interface Builder gives you an idea about what you can configure in a view. This is much faster than reading code and browsing the documentation to find which properties and methods a UIKit class offers.
- You remove a lot of boilerplate code. User interfaces need a ton of boilerplate code. Moreover, this code creeps inside the rest of your code, making it harder to read and find. Don’t forget that this is also code you have to maintain. UI code is either made of a lot of copy and paste code, or abstractions like superclasses and extensions that add more maintenance work.
- You can see Auto Layout constraints. Auto Layout is an annoying beast to tame. It has to be because the problem it solves is not straightforward. You also cannot avoid it. Nowadays every iOS app needs to deal with different screen sizes. Still, most of the time you can get away with basic constraints. Setting constraints usually requires a lot of verbose boilerplate code. In Interface Builder instead, you can configure constraints with no code and see them, which helps to set them correctly.
- You can manage size classes. If Auto Layout alone was not enough to complicate your life, size classes introduce a new magnitude of complexity when you work with different screen proportions. Interface Builder again helps a lot and lets you preview each size class.
- You can create static table views in a storyboard. This is a storyboard only feature which again saves you a ton of time. You can’t build static table views in code. I’ll show this in the article.
- You can quickly create custom containers. As we will see in a moment, most of the UI flow in iOS happens through containers. There are many ready to use containers in iOS, but you can also create your own. This is not trivial to do in code, while storyboards offer an easy way to create simple custom containers.
- Storyboards can be used by non-developers. Storyboards require no coding knowledge. Designers can learn to edit storyboards too. There are of course some things that still require a developer. But a designer can go in a storyboard and reposition elements or change colors if needed.
The one non-valid argument against building apps using storyboards
Before we get into the real problems storyboards might pose, there is one complaint I want to dismiss.
“I don’t like storyboards.”
I’m sorry to break the news, but this is not about what you like.
Suck it up.
Whether you work as an employee or as a freelance, or even if you work alone, your profession is building products to help other people.
Sure, most of us picked iOS development because of passion.
Still, you get paid to use the best solution to solve other people’s problems. You have to use the most efficient tools and techniques.
Nobody cares about what you like. What matters is results.
Rough maybe. But true nonetheless.
This is not to say that storyboards are free from issues. There are some real ones. If you find that storyboards are not the most efficient solution, that is a valid argument.
What I am saying is that “I don’t like them” or “I am used to doing things the other way” are not excuses.
These are only your habits. If you want to write code just because that’s what is familiar, my advice is to learn something new instead. Then you can decide if the new solution is better or worse.
If all you have is a hammer, everything looks like a nail.
The problems storyboard might cause in your project
There are indeed some problems related to storyboards. A balanced analysis cannot sweep them under the rug.
I hunted down all the complaints iOS developers have against storyboards and made a comprehensive list.
I don’t want to be dismissive. In some projects, these might be fair points worth considering. For example, if you look at the answers in this Stack Overflow question, the list of cons seems to be longer than the list of benefits.
But the devil is in the details.
I don’t think those are general guidelines that rule out using storyboards in every project. Moreover, I don’t think these problems weigh as much as the benefits I listed above, even taken all together.
Mainly because some of these problems don’t even stand on their own.
You might have a different opinion on some. At least having a comprehensive list can help you decide whether storyboards work for your specific case or not.
- Storyboards create hard to merge conflicts when working in a team. This is true. Storyboards are XML files under the cover, which are harder to combine than Swift code. But this is much less of a problem that many people make it seem. There are many ways to reduce merge conflicts. For example, using multiple storyboards. I will cover these in a dedicated section later in this article.
- Storyboards make code reviews harder. I don’t think this is a valid point. Sure, XML is harder to review than code, but I think you should not review it. UI changes are validated by the app design, not by the correctness of their code. There are other places to do this, like quality assurance if you have it or UI testing in Xcode. I would even say this is an advantage. It removes a lot of useless code from code reviews.
- Storyboards get confusing when the flow of an app gets more complicated. This is another non-issue since you can (and you should) use multiple storyboards to break your UI flow. You should not put all your UI in a single storyboard in the same way you should not put all your code in a single class. To be fair, this criticism might come from a time where storyboard references did not exist. But it was always possible to use more than one storyboard in just a couple of lines of code. So this was never an excuse.
- Xcode is slow when opening large storyboards. True. But again, you should not have large storyboards, to begin with.
- Storyboards fail at runtime, not at compile time. Yes. So what? There are many similar things in your code, which you solve with better coding practices. The same applies to storyboards. Moreover, Xcode gives you many warnings and errors at compile time (or even before) for storyboards as well. Finally, these issues are easy to spot when the app runs, hence detectable during QA or UI testing. So yes, this point is valid, but no big deal.
- Storyboards hinder code reuse. No. UI code is often boilerplate code that is better not to write in the first place, let alone reuse. The UI code that you have to write instead is perfectly reusable, using subclassing and extensions. Many developers don’t know that you can even put objects instances in a storyboard. This said it was true in the past that some things like colors where hard to change globally. Since Apple added colors to asset catalogs though, this is less of an issue. And if you want to write global settings and values in code instead, you can still do so without throwing away storyboards completely.
- Storyboards require constant context switches in the mind of the developer. I find this point ridiculous, but maybe it’s just me. This is not a context switch like when a colleague interrupts you to talk about his dog. You are still working on the app, only with another tool. When you read the documentation or search for a solution on Stack Overflow, it’s also a “context switch.” I never had any problem going back and forth between code and storyboards. Heck, you can even display them side by side in Xcode.
- Storyboards are hard to refactor, brittle and discourage changes. Yes, storyboards are slightly more fragile than code. These are some things I don’t like either, like string identifiers for view controllers and cell prototypes. Keeping these in sync with your code is annoying. That said, this has never been such a big deal for me. It’s a small annoyance that you can reduce with some coding practices.
- Storyboards are less flexible while, in code, you can do anything you want. Yes, but at what price? Writing UI code is tedious, and the less I write, the happier I am. I can do most things in a storyboard and use code only when necessary. Some developers make it sound like writing more code is always right, which is not true at all.
- Storyboards don’t let you change the type of special view controllers. True. But you don’t have to use them. This is different from not using storyboards at all. For example, I recommend not to use
UITableViewControllerwith dynamic table views. It makes sense only for static table views, which are available just in storyboards anyway. You can also use container views as we will see below. So again, I don’t see where is the problem. - Storyboards add two extra liabilities to your project. These would be Interface Builder and the storyboard parser in iOS. The complaint is that these two are software pieces that might have bugs you can’t fix. True. But again, how often does this happen? These are quite reliable developer tools and rarely have serious flaws. I have met plenty of annoying bugs in Xcode during the years. But none of these was severe enough. They were usually not in IB anyway and never in the iOS storyboard parser.
- Storyboards don’t allow you to add a subview to a UIImageView. Maybe because you shouldn’t do it? There might be reasons why Apple did not add this feature. Besides, which problem can only be solved in this way? Just put a view over the image view and position it with Auto Layout. No need for subviews. Or do it in code if you want to, you still can (but again, maybe you shouldn’t. You don’t have to throw away storyboards for this.
- Storyboards don’t allow you to enable Auto Layout for individual views or view controller, only for the whole storyboard. Again, maybe because you shouldn’t do this? That option is present mainly to transition to Auto Layout from auto resizing masks. Once you use Auto Layout, you should use it everywhere. Are there still people that write their layout code? Also, you can mark constraints as template, and they will not be present at runtime, so you are not forced to use Auto Layout in every view. Or you can put the views that don’t use Auto Layout in separate storyboards or nib files if you have some.
- Storyboards have a higher risk of breaking backward compatibility. You can find a comment about this issue on Stack Overflow, but I am a bit skeptical. My experience is that when some things change, most developers just don’t know where to look for the new settings. But maybe this is an issue; I don’t know enough. The fact that it appears only in a comment and not in a question makes me think that it does not happen that often anyway.
- You cannot provide custom view controller initializers. This is true and is something I don’t like either. But I can live it. Writing software is about compromises, not about being purists. I gladly give up this option for all the benefits storyboards bring.
In the end, all these complaints seem to boil down to just three problems.
- Not knowing that you can have multiple storyboards. You can.
- Assuming that writing some UI code means that all the rest of UI should also be in code. You can use storyboards for most of your UI and put in code the parts that need to.
- Not being able to compromise on drawbacks. There is no career or human endeavor where you can avoid compromises.
So, my take is: use storyboards.
Don’t fight against the tools and the ecosystem.
Storyboards are not only for development but also work as a UI prototyping tool
Storyboards are not only useful for developing apps.
If you are looking for a free tool to create an interactive prototype for your app writing no code, look no further.
A storyboard can define most, if not all, the user interfaces and the transitions of an app. This is not enough for a fully functional app, of course. But if all you care about is to have a prototype to play with and to show to people, storyboards can be enough.
The code-less nature of storyboards makes them a UI prototyping tool that can also be used by designers or other team members. A lot of functionality in Interface Builder is not so different from what you find in standard apps for designers.
Mind you; I am not suggesting to design apps using storyboards.
As powerful as it can be, Interface Builder is still a bit too clunky for the app interface design. In the end, it is a development tool, not a design tool. Apps like Omnigraffle and Sketch are better for the iterative design process.
Still, it is possible to build an interactive prototype using storyboards quickly. It also has a couple of benefits.
- The prototype is a real app. It has the transitions and the behavior of an actual app. You can distribute to testers using Testflight/iTunes Connect (how is it called nowadays?). This is not true for prototypes built with other tools.
- You can quickly add a bit of code where needed. Maybe you want to code some interactive functionality swiftly. Other prototyping tools don’t allow you to run any code.
- Designers can access and edit storyboards. So you don’t need a developer to build the prototype, although you can add one.
- You can use the prototype for the actual development of your app. When the app’s navigation is settled, you just need to add code. This can speed development a lot.
My experience has always been that design, by its nature, is much faster than development. Even a team of developers can be significantly slower than a single designer.
So there are benefits of integrating the skills of a designer into the development of an app.
In this article, I will not only show you how storyboards work. I will do so by creating a working prototype for an app with a sophisticated navigation, writing practically no code.
The structure of iOS storyboards: scenes and segues
Before we start creating our app prototype, let’s clarify what a storyboard is.
First of all, a storyboards is a file that contains the user interfaces for your app. Unlike nib files (which have .xib extension), which contain only one screen, a storyboard can contain multiple ones.
There are two elements in a storyboard: scenes and segues.
- A scene usually represents one screen of an app. It contains a view controller, its view, segues and some other elements. In the view, you lay out the whole view hierarchy for the view controller.
- A segue is a connection between two scenes. Segues are usually represented by arrows in a storyboard, although some segues are not.
These are superficial definitions though, and there is more to both scenes and segues.
Let’s start with the scenes.
A scene usually represents a single screen, but not always. Some scenes contain a container view controller. Frequent instances of containers are tab bar controllers and navigation controllers. As I explained in this article, containers manage other view controllers, so they don’t map to a screen in the app.
A view controller scene can also contain more than the view controller’s view. Many developers don’t know this, but it is possible to add custom views to a scene. These are not part of the view controller’s hierarchy. You can even add objects other than views, like model controllers.
The different types of storyboard segues and their behavior
Segues are more than just arrows in a storyboard.
First of all, segues are objects. They have a class, UIStoryboardSegue, which you can subclass to add more functionality.
This is a more advanced use of segues and is not common, so I won’t cover it in this article. But it’s good to keep this in mind.
Segues come in different flavors:
- Selection segues trigger a transition. This can be either the modal presentation of a view controller or a transition inside a container. Pushing a view controller on a navigation controller is one example.
- Relationship segues represent the relationships between containers and their contained view controllers. They do not trigger any transition, nor the
prepare(for:sender:)method in view controllers (more about this later). - Embed segues embed a view controller inside another view controller through a container view. This is an easy way to create custom container view controllers without writing code. Embed segues are not relationship segues, and they do trigger
prepare(for:sender:). - Unwind segues roll back selection segues. They are not limited to the last transition, and they can jump back more than one view controller in the navigation. Unlike all other segues, unwind segues have no arrow in a storyboard.
We will see each of these segues in detail as we create our prototype.
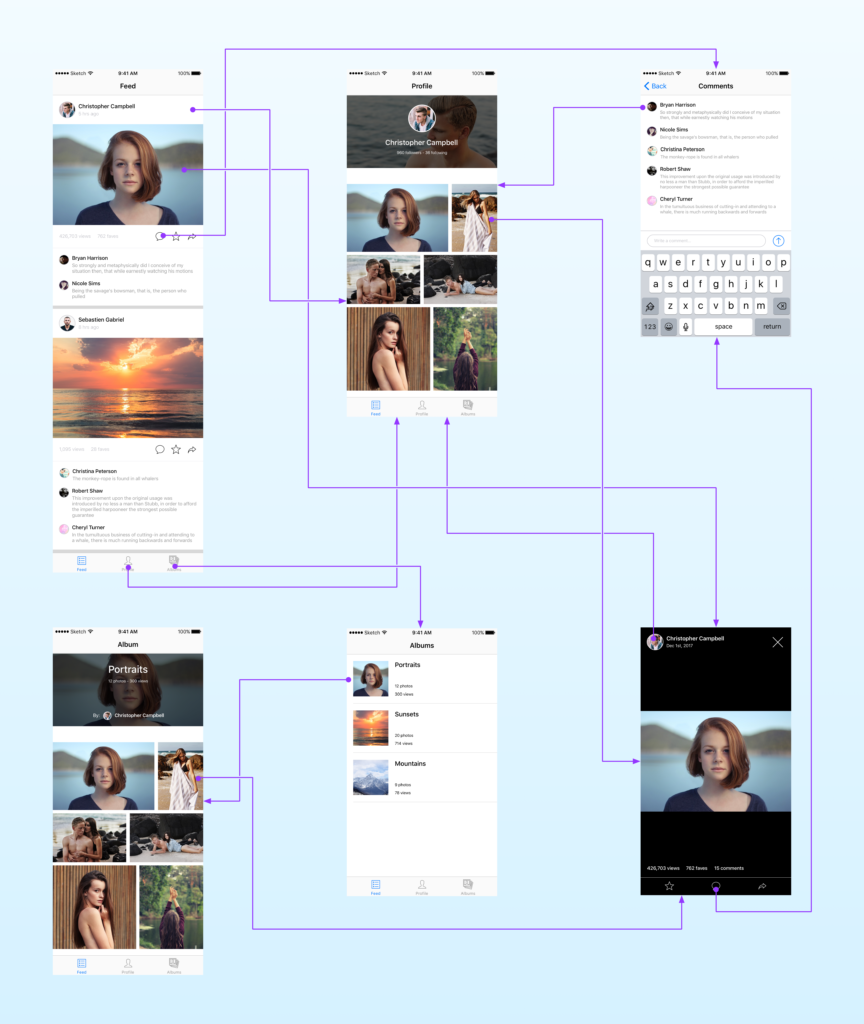
The mockup and wireframe for our app prototype
In the rest of this article, I will show you how to create a prototype for a social network for photos like Flickr. You can find the full Xcode project on GitHub.
As you can see in the diagram above, this kind of app has a sophisticated navigation. There are many paths a user can follow as he explores photos, profiles, and comments.
A couple of things to keep in mind before we start:
- This prototype aims to show you everything about storyboards without writing code. This is the whole point of using storyboards: remove as much UI code as possible.
- Since this is a prototype and not a full app, there is no dynamic data in the app. While the navigation will be fully functional, the screens will always show the same data. There won’t be any code for view controller communication. I cover passing data between view controllers here.
So, let’s begin.
Placing photos, icons, colors and other assets in the project’s asset catalog
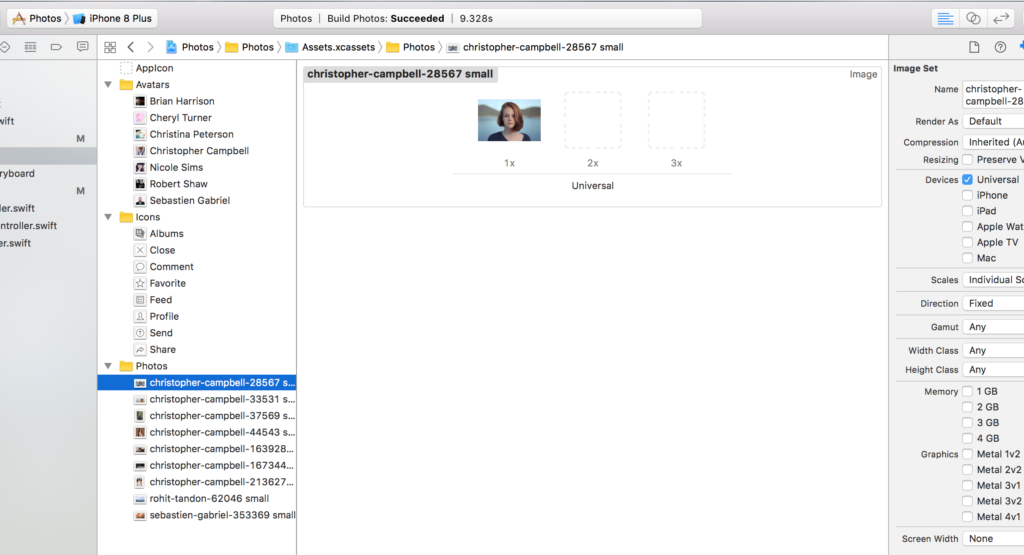
Before we can create our UI, we need some icons and some photos. In Xcode, you put assets in an asset catalog.
An asset catalog can contain different types of assets, like images, icons, colors, and data. If you are making a game, you can also put textures and sprite atlases in it.
You can use the assets in the asset catalog both in storyboards and your code. For the latter, Xcode offers image literals and color literals.
I took the icons from Icons8. An essential setting for icons in an asset catalog is Render As. Selecting Template Image from the drop-down menu allows you to give any tint color to your icons later.
The photos instead come from Unsplash, and you can find them here, here, here, here, here, here, here, here and here . I generated the text, names and some of the avatars using the Content Generator plugin for Sketch.
Adding view controller containers to structure the app’s navigation
Most of the navigation in iOS apps happens through view controller containers. You can find a list of all types of view controller containers here.
Most iOS apps though need only two types of container:
- tab bar controllers, for apps divided into sections. Tab bar controllers show a tab bar at the bottom of the screen. Tapping on a section in the tab bar switches to the related screen.
- navigation controllers, for drill-down navigation with the typical right-to-left animation.
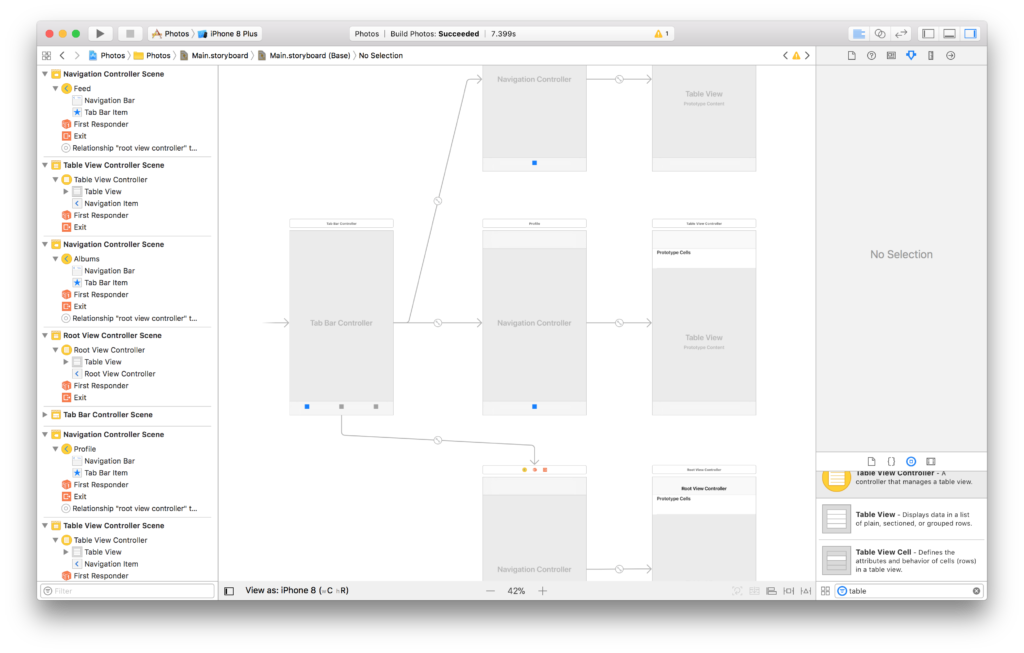
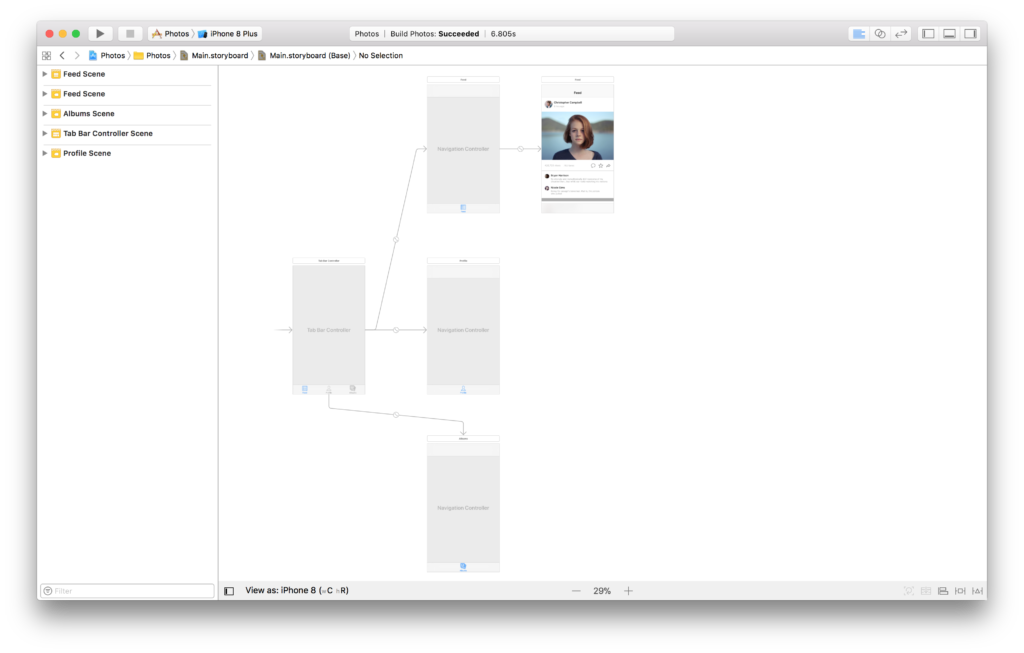
A single tab bar controller is usually enough to handle the main navigation in an app. This is the case also for our prototype, which has three sections: Feed, Profile, and Albums.
You need a navigation controller in any place where drill down navigation happens. We will need it in all three sections, so we need a separate navigation controller for each one.
The three navigation controllers go inside the tab bar controller. This is possible because containers are also view controllers.
Navigation controllers usually come with an attached table view controller. I often remove it, but in this case, we will need it. I’ll get to that in a moment.
Here you see the first example of relationship segues between containers and their children.
- The tab bar controller has three relationship segues to the navigation controllers;
- The navigation controllers each have one relationship segue to the respective table view controller.
If you are not familiar with Interface Builder, you can see how to create segues here.
In a storyboard, you have to set the view controller from where navigation starts. You do so using the Is Initial View Controller checkbox in the Attributes inspector panel on the right.
You can see that our tab bar controller the initial view controller because it has left-to-right arrow pointing to it. You can drag that arrow to other view controllers when you want to change the initial one.
We then give a title an icon to each tab:
You can already run the app if you want. You can only switch between tabs, so it’s not a very exciting app. Still, this is one of the advantages of building prototypes using storyboards: you can interact with your app from the start.
Static table views are ideal for any view controller with a layout that does not change
Now that we have the main navigation in place, we can get into the details of each screen.
Since this is a prototype, we will use static table views for most screen. They work great for our purpose because they don’t need any code or data.
Table views are a versatile piece of UI. As I explained in this detailed article on UITableView, you should use them for pretty much any type of scrolling user interface.
Providing data to table views is not straightforward though. That’s why I wrote a full article on it. Table views need a data source and sometimes a delegate.
But static table views are an exception.
They are useful when the number of sections and rows never changes. If your user interface always keeps the same layout, the chances are that a static table view is the best solution.
In static table views, you can create all sections and rows directly in the storyboard.
No code required.
Static table views need a table view controller, a subclass of UITableViewController, instead of a simple view controller.
The reason is that behind the scenes, UITableViewController acts as the data source and the delegate for the table view. It uses the setup in the storyboard to provide all the data source logic to the table view, so you don’t have to write it yourself.
I usually recommend not to use table view controllers for dynamic table views. But for static table views, they are a requirement.
I am usually against table view controllers because they give you practically no benefit when you use dynamic table views while imposing restrictions on the UI layout. A table view controller can only contain a table view with no subviews. So you can’t add custom controls besides or on top of the table view.
But, as we will see later in this article, there is a way around this restriction.
Since they don’t need any extra code, static table views are an excellent solution for our app prototype.
But they are also useful in real apps. You often have screens with a fixed layout. A settings screen or a login screen are two examples where you should use a static table view.
Creating and populating static table views in Interface Builder
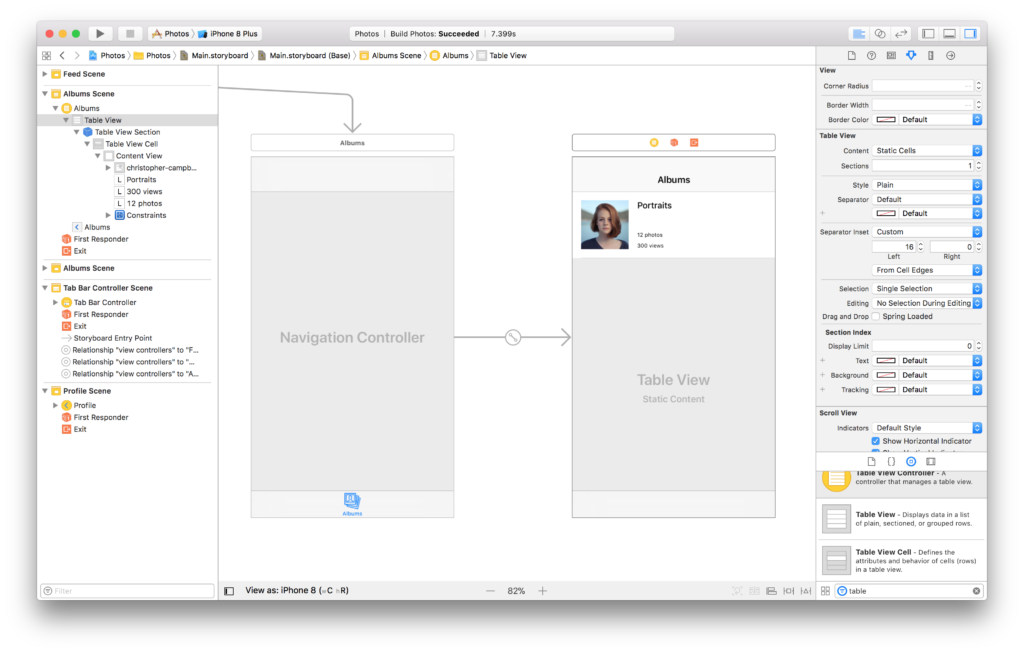
Let’s start implementing the most unadorned screen of the first three: the Albums screen.
This screen needs a simple table view with three rows that all look the same.
We start creating the first cell:
This is a cell with a straightforward layout. I used a few simple Auto Layout constraints.
In static table views, the height of rows is also static. There is no need to set constraints so that they expand the row height like you would in a dynamic table view. The table view controller uses the row heights you set in the storyboard.
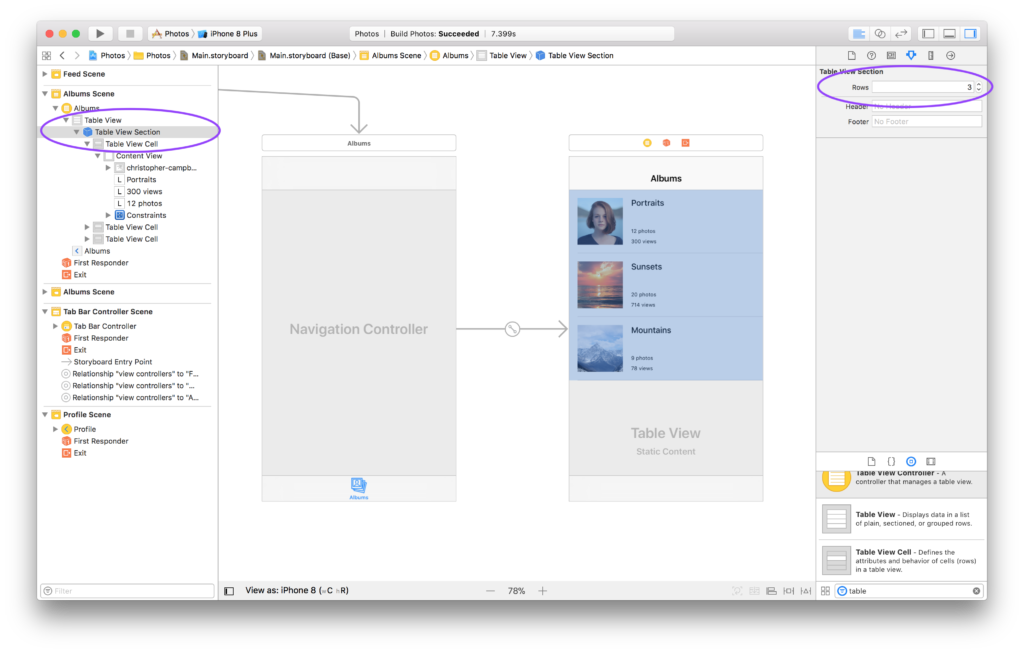
When you need to create similar rows in a static table view, start by creating one entirely instead of building all rows at once. The reason is that it’s effortless to duplicate a row in a static table view.
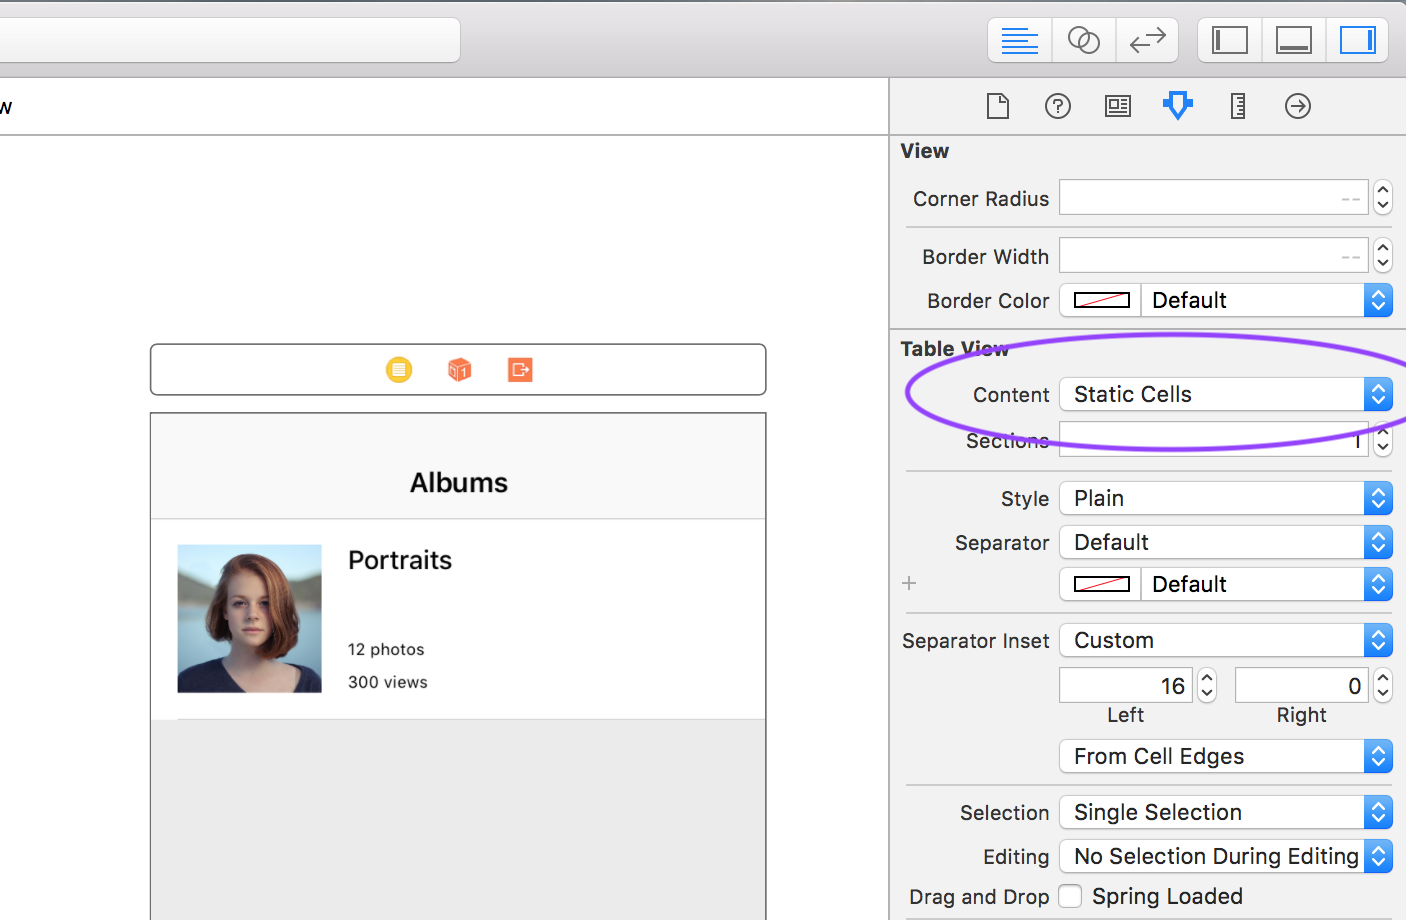
Of course, remember to set the table view to be static. You do so by selecting Static Cells for the Content option in the Attributes inspector.
Then, select the Table View Section in the Document Outline on the left, and increase the number of rows in the Attributes inspector for the section. This will create duplicates of the cell you already created.
You only need to edit their content.
Splitting the user interface into separate static table view rows according to interaction
Let’s now move to the Feed screen.
There is nothing new about this screen. This is still a static table view.
The only difference here is the rows are different from each other. That’s not a problem. You can put all the kinds of rows you want in a static table view.
When splitting the UI into rows, we need to make some considerations about navigation. Later we want to be able to navigate to different parts of the app, depending on where we tap on the screen.
That directs how we split the UI into separate cells.
For example, it’s clear that comments are repeating and will need separate cells. At a first look though, it looks like the rest of the UI could all go inside the same cell.
But looking at our mockup we see that we should:
- go to the Profile screen when tapping on the user details;
- go to the Photo screen when tapping on the photo;
- go to the Comments screen when tapping on the balloon icon.
So it’s better to split this part of our table view into three cells instead of one.
This said, creating the cells works the same way.
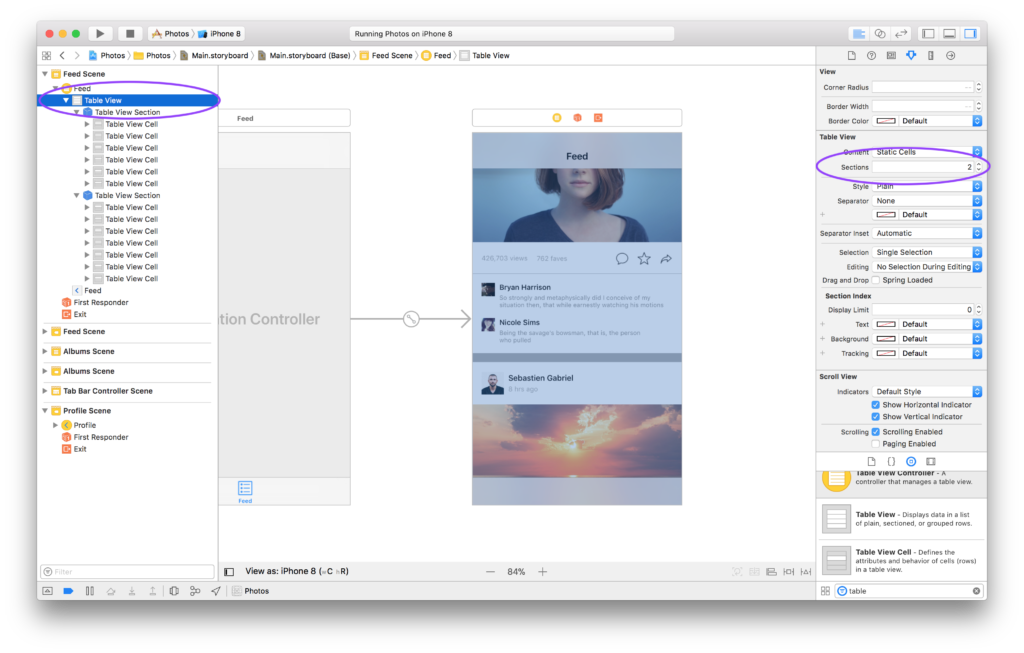
To be quicker, create a whole section again before you create other ones. Increasing the number of sections in the table view also duplicates a section, as it happens for rows:
Just final a note: the icons below the picture are buttons and not only image views. Buttons are interactive, and we can attach segues to them later.
If you run the app in the simulator, our table views already work correctly, and we did not write a single line of code.
Previewing user interfaces at different screen sizes in Interface Builder without running the app
Another great feature of storyboards allows you to preview the user interfaces you create so you can be sure they work correctly at different screen sizes.
And you can test all of them once.
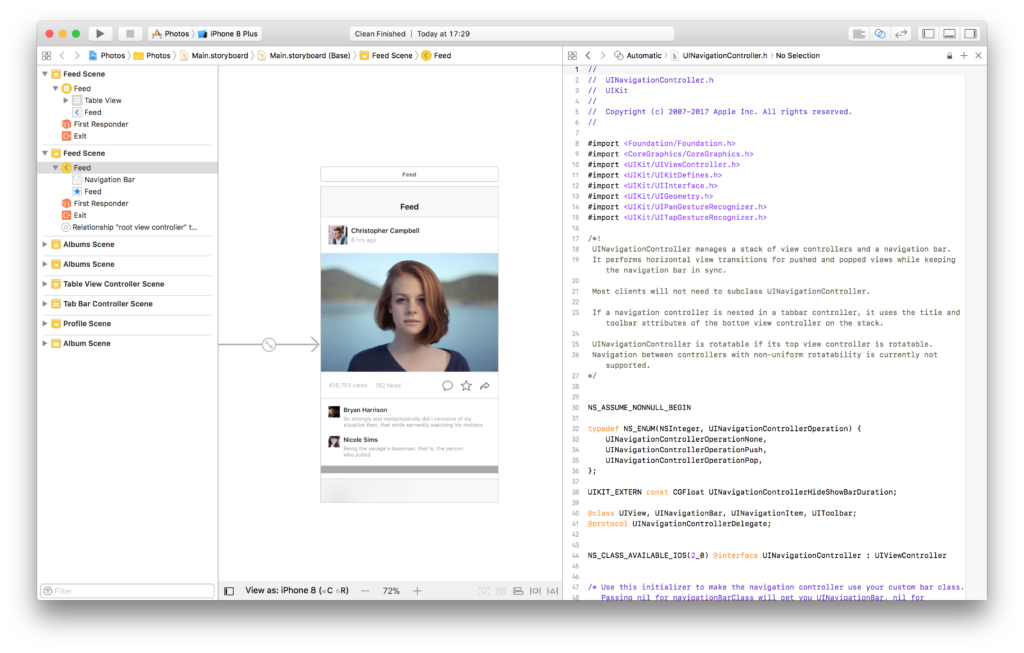
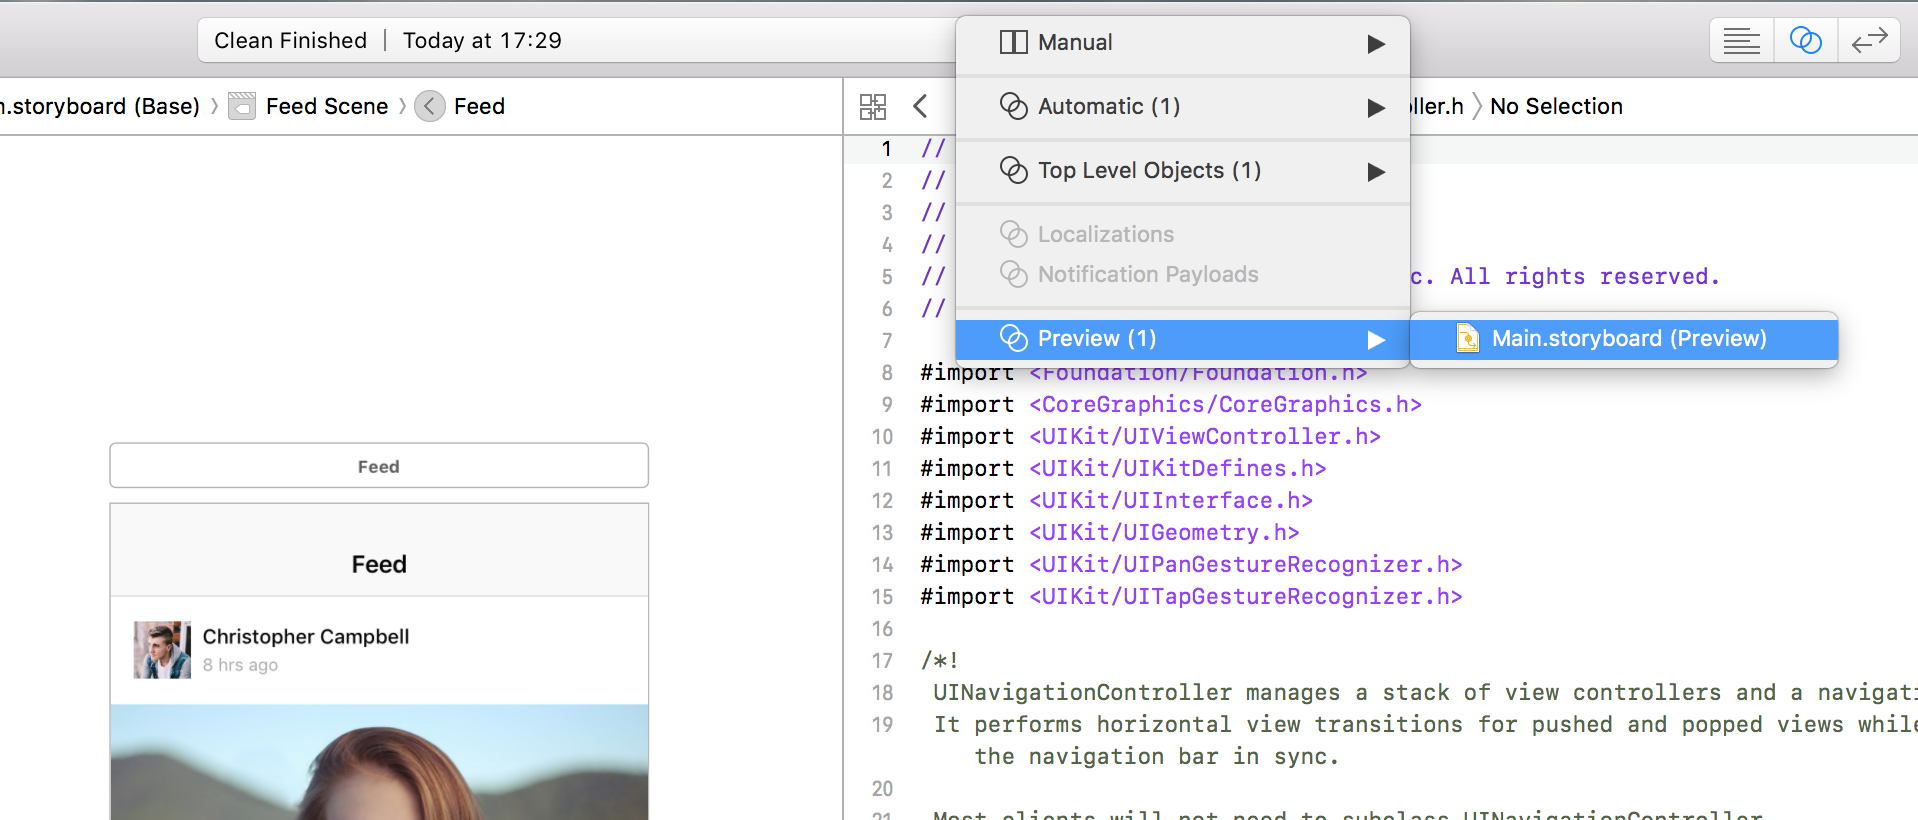
In Xcode, you can bring out the Assistant editor using the buttons in the upper-right corner of the window.
In Interface Builder, you usually use the Assistant editor to connect views to outlets and actions.
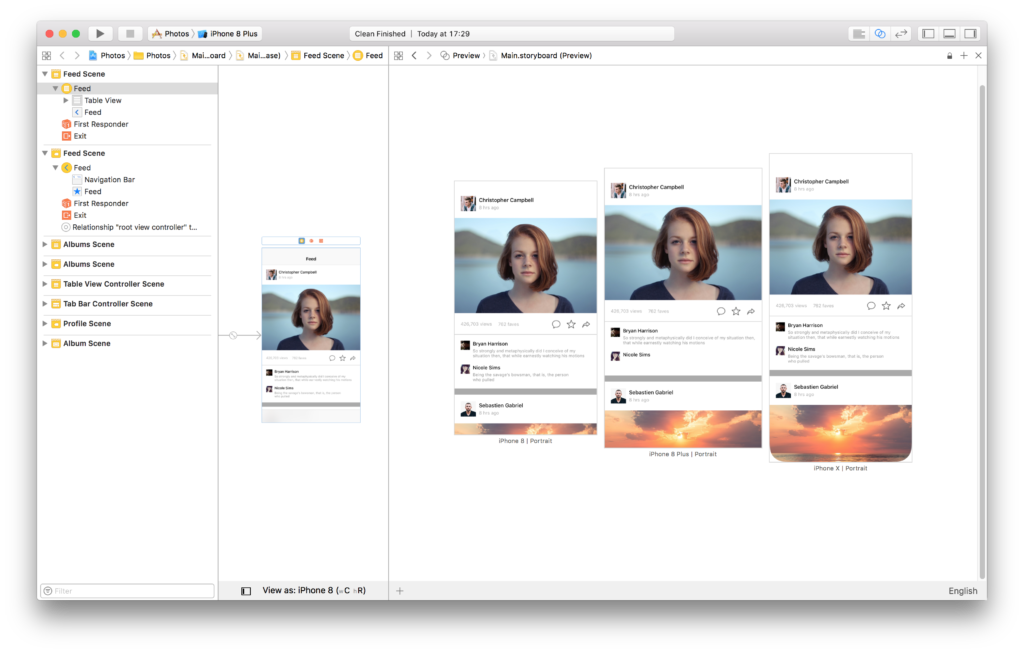
But it has another feature that few developers know: the preview.
In the preview, you can see how your user interfaces look on different devices. You can add as many devices as you want, and see them side by side:
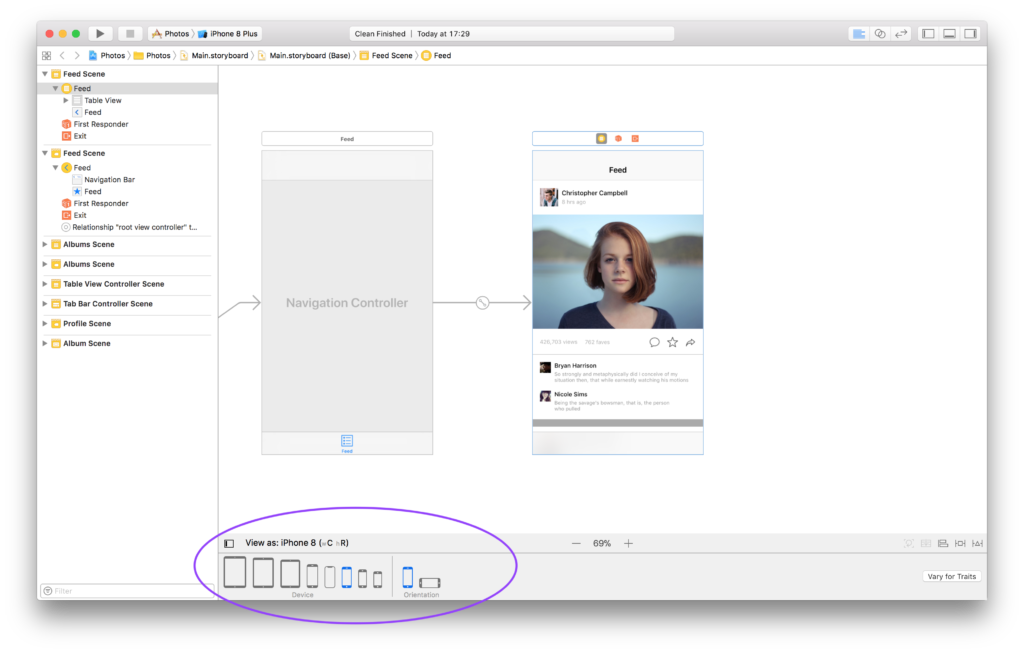
If your interface does not look good at a specific size and you want to work on it, you can change the size of all the scenes in your storyboard using the View as option at the bottom of the screen.
Rendering the drawing code for custom views in a storyboard using @IBInspectable and @IBDesignable
There is still a difference between our app and the mockup.
In the mockup, the user avatars are all round and have a border. But in our app, they are all square. It would be nice to have them circular.
It would be even nicer to see that already in the storyboard.
Since this is a prototype, we could make the images round in an image editor. But even for a prototype, this is a bit annoying, since we have to edit every single picture.
Luckily there is a better solution.
We have to write a few lines of code, but who said that we should not write any?
Usually, storyboards display only the content of standard UIKit views. Likewise, you can just set the properties of these conventional views in the Attributes inspector.
With a couple of special keywords though, you can make Interface Builder also accept your custom code.
@IBInspectableallows you to create properties on your classes that can be set in the Attributes inspector.@IBDesignablecompiles your rendering code and displays the result in the storyboard, so you see the final result without running the app.
I will only show you how to do it, and I won’t go into the specifics since they are beside the point of this article. You can find an explanation here and some more in-depth examples examples here.
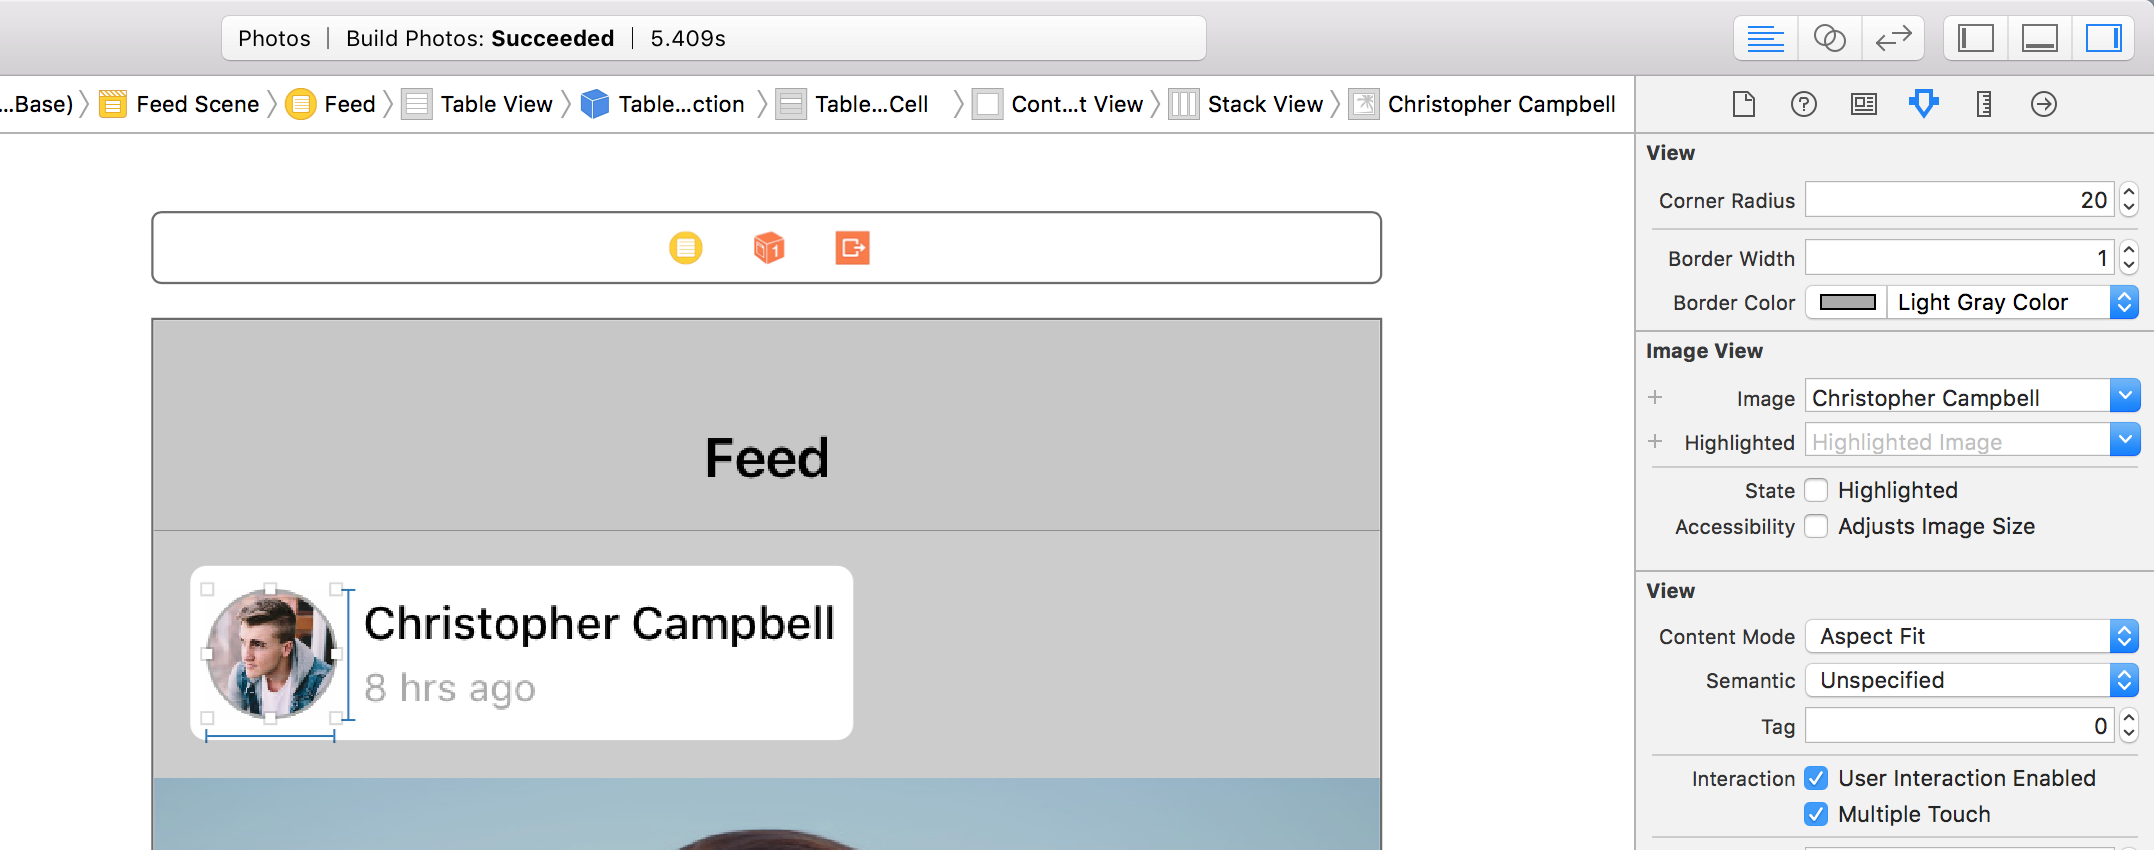
First of all, we need properties to set the corner radius, the border thickness and the border color of our images.
extension UIView {
	@IBInspectable var cornerRadius: CGFloat {
		get { return layer.cornerRadius }
		set {
			layer.cornerRadius = newValue
			layer.masksToBounds = newValue > 0
		}
	}

	@IBInspectable var borderWidth: CGFloat {
		get { return layer.borderWidth }
		set { layer.borderWidth = newValue }
	}

	@IBInspectable var borderColor: UIColor? {
		get { return layer.borderColor.flatMap { UIColor(cgColor: $0) } }
		set { layer.borderColor = newValue?.cgColor }
	}
}
I put the properties in an extension of UIView so that they are available to any view in the storyboard. This allows us to set rounded corners and borders around any view, including images and buttons.
Next, we have to make classes @IBDesignable to see the result of changing these properties.
Unfortunately, we cant use @IBDesignable it on extensions. We have to create concrete classes of any view we want to render in the storyboard.
@IBDesignable class DesignableView: UIView {}This is enough, even if DesignableImageView is empty.
Once you set the class in the Identity inspector in Interface Builder, you will find each property in the Attributes inspector.
To obtain a perfectly round image, all you have to do is set the corner radius to be half of the height of the view.
Embedding view controllers inside custom containers using embed segues
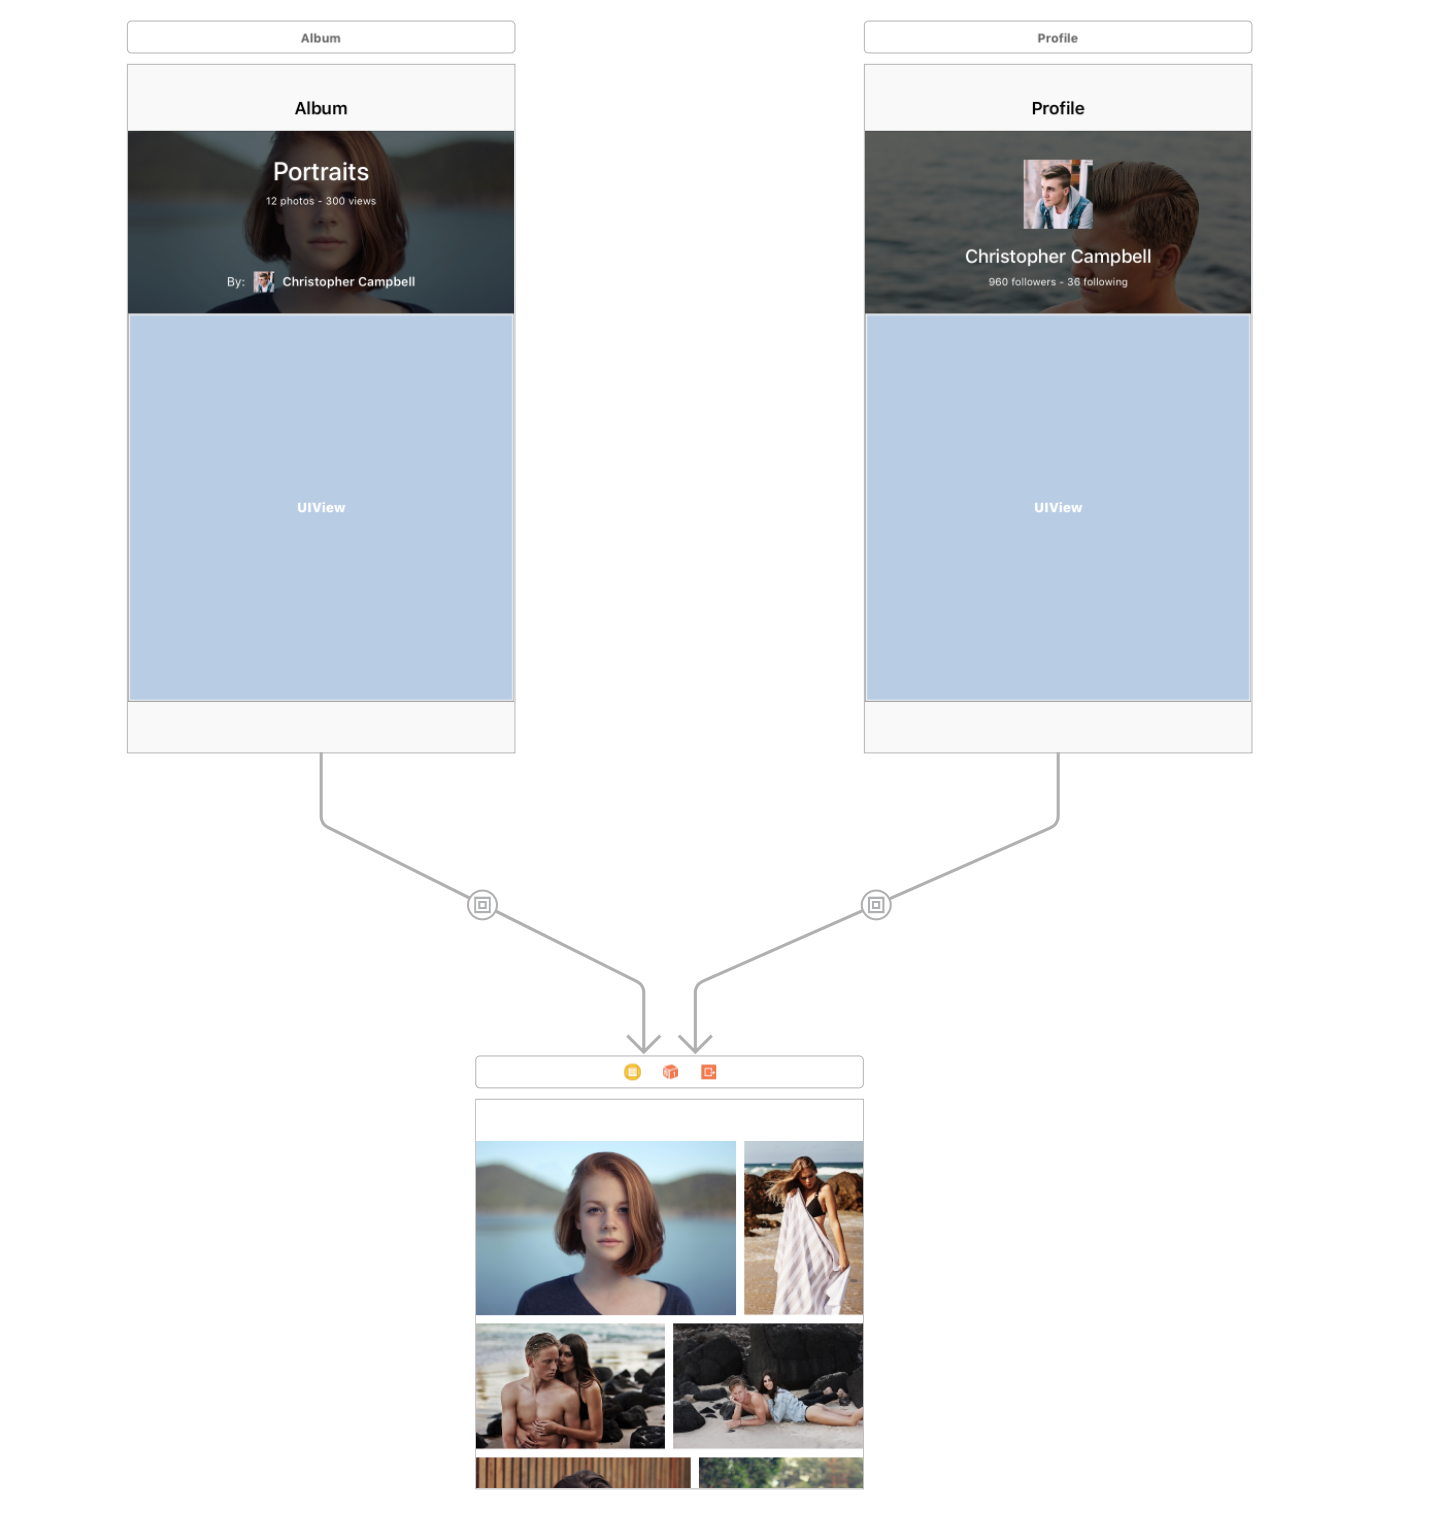
Let’s now get to the Profile and Album screens:
These screens are quite similar, but not enough to use the same view controller. Their top parts have:
- a different layout,
- different UI elements, and
- different interactivity.
The lower part though is the same.
Not only that, but it’s also a static table view, which requires a table view controller. But as I said above, table view controllers don’t allow any other interface element besides the table view.
So how do we solve this?
What we need to do is to put a table view controller inside other view controllers.
This looks like the job of a container view controller. Looking at the catalog for containers though, we cannot find any that fits our needs.
Luckily there is a solution.
The documentation for the UIViewController class shows that any view controller can act as a container for another view controller. Unfortunately, that documentation only mentions how to do it programmatically.
It is not trivial to keep the various calls in balance, and we don’t want to write any extra code.
Luckily this section in the View Controller Programming Guide gives us an alternative. It is possible to create custom containers in a storyboard, using embed segues.
So we need to:
- create the Profile and Album view controllers, with their distinct interfaces;
- create a separate table view controller with rows containing the pictures;
- add a container view to both the container view controllers and connect them to the table view controller using an embed segue
The table view controller is smaller than the other two only because Xcode resizes it to fit the container views. Otherwise, it’s a view controller like any other.
We won’t need to pass data between view controllers in our prototype, but if you are wondering how you would do it for embed segues, you need to use the prepare(for:sender:) method like for any other segue. I talked in more detail about it in my article on passing data between view controllers.
Pushing view controllers on a navigation controller using selection segues
In iOS apps, most containers handle most transitions.
We can already move between sections thanks to the tab bar controller we set as the initial view controller. In that case, we don’t have to do anything other than set the relationship segues.
Drill-down navigation is managed by navigation controllers. We already have them in our app, but still no navigation.
Let’s fix that.
To add drill-down navigation between the view controllers inside a navigation controller all you have to do is add a show segue from the interactive control that triggers navigation to the destination view controller. The interactive control can be, for example, a button or a table view cell.
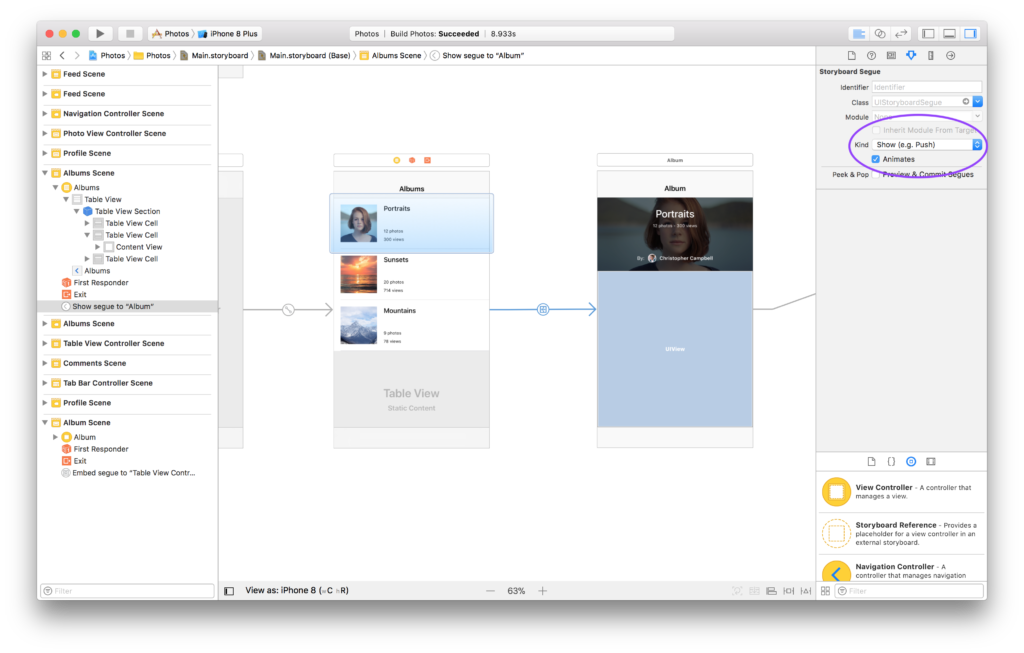
We can add a show segue from a cell in the Albums scene to the Album scene.
In the picture, you can see that the type of this segue is Show in the Attributes inspector on the right.
You can add a segue for each cell if you want to be more complete. Unlike dynamic table views, where you adding a segue to a prototype is enough, static table views need a segue for each cell.
A show segue triggers the transition in the container view controller, which in this case is a navigation controller.
The navigation controller also provides a back button for returning to the previous view controller.
Modal presentation can happen in any view controller
Not all navigation in iOS apps is a drill-down.
We use drill-down navigation to go down a hierarchy, seeing more and more details about our selections as we go on.
There are cases instead where we should present screens on top of each other. This transition has a different meaning: placing something front and center to get the user attention.
In iOS, this is called modal presentation.
In modal presentation, the transition usually brings in a new view controller from the bottom of the screen. But we can change this transition to be, for example, a cross dissolve.
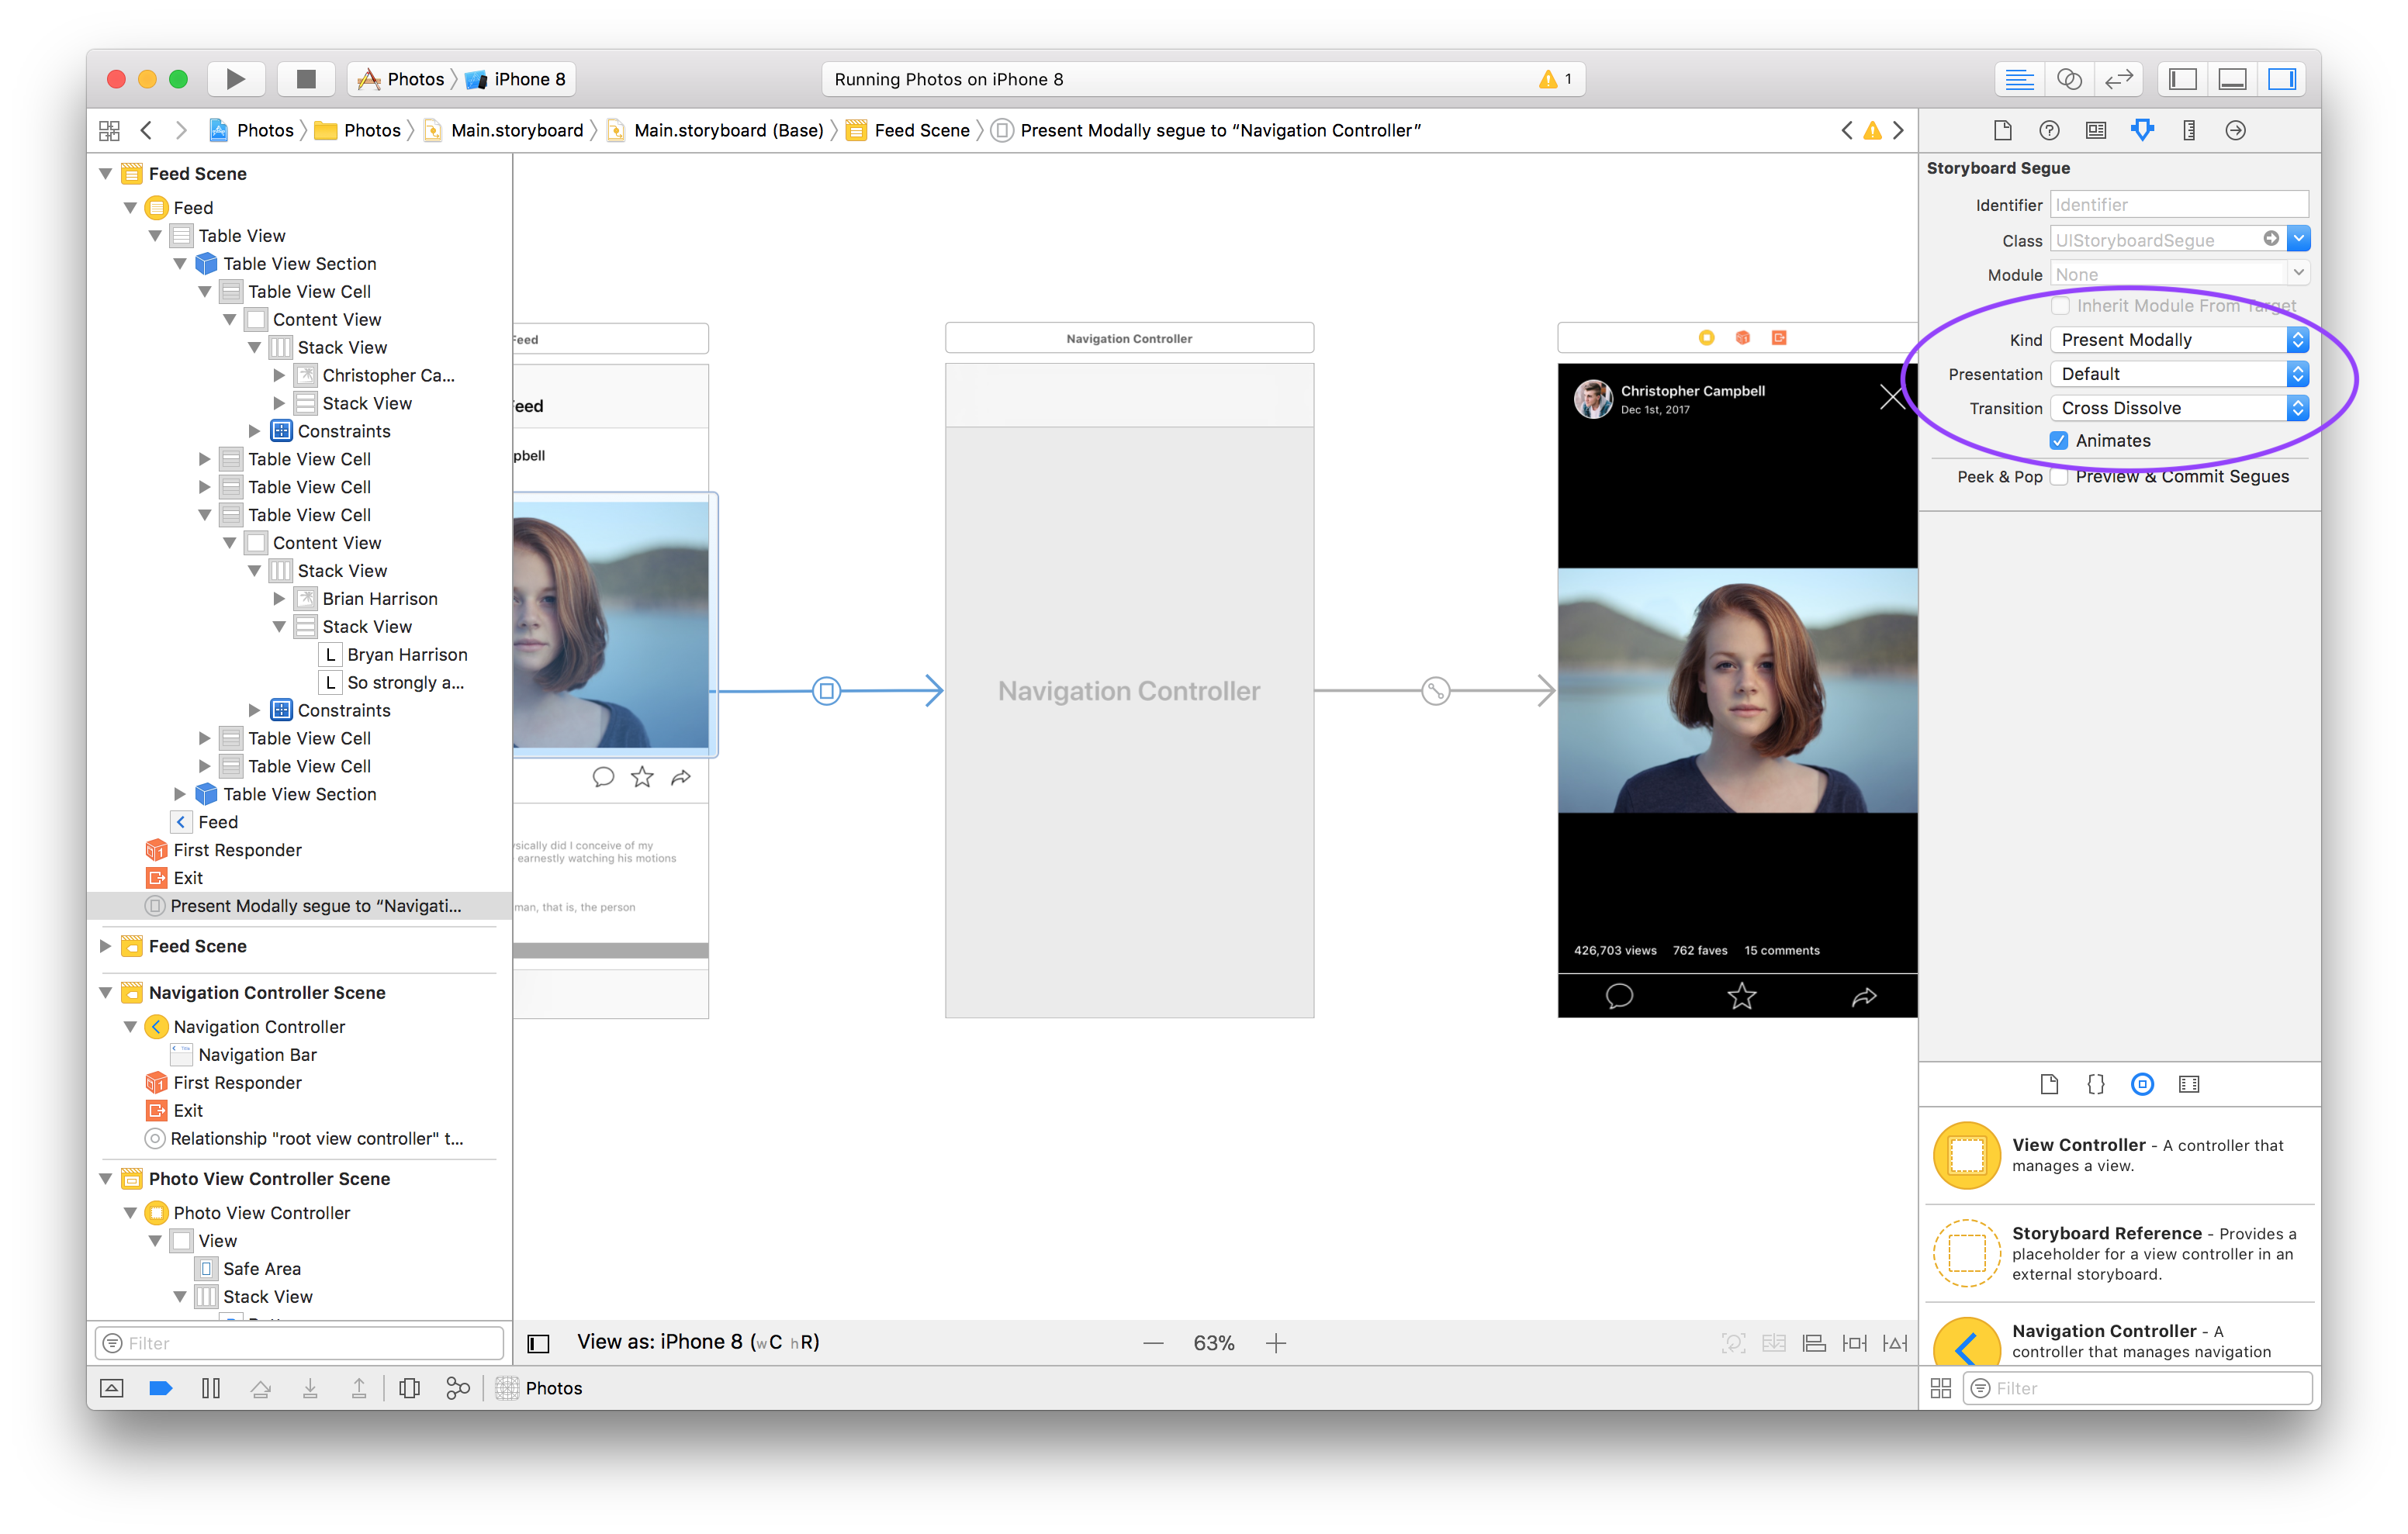
We will use this in our app to transition from the Feed screen to the Photo screen:
For this screen, we won’t use a static table view. A simple layout with some stack views and basic constraints is enough. I won’t go over the details for this; you find the final result in the Xcode project at the bottom of this article.
Usually, this kind of screen would also allow zooming into the picture. That requires a scroll view and some complications in code that we are not interested in. This is just a prototype to play with navigation and zooming is beside the point of this article.
Modal presentation also works through a selection segue, so you connect it the same way. The difference is that it does not need a container view controller.
Any view controller can present another view controller modally.
I could attach a segue to the picture because I put it in its separate cell in the table view. Image views are not interactive.
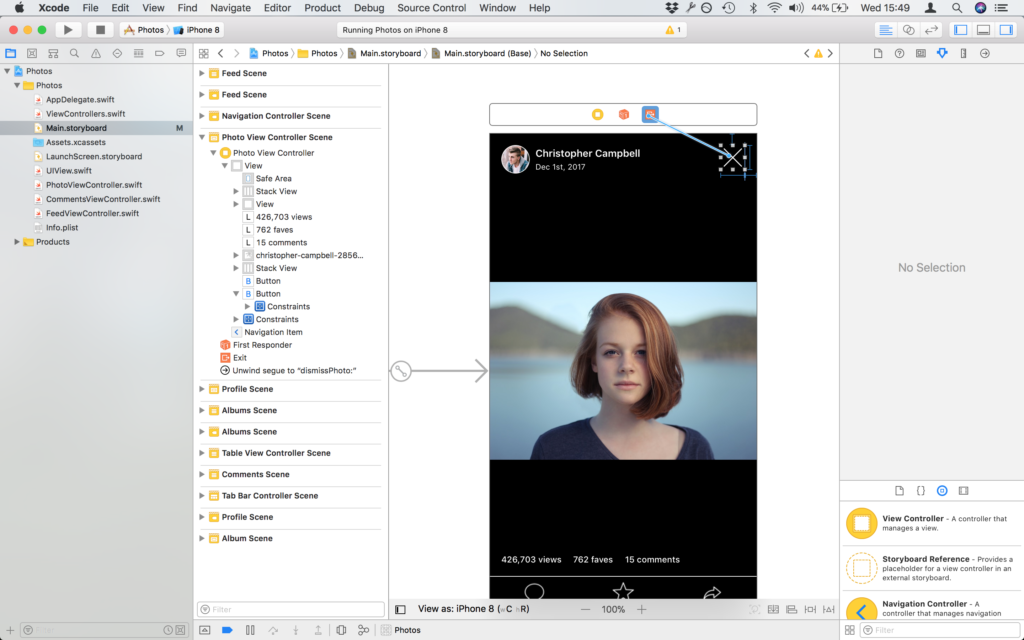
I’m sure you noticed the navigation controller between the Feed scene and the Photo scene.
This would not be necessary if navigation did not go further than the Photo scene. But in our mockup, we can go to many other places from this screen. Drill-down navigation always required a navigation controller for each path.
A navigation controller always shows the navigation bar at the top, but for this view controller, we don’t want it. We have to hide it when the view controller comes on the screen and show it again when we navigate to another view controller.
class PhotoViewController: UIViewController {
	override func viewWillAppear(_ animated: Bool) {
		super.viewWillAppear(animated)
		navigationController?.setNavigationBarHidden(true, animated: true)
	}

	override func viewWillDisappear(_ animated: Bool) {
		super.viewWillDisappear(animated)
		navigationController?.setNavigationBarHidden(false, animated: true)
	}
}
I selected Cross Dissolve for the transition, so this screen will fade in instead of sliding from the bottom.
Going back to previous view controllers using unwind segues
Since modal presentation does not use a container, it does not offer any control on screen to go back.
This means that adding a modal segue allows us to go forward, but not backward. You have to provide a separate way to go back.
This is done using unwind segues.
Unwind segues do not only allow you to revert modal segues. They also work with other selection segues, including show segues in navigation controllers.
In the latter, though you don’t use them to go to the previous screen. There is already the back button of the navigation controller for that. Unwind segues are useful in navigation controllers to jump back more than one screen.
That is unless you hide the navigation bar. In that case, you might need an unwind segue also to go back one screen.
Unwind segues don’t work “out of the box” in interface builder. They also need a few lines of code.
To mark the destination of the unwind segue we need to add an action to it. This action can be empty, but you might have to put some code in it, depending on what you want to achieve. Refer to my article on passing data between view controllers for more details.
Since we came from the Feed screen, we need to mark it as a destination for our unwind segue.
class FeedViewController: UITableViewController {
	@IBAction func dismissPhoto(_ segue: UIStoryboardSegue) {}
}
Don’t forget to set this class for the view controller in the storyboard scene.
Once you add this action to a view controller, you can connect an unwind segue to it by control-dragging from a control in the origin view controller. This control-drag does not go to another scene, but to the Exit placeholder:
Custom views and extra objects in storyboard scenes
There is one last useful feature in storyboards: custom objects.
As we saw, storyboard scenes are more than view controllers. Besides the view controller, they contain other objects too:
- the First Responder and Exit placeholders;
- any segue you add to the scene.
These are not the only object a scene can include.
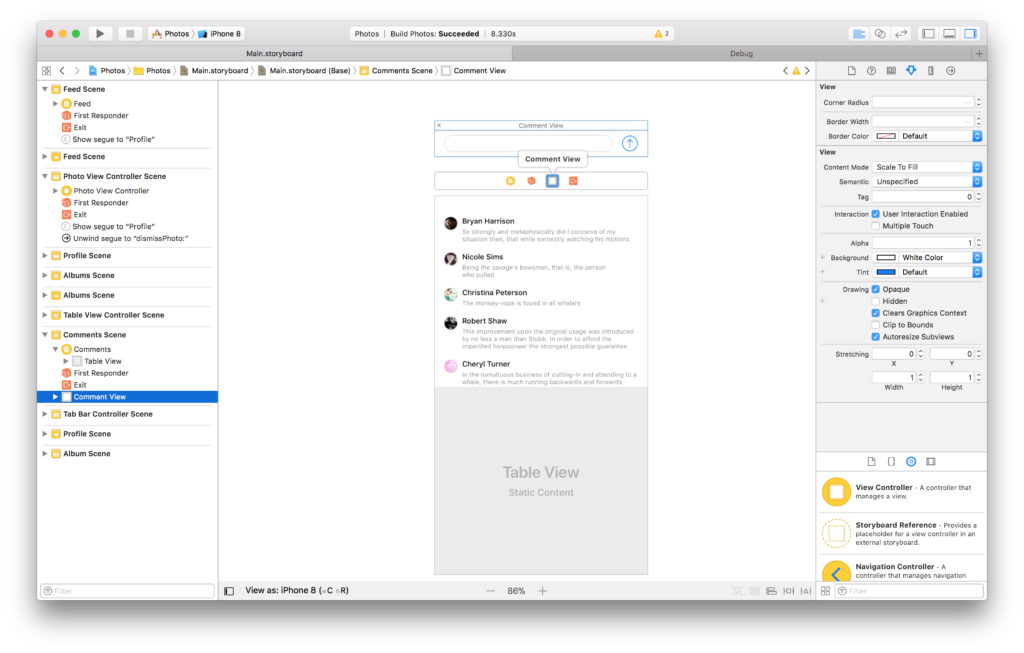
You can also add custom objects to a scene. These can be views, but also any other kind of object, like model controllers.
There are many contexts in which this is useful. As an example, we will take our Comments screen:
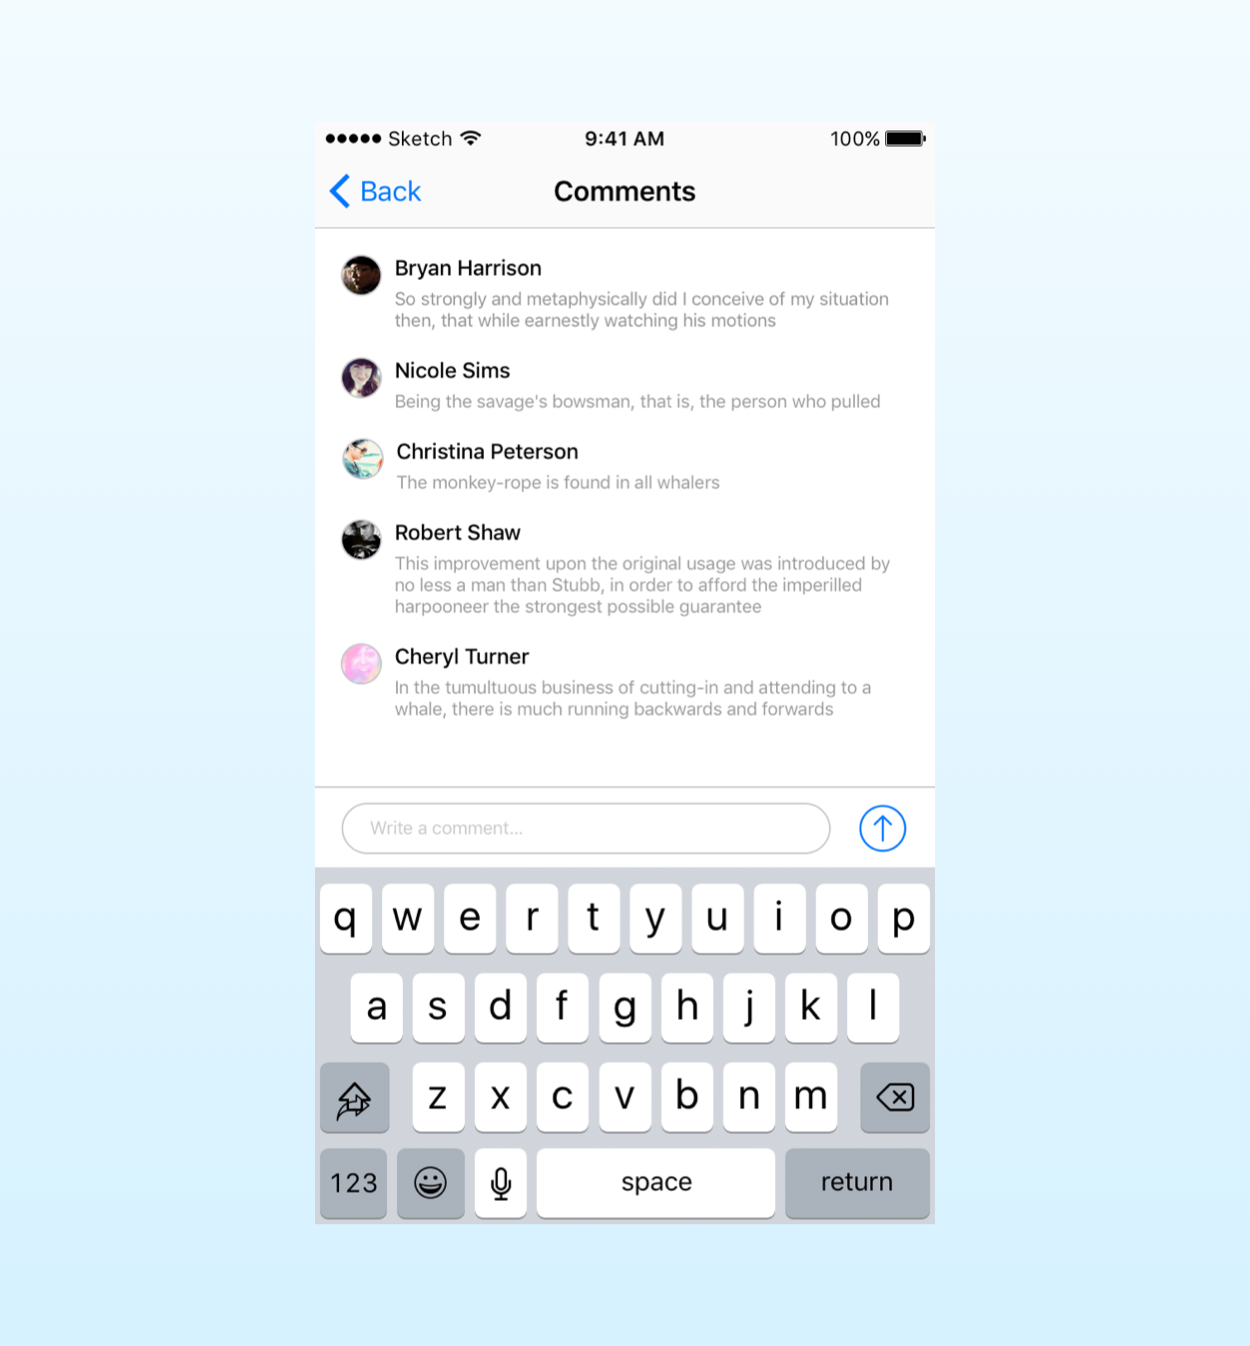
In the mockup, you can see that there is a view that contains a text field and a button at the top of the keyboard. This would be used to write a comment.
That view though moves with the keyboard, so it’s not part of the view controller’s view hierarchy.
Where should we put it?
This is an excellent example of a custom object: extra views that are not part of the view hierarchy of a view controller.
As you can see, the comment view sits at the top of the storyboard scene and in the Document Outline on the left.
By the way, I made that rounded border around the text field using again the @IBInspectable properties we added before. Those are not enough though. The placeholder and the caret in a text field are too close to the border and produce an ugly result when we add the border.
So I added a couple of lines of code to move them both to a better position:
extension CGRect {
	func shifted(by x: CGFloat) -> CGRect {
		var newRect = self
		newRect.origin.x += x
		return newRect
	}
}

@IBDesignable
class DesignableTextField: UITextField {
	override func placeholderRect(forBounds bounds: CGRect) -> CGRect {
		return bounds.shifted(by: 16.0)
	}

	override func editingRect(forBounds bounds: CGRect) -> CGRect {
		return bounds.shifted(by: 16.0)
	}
}
Since the comment view is detached from the view controller, if we run the app now, we won’t see it anywhere. We have to first attach it to the keyboard, which we can only do in code.
Luckily, it’s again only a few lines long:
class CommentsViewController: UITableViewController {
	@IBOutlet var commentView: UIView!
	@IBOutlet var commentTextField: UITextField!


	override var inputAccessoryView: UIView? {
		return commentView
	}

	override func viewDidAppear(_ animated: Bool) {
		super.viewDidAppear(animated)
		commentTextField.becomeFirstResponder()
	}

	override var canBecomeFirstResponder: Bool {
		return true
	}
}
Finally, we connect the balloon button in the Feed screen to the Comments scene using a Show segue.
Now, when we run the app, as soon as we get to the comments screen, the keyboard comes up, bringing along the comment view.
Breaking the navigation of an app into connected subsets with multiple storyboard and storyboard references
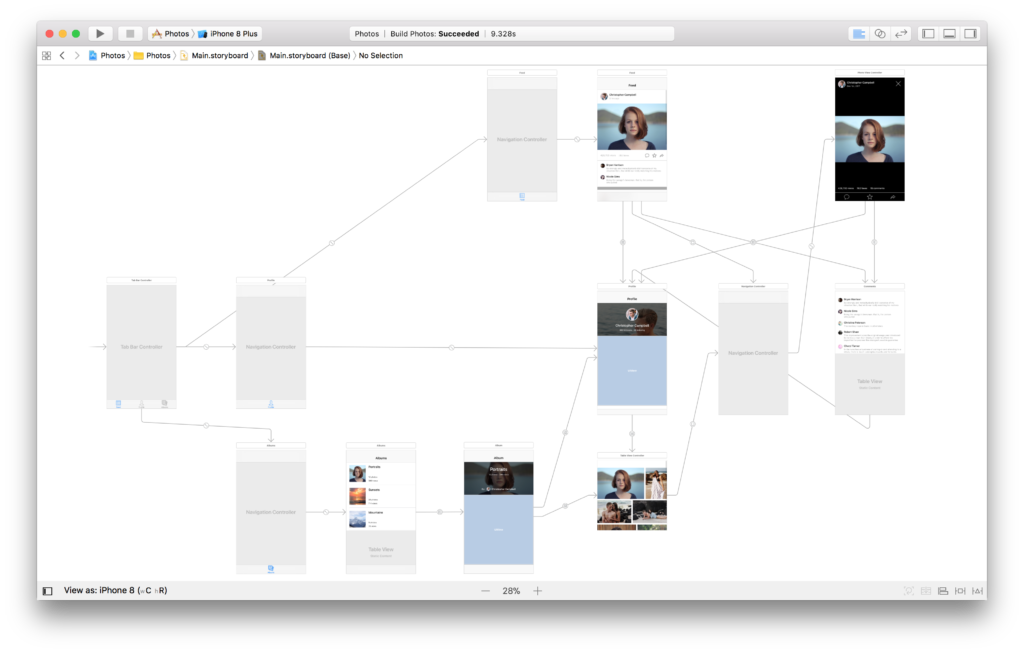
We can finally connect all the screens in our prototype using the different segues we explored above. This gives us the complete navigation defined in our mockup.
Honestly, it’s a bit of a mess.
I tried to arrange the view controllers on the canvas in a way that makes it easier to follow the segue arrows. Despite our best efforts though, storyboards get to a point where they are too complicated. No rearranging can make them more explicit.
In that case, we do what we would usually do with code: split it into smaller units.
A Xcode project can have more than one storyboard. Using storyboard references, you can connect scenes across storyboards using segues.
How should we distribute view controllers among many storyboards?
There is no rule here. The only guideline is to isolate single navigations flows in the same storyboard. In some apps, though it is hard even to identify these.
Luckily, no technical limitation stops us. You can connect any scene in a storyboard to any other scene in another storyboard.
So, let’s see what makes sense for our app.
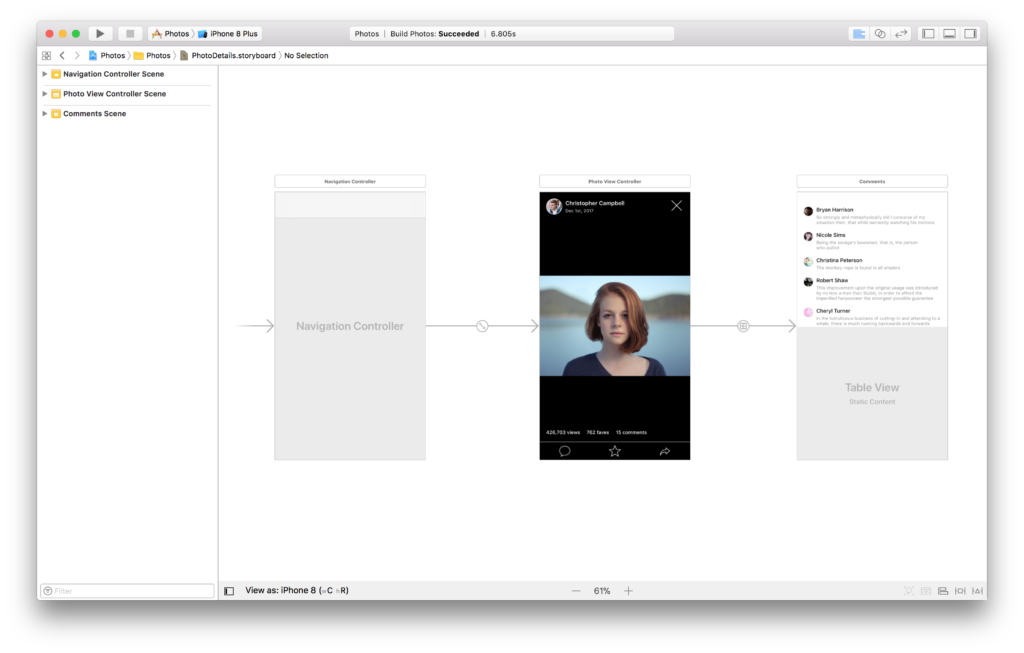
The navigation from the Photo scene to the Comments scene seems to be a part we can isolate. We can also include the navigation controller. I named this storyboard PhotoDetails.
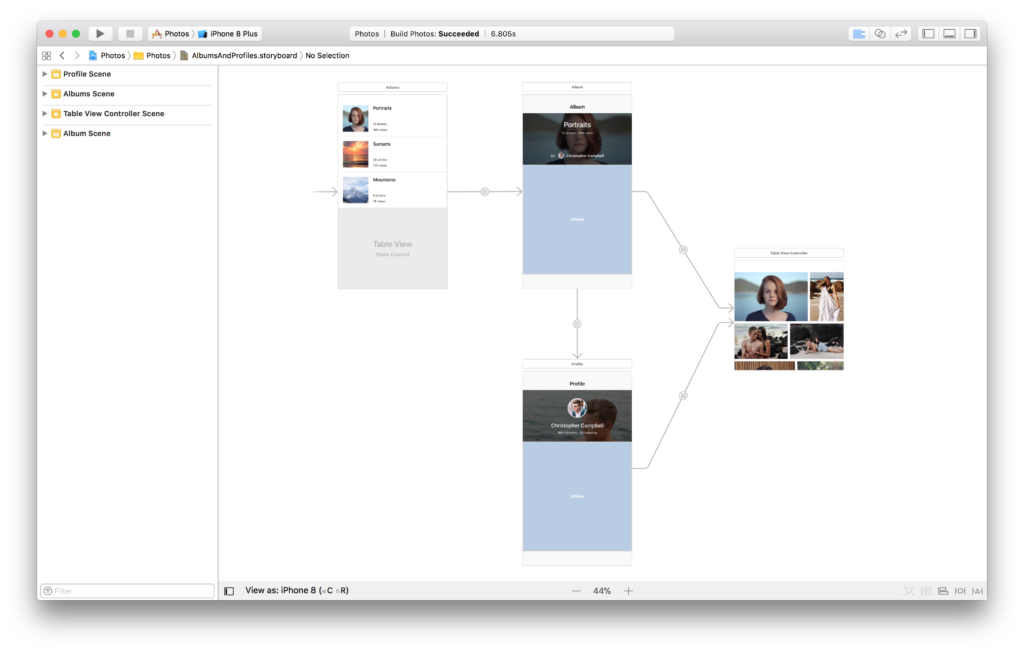
The Album and the Profile screen both embed the static table view with the pictures. It makes sense to put them all together into their storyboard, which I named AlbumsAndProfiles. I also included the Albums scene, since you can only go to the Album screen from there.
In the main storyboard, we have the main navigation (the tab bar controller and the navigation controllers) and the Feed screen.
We now have to recreate the navigation we had in the full storyboard.
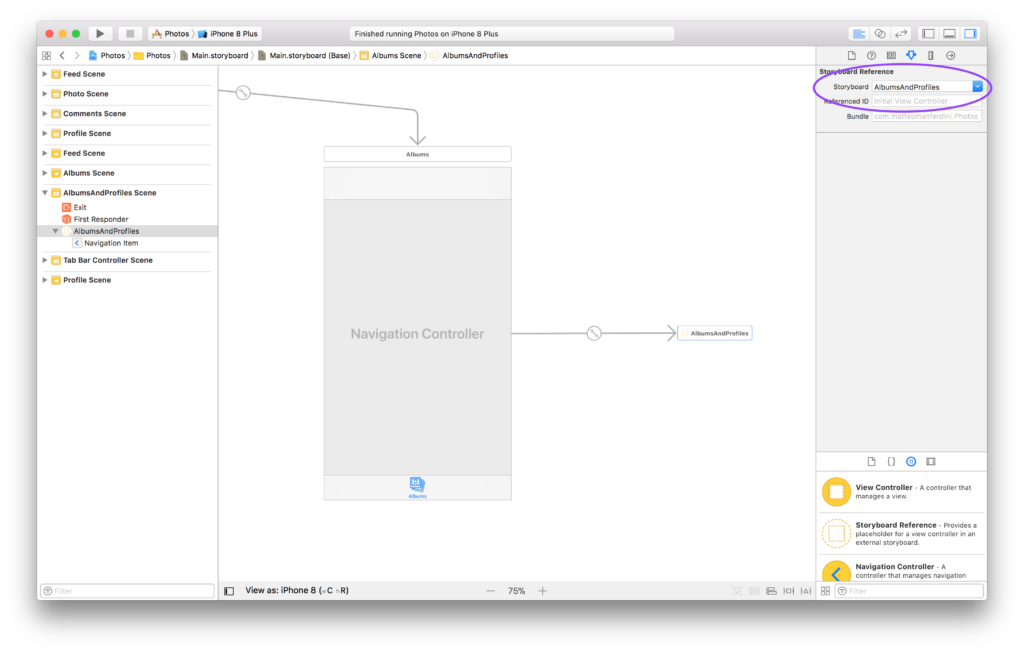
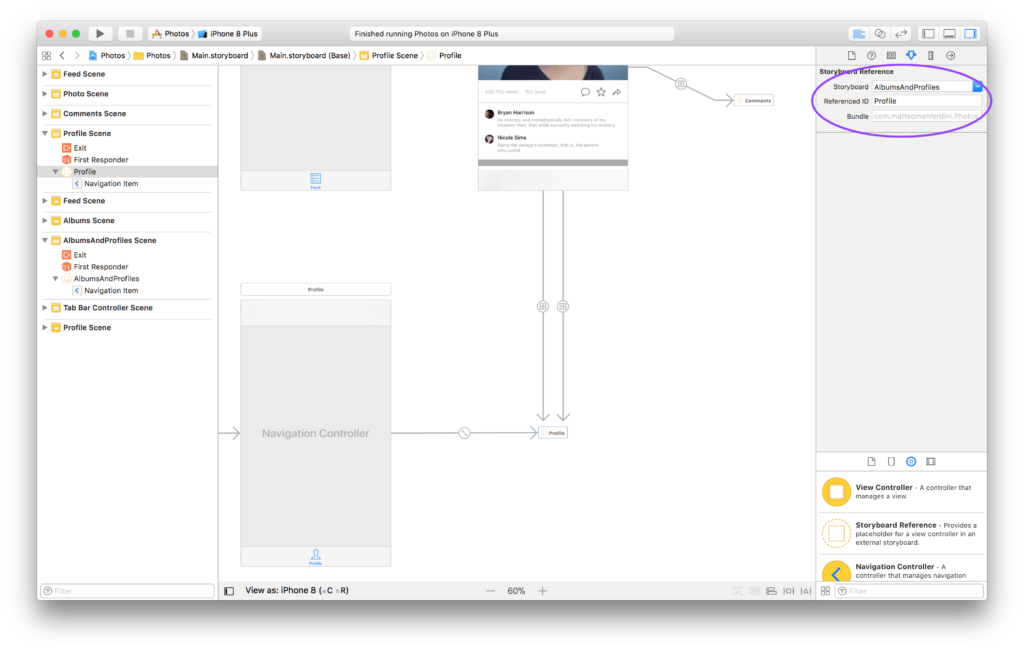
The simplest way to configure a storyboard reference is to use the only the storyboard name. This will connect a segue to the initial view controller of the referenced storyboard. As you can see in the pictures above, each storyboard has an initial view controller.
For example, to go from the Albums tab in the tab bar controller to the Albums scene, we need to configure the storyboard reference using the AlbumsAndProfiles storyboard.
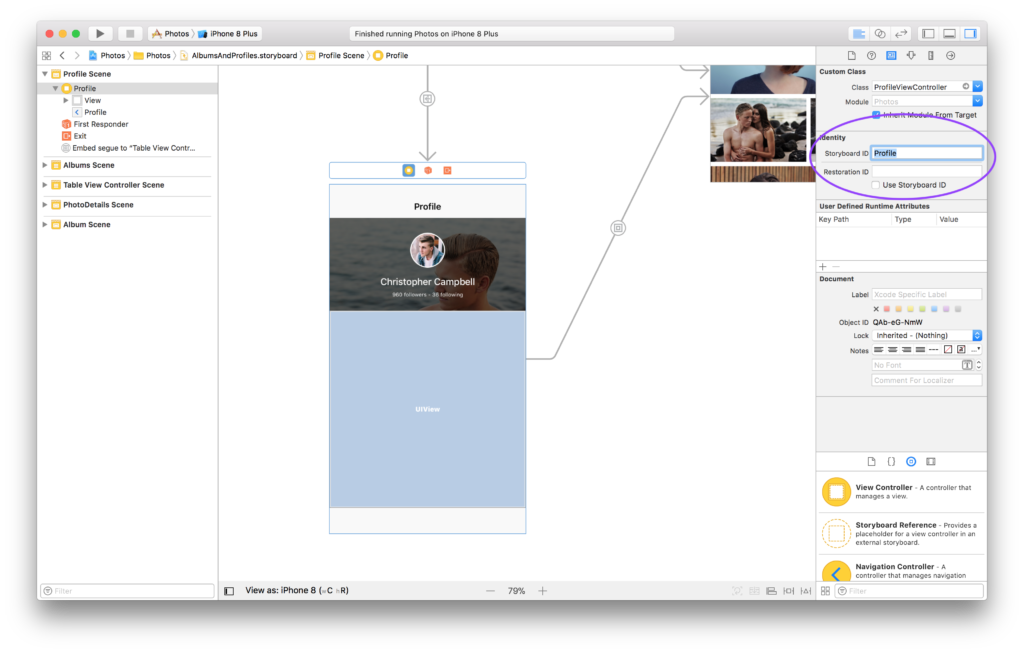
When we want to instead connect a segue to a view controller that is not the initial one, we first have to give such view controller an identifier.
For example, for the profile view controller:
After that, we can set its identifier in the storyboard reference:
The other storyboard references work the same, so I won’t go over them. You can find them in the final project.
Our prototype is finally complete.
Best practices for storyboards that are instead lousy
Reading articles on storyboards around the web, I noticed a few unconventional “best practices.” Unfortunately, in this case, “unconventional best practices” is a stand-in for bad practices.
I won’t name names or link to articles. I will address what I think are practices you should not follow.
As I discussed at the beginning of the article, problems with storyboards stem from three misunderstandings:
- not knowing that you can have multiple storyboards;
- assuming that writing some UI code means that all the rest of UI should also be in code;
- not being able to compromise on drawbacks.
So here is what I think you should not do when using storyboards.
- Don’t use a separate storyboard for every screen. First of all, this completely defeats the purpose of storyboards. A storyboard with one screen makes no sense. Second, this is an unusual practice that will only puzzle the other developers you will work with. This advice stems from the fact that storyboards might cause conflicts when merging. I’ll discuss this point in the next section. If you need to put screens in separate interface files, you should use nib files, not storyboards.
- Don’t use code for navigation instead of segues. Segues are an integral part of storyboards. They exist precisely to remove navigation code from view controllers. Again, a storyboard with no segues makes no sense. If for some reason you don’t want to use segues, nib files are still the right solution.
- You should not revert a segue in code. Use unwind segues, they exist for that. Mixing segues and code for navigation makes only things more confusing. Use the same mechanism both for going forward and backward. The excuse for this “practice” is that unwind segues are more complicated, which I find risible. I don’t think the unwind segue in the prototype we built was hard to understand.
Avoiding git merge conflicts when using storyboards in an Xcode project
Let’s now have a look at some good practices to avoid merging problems with storyboards which seem to be the only solid point against using them.
Storyboards are XML files under the hood, so conflicts are not as easy to solve as they are in code. XML is hard to read for humans (but not impossible).
If this is the problem, then I think that we need is not avoiding storyboards, but avoiding merge conflicts.
Don’t throw the baby out with the bathwater.
Here are some guidelines to avoid merge conflicts in storyboards.
- Always merge using Xcode. Xcode also works as a git client. This has been dramatically improved in Xcode 9. Anecdotally, I noticed that using Xcode to merge storyboards (or project files) seems to create less conflict. I could not find a reliable confirmation, but I did see other iOS developers with the same experience. It makes sense since Xcode knows the actual structure of storyboard files, while to a generic merge tool they are just XML.
- Pull and merge often. This is more a generic development advice than it is only for storyboards. It’s better not diverge too much from the central repository, or the number of conflicts will only increase.
- Follow a branching model like GitFlow. Another useful technique is to create your private branches on your machine. In these, you can commit as often as possible, even when your code does not compile. This allows pulling changes more frequently. When you are done, and you have to merge back into an official branch, you can clean your history with git commands like
squashandrebase. - Use storyboards references. As I said, most problems with storyboards seem to come from having only a monolithic storyboard in a project. Breaking your navigation into smaller storyboards makes it harder to have two developers change the same file.
- Never have more than one developer work on the same user interface. Most merge conflicts seem to come not from the storyboard file being edited, but from the same view controller being edited by more than one person (this also means that you get the same problem in nib files). You should structure your team so that developers work on separate user interfaces. This is not as hard to do as you might think. I worked in teams where there was no such rule and still working on the same view controller at the same time with others never happened. If this happens in your team, you might want to look at your process carefully. There is another good practice that I heard Apple and other companies use. Developers in an organization should own the code they create. Of course, every developer should be able to read and change any part of the code. But it makes sense that the developer who wrote some code should be the one that changes it when needed. This speeds up development since the developer knows does not have to understand the code first. This also reduces storyboards conflicts.
- Use custom view controller containers. If two developers need to change the user interface, chances are a feature affects more than one screen. As we have seen in this article, shared UIs can be isolated inside a single view controller that gets embedded into other ones. This should reduce the need to have more than one person edit a view controller.
- Learn the XML structure of a storyboard file. Yeah, I know. Not the most fun thing to do. But many developers hate solving conflicts in storyboards because they have no idea what they are looking at. In the end, a storyboard file has a logical XML structure. When you know how they work, you can solve merge problems better. You can find a couple of tips here.
- Use a tool other than Xcode to resolve the conflicts. Xcode might be better at merging storyboards, but it might still mark some conflicts that do not exist. You can see an example in the link I provided in the previous point. There some parts of a view controller that did not change were marked as a conflict anyway. There are specialized tools for merging XML files. These turn an XML file into a canonical form that is easier to merge. Here is a more detailed question on StackExchange’s SuperUser website. To be honest, I have never tried this approach myself, so I don’t know how Xcode might react to the rearranged file. But my experience while merging is that the reordering of XML tags does not affect Xcode.
Where do you go from here?
I covered everything there is to know about storyboards in this article. But iOS development is more than just storyboards.
A few pointers:
- Whether you use a storyboard or not, it is crucial to pass data between view controllers in the right way. I wrote an extensive article on passing data between view controllers.
- When you write a real app, most of your view controllers will use dynamic table views instead of static ones. You can find an extensive article on table views here.
- Storyboards cover only the UI and the navigation flow of your app. Below the surface there are many architectural concepts you need to keep in mind. I cover those in my article on advanced iOS architecture.
SwiftUI App Architecture: Design Patterns and Best Practices

It's easy to make an app by throwing some code together. But without best practices and robust architecture, you soon end up with unmanageable spaghetti code. In this guide I'll show you how to properly structure SwiftUI apps.
Matteo has been developing apps for iOS since 2008. He has been teaching iOS development best practices to hundreds of students since 2015 and he is the developer of Vulcan, a macOS app to generate SwiftUI code. Before that he was a freelance iOS developer for small and big clients, including TomTom, Squla, Siilo, and Layar. Matteo got a master’s degree in computer science and computational logic at the University of Turin. In his spare time he dances and teaches tango.




Very good article. Absolutely brilliant. Keep up the good work!
Excellent Article on UIStoryboard
Great article Matteo :) I really enjoyed reading it.
Awesome and well explained article. Thank you for all these information!
Very well written , I am in agreement with using storyboards , they give a sense of flow and visually represent what the user should do at a certain time .
You write the most comprehensive iOS articles on the planet man! Thanks.
Nice to this informative and interesting article after very long time. You describe the very well for UIStoryboard. Keep Posting.
the explanation of custom objects is so terrible. Every thing just jumps from nowhere……….
Thanks for this great tutorial. One question-
“In static table views, the height of rows is also static. There is no
need to set constraints so that they expand the row height like you
would in a dynamic table view. The table view controller uses the row
heights you set in the storyboard.”
If I want to use autolayout to dynamically adjust heights to a UILabel, I can do this by setting row height to .automaticDimension in the viewcontroller, but I cannot get the storyboard to set the height correctly. If I check “Automatic” in the inspector panel, it keeps trying to revert to 44. If I change the height in storyboard manually, it no longer uses autolayout. Any advice for creating a static storyboard with autolayout based cell heights? Thanks.
I think your problem lies in the UITableViewController. Since this is the data source and delegate of the table view, it probably overrides the settings in the storyboard.
You have to override the delegate methods for the cell height in your view controller and return .automaticDimension. The tableView(_:heightForRowAt:) method should be enough, but you might also have to override tableView(_:estimatedHeightForRowAt:).
Hi, my app development guys has asked me to hire someone who can create storyboards and become the translator from app visuals from designers to export UI code for developers. May I know what will be the title of this person? Should this person come from Design background or Code background? Appreciate any advice :)
To be honest, it’s a strange question. Your developers should be able to do this themselves.
Maybe they are not iOS developers, or maybe they are too busy and you need an extra person. In that case, you need someone that is familiar with Xcode and probably code, so that would be an iOS developer.
Some designers might be able to create storyboards, but the approach is limited, since many things require code. That is the domain of a developer.
Hey, people usually don’t go along with storyboards, not because they are used to writing UIs in code, but mainly because storyboards are not production ready. If you can explain to me how two people work on the same storyboards using version control, and figure out how to successfully manage that, I am sure you will win all the arguments between storyboards vs code… Have a look at those merge conflicts on those ugly xml files automatically generated by XCode and then you will probably understand why people learn how to not do UIs using storyboards.