Any iOS developer, at some point, feels the need to make the step from basic to advanced concepts.
You can get a lot of mileage from the fundamentals of Swift and iOS development.
But working on complex projects demands a new set of tools if you want your code to be reusable and remain at the same time maintainable and testable.
If you are looking to expand your Swift knowledge into more advanced topics and understand why you would need such concepts, this article is for you.
Contents

Chapter 1
The Reasons Behind Advanced Techniques

Chapter 2
Structuring a Complex Swift Project

Chapter 3
Model Versioning and Data Migration with Codable types

Chapter 4
Domain-Specific Languages and Custom Operators
Chapter 5
Declarative DSLs and Result Builders

FREE GUIDE - SwiftUI App Architecture: Design Patterns and Best Practices
MVC, MVVM, and MV in SwiftUI, plus practical lessons on code encapsulation and data flow.
DOWNLOAD THE FREE GUIDEChapter 1:
The Reasons Behind Advanced Techniques
Everything you learn, you do for a reason. We often learn new topics just for fun. But when it comes to advanced Swift techniques, fun is not enough.
Advanced Swift techniques exist to help you solve real-world problems in complex projects. You can put together a treehouse with little technical knowledge, but a skyscraper requires advanced engineering, or it will collapse under its weight.
What is advanced Swift, really?
The internet seems to have different takes on advanced Swift techniques.
What makes a topic actually advanced?
Sometimes that’s easy to define. For example, many will agree that Swift generics are an advanced topic because of several factors:
- Generics are not fundamental when you learn Swift programming.
- Many developers struggle to understand generics, especially without clear examples explaining why they are needed.
- Generics solve specific abstraction problems, but if you are willing to live with some repetition in your code, you can avoid them.
- Generics are often out of sight thanks to Swift’s type inference. For example, SwiftUI uses them extensively, but you can become pretty proficient in building UIs without understanding generics. (They do pop up often in Apple’s documentation, though.)
While not comprehensive, these are common assumptions you can use to decide if a topic is advanced or not.
Unfortunately, the boundaries are not always clear-cut.
For example, I have seen people list Swift optionals as an advanced topic. Optionals can be annoying for beginners, but you can’t go far in Swift or iOS development without using optionals. So, in that way, they are not advanced.
At the same time, there are some advanced topics related to optionals, like mapping. You can learn about those in my Complete Guide to Understanding Swift Optionals.
In this article, I will show you some techniques I consider both advanced and useful.
Advanced techniques should be practical and not just intellectual entertainment
In all my articles and courses, I always try to show real-world practical applications of any technique.
Software development does not happen in a vacuum.Theoretical concepts can be fun and exciting, but they are just useless entertainment if you can’t apply them to your work.
On the other hand, it takes me an entire course to explain in detail many of the techniques you’ll find in this article. You can get on the waitlist for The iOS Architect here.
That course took me years to develop, so it’s simply not practical to cover much in a simple article.
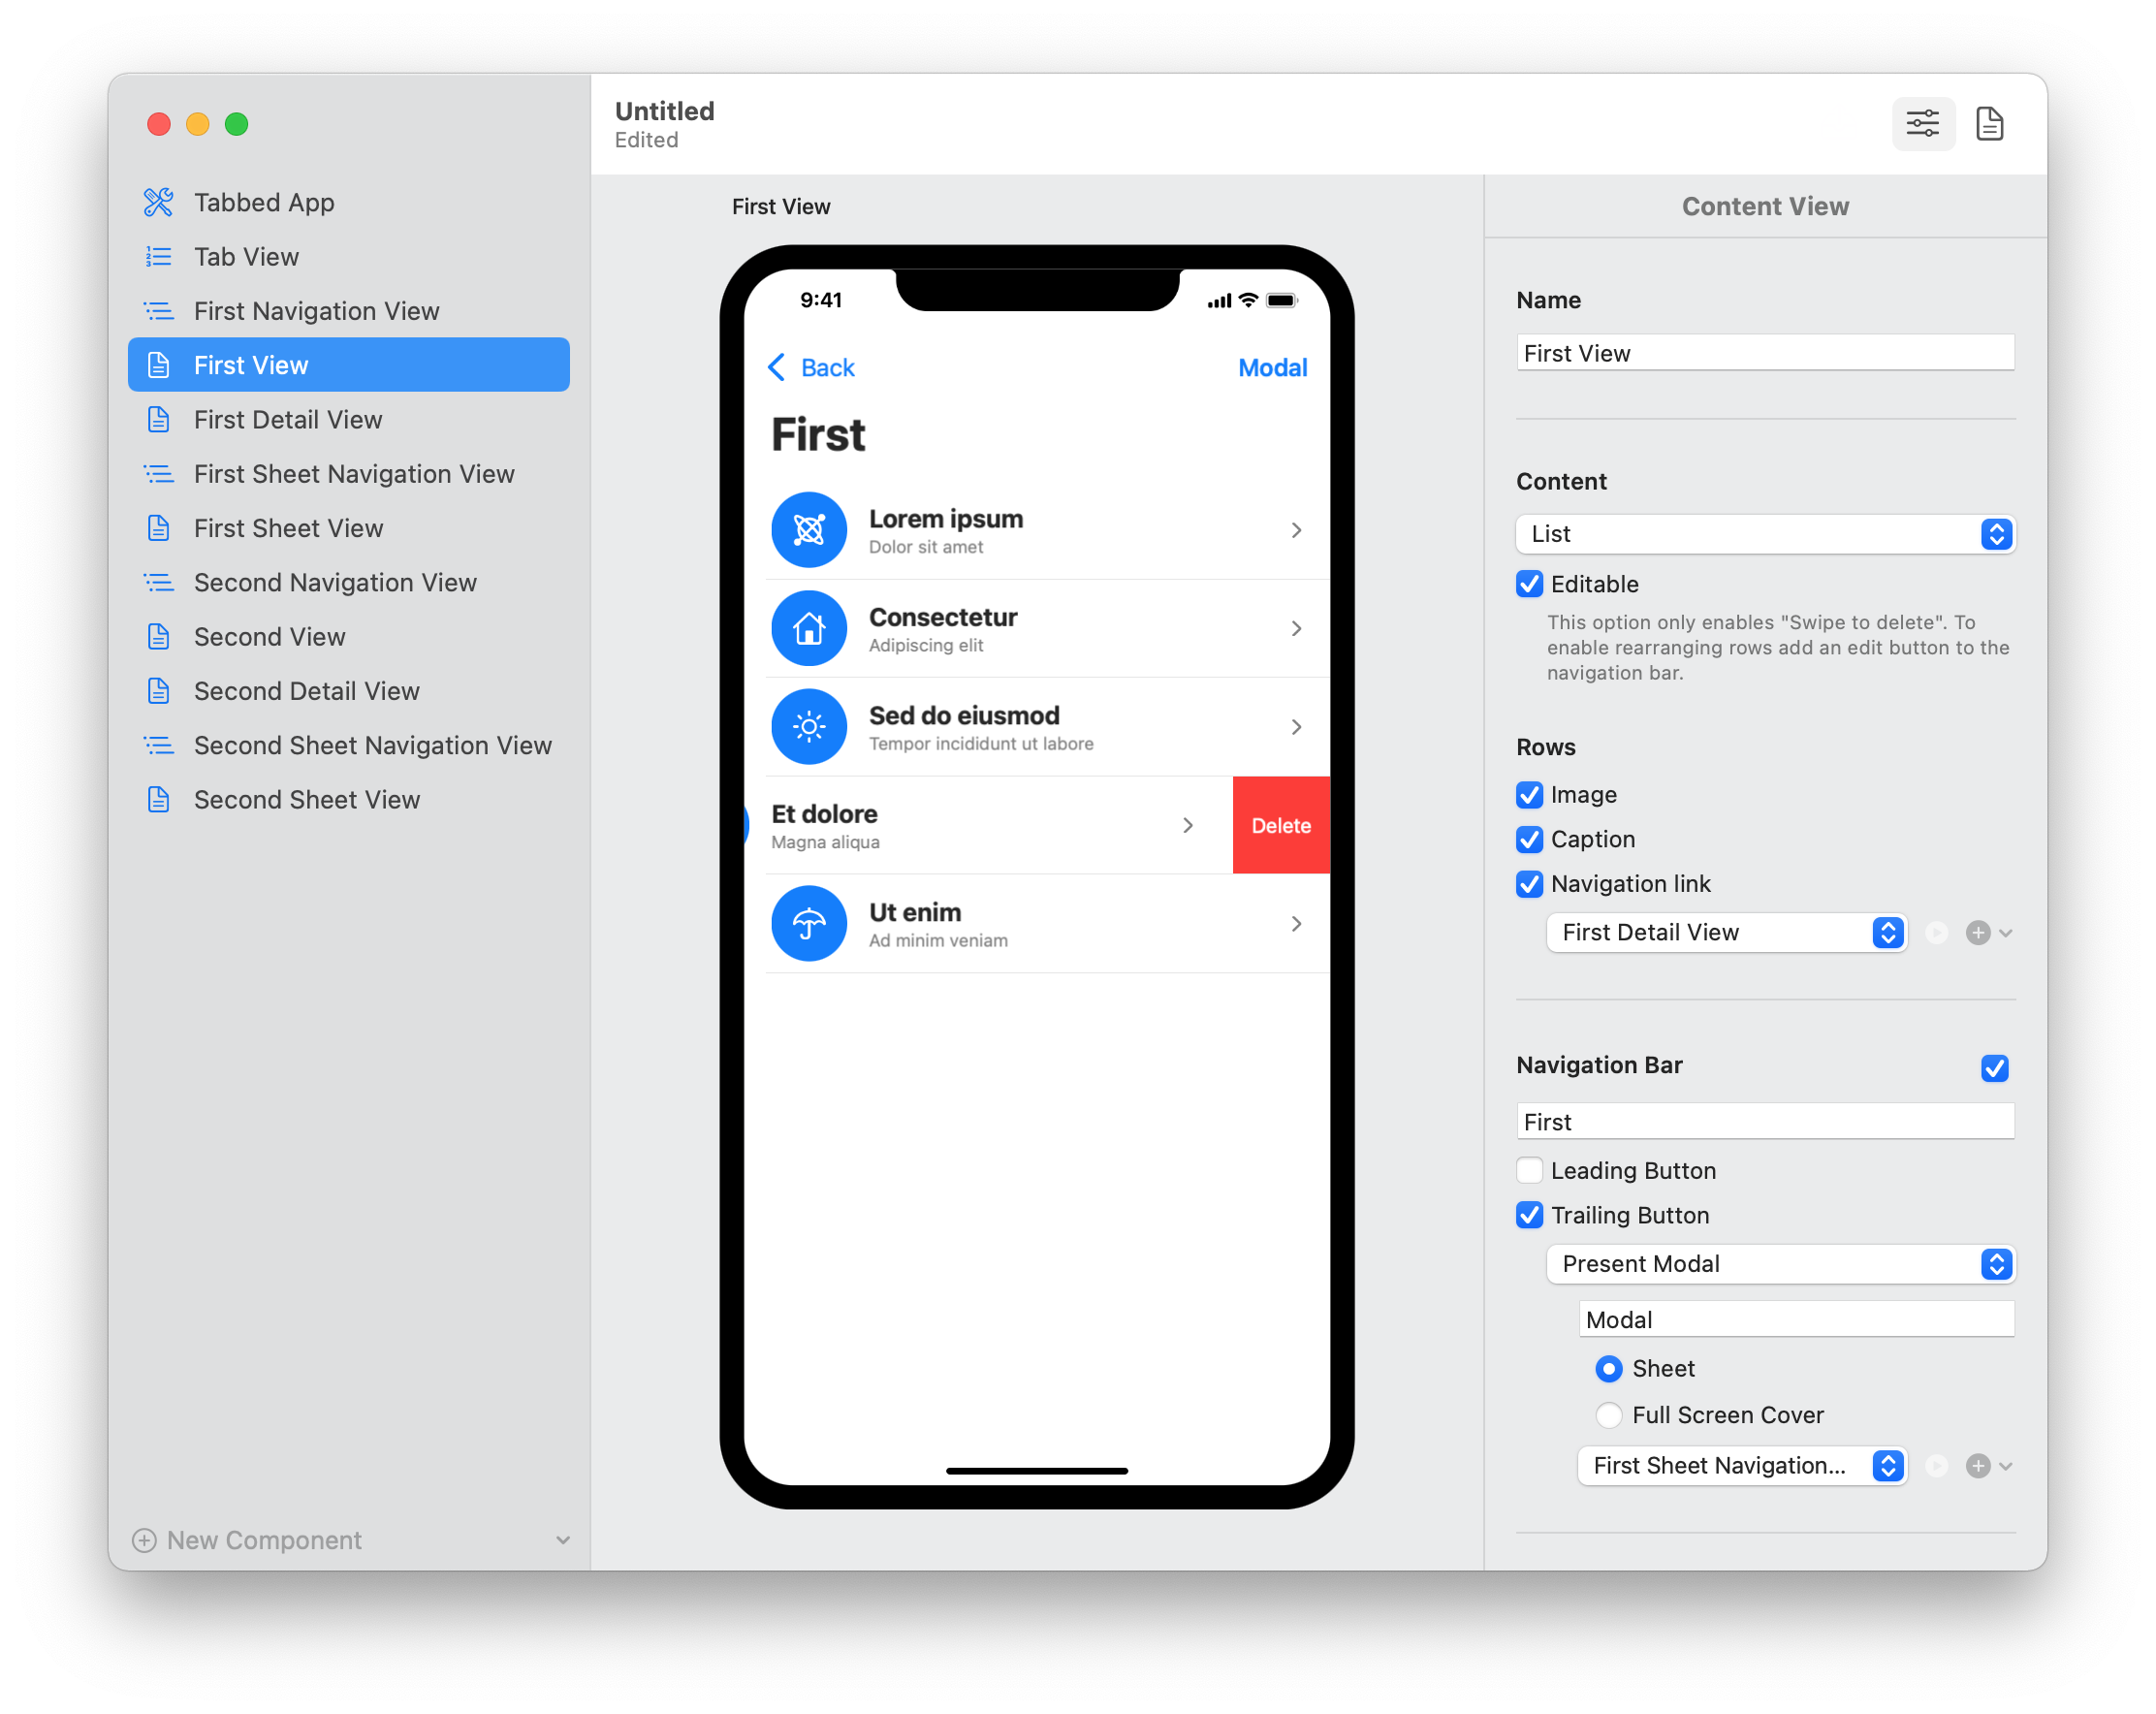
Still, I want to show you practical examples, so I will use parts of my Vulcan app. Since this is an advanced article, I won’t show the code in its entirety, and you’ll have to fill some gaps.
I have been asked on a few occasions if I plan to open-source Vulcan’s code. The answer is no because it’s a commercial project.
But I suspect that most people are just interested in seeing how I implement specific functionality rather than wanting the code to make a similar app.
This article will be an excellent way to show you what goes into a real app published in the app store.
Your minimum viable product does not require any advanced technique
Before we dive into technical details, here are some statistics that will give you an idea of the scope and the evolution of the app’s code.
Version 1.0 of the app was a Minimum Viable Product or MVP. I chose the smallest set of features possible to have an app that would be useful to any SwiftUI developer and thus worth paying for.
It’s important to restate that the MVP did not sport the techniques I will show you here. The purpose of an MVP is speed to test the idea with real users. The app’s UI was (and still is) limited and straightforward, especially compared to what I have in mind for the future.
| Version | Completed on | Swift LOC | SwiftUI LOC | Test LOC | Total LOC | Time (in hours) |
| 1.0 | 13 Nov 2020 | 1.420 | 1.867 | 317 | 3.604 | 75 |
| 1.1 | 7 Dec 2020 | 1.564 | 2.164 | 329 | 4.057 | 85 |
| 1.2 | 13 Dec 2020 | 1.655 | 2.197 | 329 | 4.181 | 89 |
| 1.3 | 21 Dec 2020 | 1.881 | 2.448 | 374 | 4.703 | 105 |
| 1.4 | 3 Jan 2021 | 2.035 | 2.543 | 440 | 5.018 | 112 |
| 1.5 | 14 Jan 2021 | 2.452 | 2.779 | 568 | 5.799 | 132 |
| 1.6 | 24 Jan 2021 | 2.620 | 2.913 | 584 | 6.117 | 139 |
| 1.7 | 2 Feb 2021 | 2.872 | 3.242 | 632 | 6.746 | 211 |
| 1.8 | 7 Feb 2021 | 2.920 | 3.324 | 632 | 6.876 | 216 |
| 1.9 | 25 Feb 2021 | 3.239 | 3.376 | 670 | 7.285 | 231 |
| 1.10 | 6 Mar 2021 | 3.346 | 3.456 | 702 | 7.504 | 240 |
| 1.11 | 15 Mar 2021 | 3.441 | 3.323 | 702 | 7.466 | 246 |
| 2.0 | 28 Apr 2021 | 4.443 | 3.649 | 1.134 | 9.226 | 288 |
| 2.1 | 5 Jul 2021 | 4.934 | 3.900 | 1.312 | 10.146 | 321 |
| 2.2 | 23 Jul 2021 | 5.103 | 4.055 | 1.329 | 10.487 | 327 |
| 2.3 | 1 Aug 2021 | 5.178 | 4.223 | 1.369 | 10.770 | 333 |
The total lines of code count for the MVP was a mere 3.604 and took me 75 development hours to complete.
Keep in mind that the release dates in the table do not paint an accurate picture. My full-time occupation is creating iOS development material. I develop this app only in my spare time.
At the time of writing, the last app release features a total of 10.770 lines of code and 333 hours of work, which does not include time spent on App Store submission, the app’s website, documentation, and some promotion.
My average speed is relatively stable at 2-3 hours per 100 lines of code, but take that number with a grain of salt.
Is that fast? I don’t know, but I suspect it to be. I have always been considered a fast developer by my previous employers and clients.
Also, I now have decades of experience as a software developer, 13 of which are on iOS. So, that contributes to the speed.
Not all time is spent on writing new code, though. I often refactor existing code, using increasingly complex techniques to make it as reusable as possible. So, those 100 lines of code actually do a lot more than usual.
Chapter 2:
Structuring a Complex Swift Project
The first place to look for a good codebase is the structure of your project. Without that, any advanced Swift technique will only make your code more entangled and harder to understand.
There are a few tried and true design patterns and techniques that, while seemingly straightforward, help you manage codebases of any size.
Complex apps do not require intricate architectural patterns
In an app of such size, architecture is critical. You can get away with some structural mishaps in small apps and MVPs, especially if you want to cut corners for speed (I didn’t do that, though).
But, when a project grows in size, if your architecture is not on point, you will incur more and more technical debt that can crush your project.
Some developers come up with fancy architectural patterns for complex apps. Those, in my opinion, abstract too much and violate some fundamental principles like the SOLID principles.
Here I must confess that I created one too. But, to my defense, I have to add that I just expanded on the MVC pattern keeping in mind design principles. Moreover, any of my additions are not mandated but merely optional.
So, some might be surprised to know that I structured the whole app following the simple MVC and MVVM patterns for SwiftUI I teach to beginners and advanced developers alike.
While the two linked articles above talk about iOS apps, these patterns work perfectly well for macOS apps as well. In fact, if you download my free guide on MVC and MVVM for SwiftUI, you can see the exact blueprint I use for all my apps, regardless of platform.
Breaking an app into Swift Packages to make code easier to change and test
The MVC/MVVM patterns are not the only thing I do to keep my project organized.
As code grows, it becomes harder and harder to compile, test, and modify. Any breaking change can generate hundreds of compile errors.
And when your code does not compile, you can’t run unit tests either.
So, how do you test new code before fixing all those errors?
Some refactoring strategies minimize these problems. These can be pretty complicated, and I talk about those only in my courses, but they are beside the point of this article anyway.
There is, though, a pretty straightforward solution: breaking your project into separate Swift Packages.
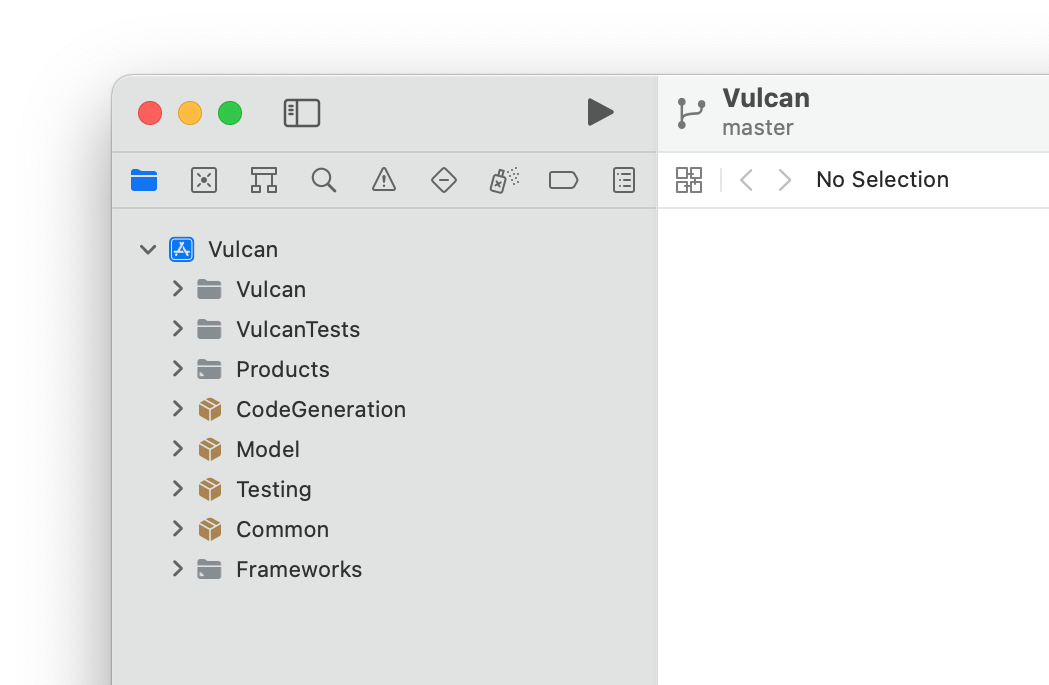
My project has four Swift Packages, but two have very little code. Most of the app’s code resides inside:
- The Model package, which contains all the model types, and the relative encoding, decoding, and versioning code.
- The CodeGeneration package, which contains all the functionality to generate the SwiftUI for each model type. This package depends only on the Model package.
- The main Xcode project, which contains all the SwiftUI views for the app, and types for settings and in-app purchases. The Xcode project depends on both the Model and the CodeGeneration packages.
Whenever I add a new feature, I start working on the Model package, adding new model types and changing existing ones. These are often breaking changes, so both the CodeGeneration and the whole Xcode project will not compile.
But thanks to this separation, I can just fix the errors in the Model package alone. Then, I add unit tests to check that the new code works.
After that, I can move up to the CodeGeneration package to fix any compile error, write new code, and add more tests. And then, I can fix the problems in the main Xcode project and add new features and tests to the app.
Using namespaces to keep type hierarchies clear and avoid name collisions
Another simple but useful technique to manage large projects with many types is to use namespaces.
For starters, Swift modules already provide a namespace for the contained types. So all the types in the Model package are inside the Model namespace, and the types in the main Xcode project are in the Vulcan namespace.
But I go much further than that, deeply nesting types.
Let’s take, as an example, the type for alerts:
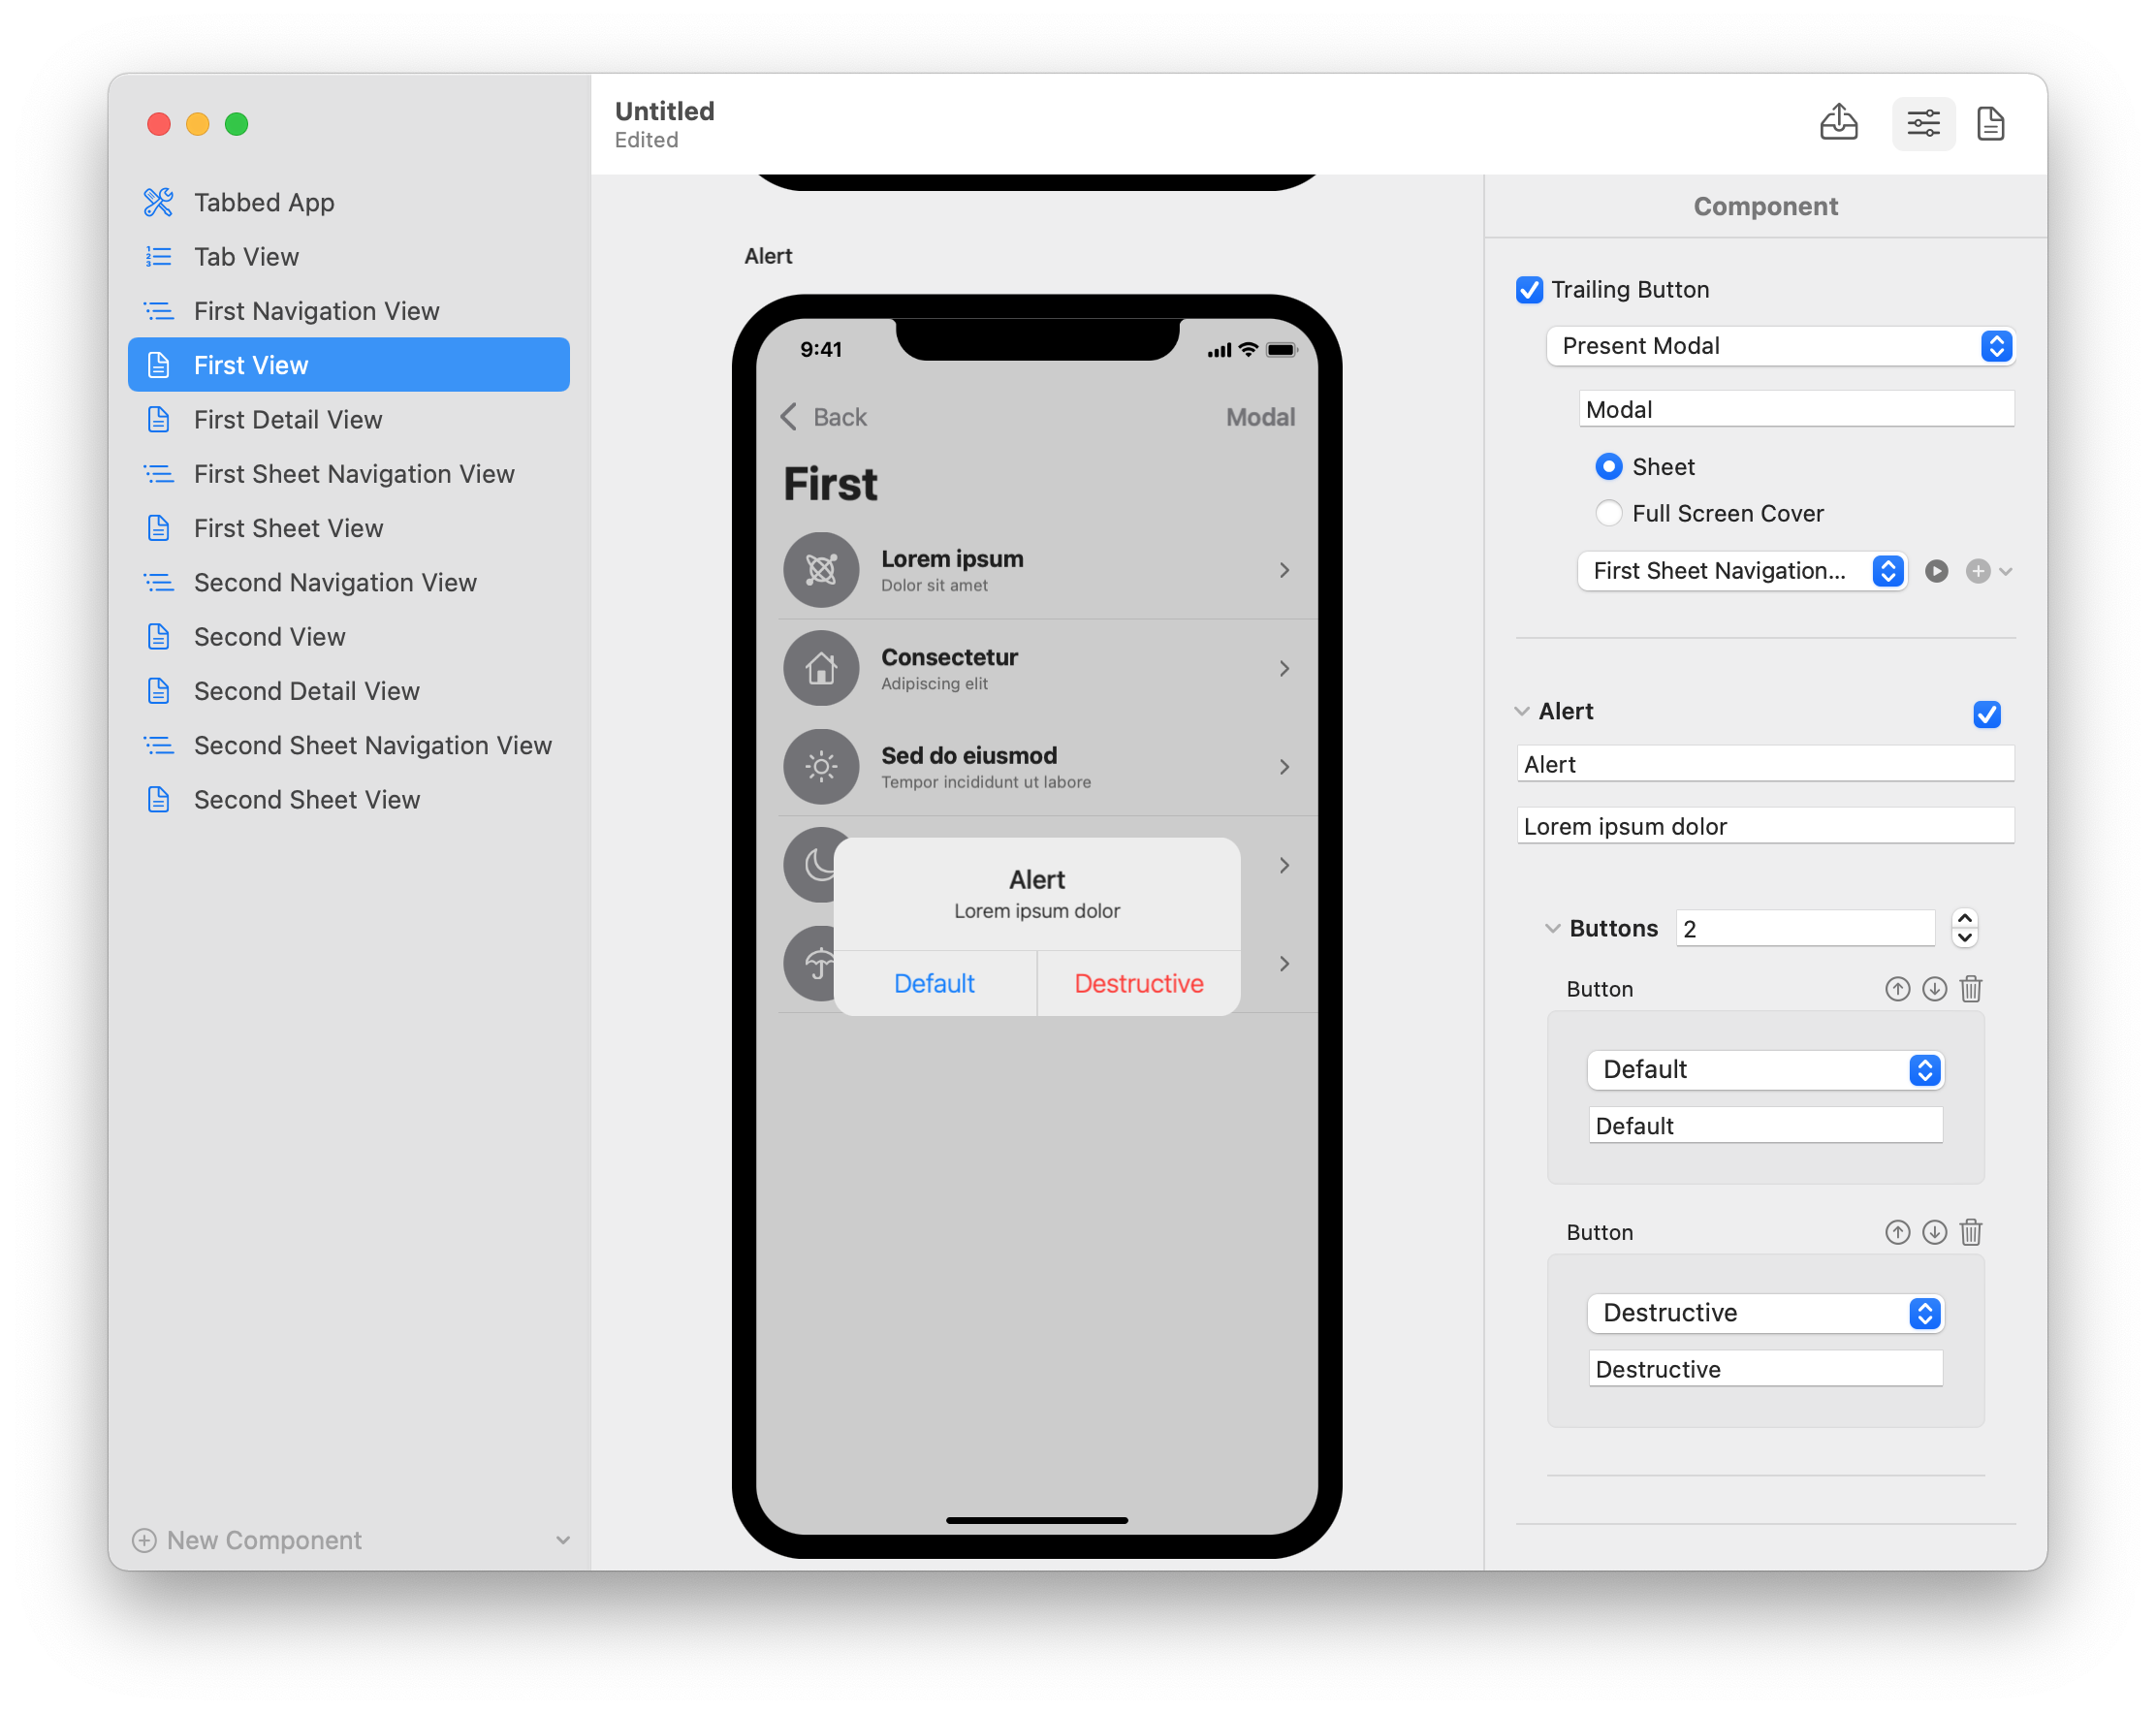
The Alert type is a simple Swift structure, but it is namespaced inside the ContentComponent type.
extension ContentComponent {
	struct Alert: Identifiable {
		private(set) public var id: ComponentID
		var title: String
		var message: String
		var buttons: [Button]
	}
}
Keep in mind that I will often show you only the stored properties of a model type in this article.
But, as I teach in pretty much every article and course, my model types also have code for the domain business logic, which I did not include in this article.
In Vulcan, components represent the structure of the app. So, the ContentComponent type represents a whole screen in an iOS app, to which the user can add content, navigation bars, alerts, and action sheets.
Notice that the buttons property is an array of Button in the code above. That is not SwiftUI’s button type. That’s another of my model types. Its fully namespaced name is ContentComponent.Alert.Button.
The namespaces organize types hierarchically, making it clear that the Alert type is meant to only be used only inside the ContentComponent type, and the Button type only inside the Alert type.
The second advantage is that it allows me to reuse both type names in other parts of the app.
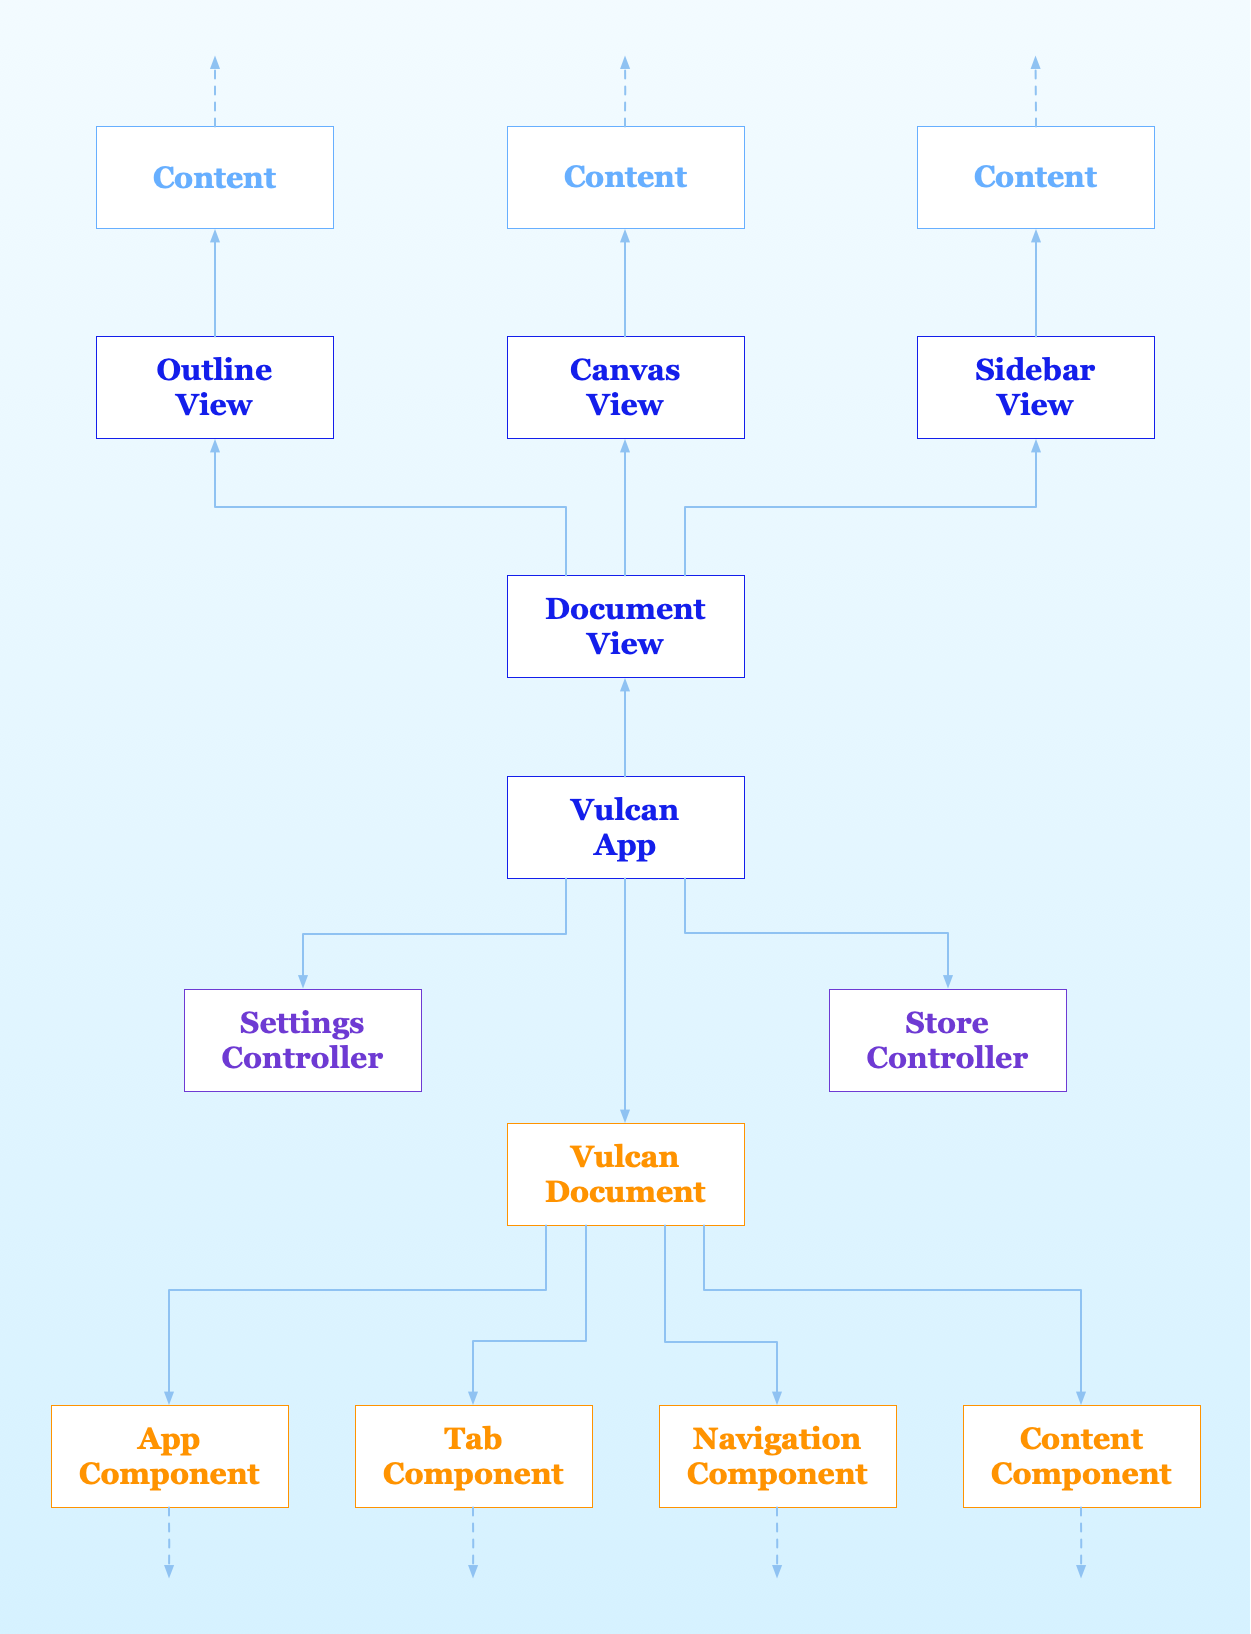
For example, each type has a visual representation in the canvas of the document window, which is called CanvasView.
There I can reuse the ContentComponent and Alert names for SwiftUI views without collisions.
extension CanvasView.ContentComponent {
	struct Alert: View {
		let alert: Model.ContentComponent.Alert

		var body: some View {
			// ...
		}
	}
}
This practice is not strictly necessary, and sometimes I do have to type the full name of a type to remove ambiguities. But the alternative I often see are types with long names that reflect my namespacing, so there is not much difference.
Chapter 3:
Model Versioning and Data Migration with Codable types
Persisting data is one of the first problems you have to solve in pretty much any app. As your app evolves past its first version, so does its data.
That presents you with a second problem: migrating old data into new formats. Users should never lose data even if they skip some versions of your app, which should be able to open the oldest of its documents.
Picking the proper document format for your app
Vulcan is a document-based app.
There are many ways to save a document into a file, but on iOS and macOS, Core Data and the Codable protocols are the two main ones. Both have their advantages and disadvantages.
I save documents as JSON files using the Codable protocols for several reasons.
A straightforward one is that I can quickly inspect the content of a document using a text editor. I can also quickly write unit tests to see if the encoding process does not create corrupted documents, which results in the loss of data for the user.
One of Core Data’s advantages is that it provides support for model versioning and data migration.
With Core Data, you can keep many consecutive versions of your data model file in your Xcode project. Core Data uses these for its lightweight (automatic) migration. When that’s not enough, Core Data also provides some classes for heavyweight (manual) migration.
With the Codable protocols, you are on your own.
Automatic data migration with standard decoding techniques
In rare cases, data migration when using the Codable protocols for documents can be automatic.
For example, if you remove a stored property from a type, a decoder will simply ignore the corresponding field in a JSON encoding.
You can also get away pretty easily when adding new stored properties by providing default values.
For example, this is an early version of my Text type.
extension ContentComponent {
	struct Text: Identifiable, Codable {
		private(set) public var id: ComponentID
		var content: String
		var font: Font
	}
}

extension ContentComponent.Text {
	enum Font: String, Codable {
		case largeTitle
		case title
		case title2
		case title3
		case headline
		case body
		case callout
		case subheadline
		case footnote
		case caption
		case caption2
	}
}
Adding stored properties for bold and italic text requires only an explicit implementation of the init(from:) initializer for the Decodable protocol. There, I can provide default values for the two properties when none is present in the JSON encoding.
extension ContentComponent {
	struct Text: Identifiable {
		private(set) public var id: ComponentID
		var content: String
		var font: Font
		var isBold: Bool
		var isItalic: Bool
	}
}

extension ContentComponent.Text: Codable {
	public init(from decoder: Decoder) throws {
		let container = try decoder.container(keyedBy: CodingKeys.self)
		id = try container.decode(ComponentID.self, forKey: .id)
		content = try container.decode(String.self, forKey: .content)
		font = try container.decode(Font.self, forKey: .font)
		isBold = try container.decodeIfPresent(Bool.self, forKey: .isBold) ?? false
		isItalic = try container.decodeIfPresent(Bool.self, forKey: .isItalic) ?? false
	}
}
But that’s as far as you can get using standard techniques. When you make changes to a type that requires transforming old data into a new format, you have to do the migration manually.
Evolving model types quickly become incompatible with old encodings
If you are to add new features to any app, and you definitely have to, your model types will evolve with time.
Here’s an example. In Vulcan’s code, the Body structure defines the content of a single screen of an iOS app.
In the first several Vulcan versions, especially in the MVP, the user could only pick a single type of content for each app screen. The choices were a single text view, a list, a carousel, or a grid.
Since it was an either/or choice, I used a simple Swift enum with associated values.
extension ContentComponent {
	public enum Body: Codable {
		case architecture(root: ComponentID?)
		case list(List)
		case carousel(Carousel)
		case grid(Grid)
		case text
	}
}
(Side note: the architecture case is for views that contain an architectural view, namely a NavigationView or a TabView.)
In version 2.0 of the app, I added the possibility to create screens with mixed content. Users could finally combine text, grids, and carousels. That also paved the way for other content types, like buttons and progress views, which I added in further updates.
The user still has an either/or choice for architecture and list content, but a single mixed case replaces the other enum cases.
extension ContentComponent {
	public enum Body: Codable {
		case architecture(root: ComponentID?)
		case list(List)
		case mixed(Mixed)
	}
}
The new Mixed type contains the Carousel, Grid and Text types that previously had their own case, plus some new ones.
The new enum is still pretty straightforward, but it’s incompatible with the encoding of the old one.
For starters, since it has different cases, the new coding keys are incompatible with the previous ones.
Moreover, the old text, grid, or carousel cases must be transformed into the new mixed case. There is no way for the compiler to know that. We have to make the migration manually.
This is not only limited to enumerations. Changing the type of stored properties in a Swift structure causes the same problem.
Manually migrating data by chaining multiple versions of a Codable type
If you try hard enough, you can write a single init(from:) initializer to decode both the old and new encodings.
But that’s not a great solution.
As your data evolve, you will have to manage more and more document versions. Your decoding code will become an unmaintainable nightmare. You are guaranteed to make a mistake at some point and lose your user’s data.
The solution is similar to what Core Data does.
We have to keep all the versions of a type in our code, each decoding its corresponding data.
On top of that, any type will also be able to convert the previous version into itself. In this way, we create a chain of versions that can be progressively transformed into each other.
Let’s see that in practice.
First of all, we need a way to compare the version of documents.
struct Version: Codable {
	let major: Int
	var minor: Int
	var patch: Int
}

extension Version: Comparable {
	public static func < (lhs: Version, rhs: Version) -> Bool {
		lhs.major < rhs.major
			|| (lhs.major == rhs.major
					&& lhs.minor < lhs.minor)
			|| (lhs.major == rhs.major
					&& lhs.minor == lhs.minor
					&& rhs.patch < lhs.patch)
	}
}
Keep in mind that document versions evolve separately from app versions. A new app release might use the same introduce document format as the previous one.
Then, we make our requirements explicit using a protocol.
protocol Versionable: Codable {
	associatedtype PreviousVersion: Decodable
	static var introducedInVersion: Version { get }
	init(current: Decoder) throws
	init(previous: PreviousVersion)
}

extension Versionable {
	init(from decoder: Decoder) throws {
		guard let documentVersion = decoder.userInfo[.documentVersion] as? Version,
			  documentVersion.major < Self.introducedInVersion.major else {
			try self.init(current: decoder)
			return
		}
		let previous = try PreviousVersion(from: decoder)
		self.init(previous: previous)
	}
}
The Versionable extension implements the init(from decoder:) initializer of Decodable, which:
- Reads the document version from the decoder;
- Decode the data directly if possible,
- Delegate the decoding to the previous version of the type otherwise and uses it to initialize itself.
For this to work, you need to read the version of your document when you open it and add it to the userInfo dictionary of the JSONDecoder instance you use to decode the document.
We can now connect the two versions of the Body enumeration.
extension ContentComponent {
	public enum Body {
		case architecture(root: ComponentID?)
		case list(List)
		case mixed(Mixed)
	}
}

extension ContentComponent.Body: Versionable {
	static let introducedInVersion = Version(major: 2)

	enum CodingKeys: CodingKey {
		case architecture, list, mixed
	}

	init(current: Decoder) throws {
		// ...
	}

	init(previous: V1) {
		switch previous {
			case let .architecture(root): self = .architecture(root: root)
			case let .list(list): self = .list(list)
			case let .carousel(carousel): self = .mixed(.init(content: [.init(carousel)]))
			case let .grid(grid): self = .mixed(.init(mode: .scrolling, content: [.init(grid)]))
			case .text: self = .mixed(.init())
		}
	}

extension ContentComponent.Body {
	enum V1: Codable {
		case architecture(root: ComponentID?)
		case list(ContentComponent.List)
		case carousel(ContentComponent.Carousel)
		case grid(ContentComponent.Grid)
		case text
	}
}
I omitted the code for the init(current:) initializer because that’s tedious boilerplate. The compiler usually synthesizes that, but this approach requires you to write it explicitly. You can find the details in this Swift evolution proposal.
Notice that the init(previous:) initializer is the one that does the work of migrating the old data into the new type. It preserves the architecture and carousel cases and puts the old carousel, grid, and text data into the enum’s new mixed case.
Chapter 4:
Domain-Specific Languages and Custom Operators
Any domain has its specific jargon and symbols so that experts can define problems and solutions using a concise notation.
Any app has a domain as well. As you develop its code, common patterns will emerge. Defining custom operators will help you avoid repetition, making your Domain Specific Language more expressive.
Do not over-engineer your code when a simpler solution will do the job
Let’s now have a look at how I generate the exportable SwiftUI code from my model types.
One of the reasons why I think people are interested in seeing the code of my app is because they wonder how I generate code.
While you can use a library to generate Swift code like Sourcery or SwiftSyntax, those are overkill for my app.
One crucial skill developers need to learn is not to make things more complex than they need to be.
In the case of generating SwiftUI code, a lot of it is boilerplate that does not change. Then, there is no point in having a system that can generate code when you can just use a template instead.
Let’s take, for example, the starting point of any SwiftUI app.
@main
struct SampleApp: App {
	var body: some Scene {
		WindowGroup {
			Text("Hello, World!")
		}
	}
}
Most of this code is always the same. The only parts that change are the name of the type and the WindowGroup content.
So, all we need is a template with a couple of placeholders.
@main
struct #typename#: App {
	var body: some Scene {
		WindowGroup {
#content#
		}
	}
}
The #content# placeholder is not indented because that creates problems when indenting more than one line of code. So, I indent a whole code block before replacing the placeholder, getting consistent indentation.
Advanced programming paradigms to manipulate complex data structures
Since code generation is done using templates, we need, for starters, a couple of utility functions to open a template file and indent code.
extension Bundle {
	func loadTemplate(named name: String, withExtension extension: String) -> String {
		let url = self.url(forResource: name, withExtension: `extension`)!
		let template = (try? String(contentsOf: url)) ?? ""
		return template.removingLast()
	}
}

func template(_ named: String) -> String {
	Bundle.main.loadTemplate(named: named, withExtension: "tmpl")
}

extension String {
	func indented(by count: Int) -> String {
		guard count > 0 else { return self }
		let indents = (0..<count)
			.reduce("", { indents, _ in indents + "\t" })
		return self.components(separatedBy: .newlines)
			.map { indents + $0 }
			.joined(separator: "\n")
	}
}
With these, generating the code for an AppComponent is somewhat straightforward.
struct AppComponent: Component {
	private(set) var id = ComponentID()
	var name: String = "App"
	var root: ComponentID?
}

// MARK: Symbolizable
extension AppComponent: Symbolizable {
	func symbolicate(with table: SymbolTable) -> SymbolTable {
		let table = symbolicateContent(with: table)
		let typename = table.newSymbolName(for: self)
		let content = codeForContent(with: table)
		let code = template("App")
			.replacingOccurrences(of: "#typename#", with: typename)
			.replacingOccurrences(of: "#content#", with: content.indented(by: 3))
		return table.adding(SymbolTable.Symbol(name: typename, code: code), with: id)
	}
}
I say somewhat because, while the three lines of code that open the template and replace the placeholders are easy to understand, the code generation process for a whole document is far more complex.
Here is a summary to give you an idea.
A Vulcan document is made of several components linked to each other. To generate the code of a component, I then first need to generate the code for any linked component.
Moreover, I need to generate unique names for types and stored properties to avoid name collisions.
Going into the details is out of the scope of this article. Luckily, I already wrote two other articles that explain the principles in detail:
- Protocol-Oriented Programming: every Vulcan model type that can emit SwiftUI code must conform to the
Symbolizableprotocol. This protocol requires conforming types to implement asymbolicate(with:)method that generates the code for the type. This method returns aSymbolTablecontaining an array ofSymbolvalues with all the code generated until that point. TheSymbolizableprotocol also provides standard functionality needed by every conforming type through protocol extensions, e.g., thesymbolicateContent(with:)andcodeForContent(with:)methods you see in the code above. - Functional Programming: more specifically, recursion. Each symbolizable type delegates code generation to its children. Then it uses the results in the returned
SymbolTableto generate its code. Finally, it adds the result to the symbol table and returns it to its caller ancestor. Moreover, some of the code in the varioussymbolicate(with:)methods and theindented(by:)method in theStringextension follows a functional programming style.
You can read about those concepts in detail in the two linked articles. What is important here is that the code generation follows these simple steps:
- Get the code for any child through a recursive call to the
symbolicate(with:)method; - Generate a new unique name for the type if needed;
- Open the file with the template code;
- Replace its placeholders.
Spotting the signs of an embedded Domain Specific Language in your code repetition
Even just looking at the symbolicate(with:) implementation I showed above, it soon becomes clear that a large part of the app’s code will be made of string manipulations.
Specifically, such code will be full of calls to the replacingOccurrences(of:with:options:range:) and indented(by:) methods.
When you spot such repetitions in your code, it usually means you are developing a Domain-specific language or DSL.
A DSL is more abstract than the basic building blocks that compose it, thus enabling you to express ideas more concisely. Embedding such DSL into your code will make the language more expressive, resulting in more readable and faster to write code.
In our case, our DSL has two higher-level actions that are more specific to our domain than generic string manipulation.
- “Indent code by N tabs,” instead of the more generic to “add N tab characters after each newline character in a string”;
- “Replace a placeholder in a template,” instead of the more generic “replace the occurrences of string X inside another string.”
Making your Domain Specific Language more concise using custom Swift operators
The first obvious way to implement these two abstractions for our DSL is through simple methods. The indented(by:) method I added to the String already expresses the higher-level idea of indentation.
Similarly, we could also replace the replacingOccurrences(of:with:options:range:) method with one more specific to replacing placeholders in a template.
We would gain clarity, but not conciseness.
Verbosity is not only acceptable but even required for any function you use sparsely in your code. You need to follow Swift’s specific guidelines to keep your code readable and idiomatic.
But when something repeats often, it is helpful to develop specific symbols for your DSL, i.e., operators, to increase conciseness and readability.
After all, you never write 5.advanced(by: 7) in place of 5 + 7.
The + operator also works on other types. "Hello, " + "World!" is better than "Hello, ".appending("World!").
When concatenating arrays, [1, 2, 3] + [4, 5] does not even have an equivalent method call. You need to use variables and a couple of lines of code to replicate that simple expression.
After repeating the two actions above, again and again, I decided to create two custom operators to make my code more compact.
infix operator >>
infix operator -+ : ReplacementPrecedence

extension String {
	static func >> (string: String, indents: Int) -> String {
		string.indented(by: indents)
	}

	static func -+ (code: String, substitution: (String, String)) -> String {
		let (placeholder, replacement) = substitution
		return code.replacingOccurrences(of: placeholder, with: replacement)
	}
}
Oddly enough, you won’t find a list of precedence groups in the official Swift documentation. You can find some on Apple’s website, but you will not find the ReplacementPrecedence group I used.
I recall getting that group also from Apple’s documentation. I have a clear memory of a page with a list of all precedence groups, but I can’t find it anymore.
Thanks to these two custom operators, the code for the symbolicate(with:) method above becomes more concise.
extension AppComponent: Symbolizable {
	func symbolicate(with table: SymbolTable) -> SymbolTable {
		let table = symbolicateContent(with: table)
		let typename = table.newSymbolName(for: self)
		let content = codeForContent(with: table)
		let code = template("App")
			-+ ("#typename#", typename)
			-+ ("#content#", content >> 3)
		return table.adding(.init(name: typename, code: code), with: id)
	}
}
I also have other custom operators. For example, I have one to add newline characters at the end of a line of code and one to delete a placeholder from a template when it’s not needed. I won’t show their definition here because it looks exactly like the two I already showed you.
Chapter 5:
Declarative DSLs and Result Builders
Domain-Specific Languages often arrange concepts in hierarchies. Unfortunately, imperative languages like Swift are ill-equipped to handle such hierarchies, often producing code that flips a domain upside down.
Result Builders in Swift allow you to define declarative Domain-Specific Languages with code that matches the natural hierarchies of your domain.
Imperative DSLs and custom operators reverse the natural hierarchy of the domain
Some developers argue that custom operators make code less readable, not more. And sometimes, they are right.
Someone new to my codebase would not have any way to understand that my -+ custom operator means placeholder replacement in a template. A well-named method instead is always evident.
On the other hand, such a developer can look at the operator declaration and learn its meaning. When you started learning Swift, you didn’t know what a for loop was until you did.
So I don’t think custom operators are counterproductive. But they do have one drawback.
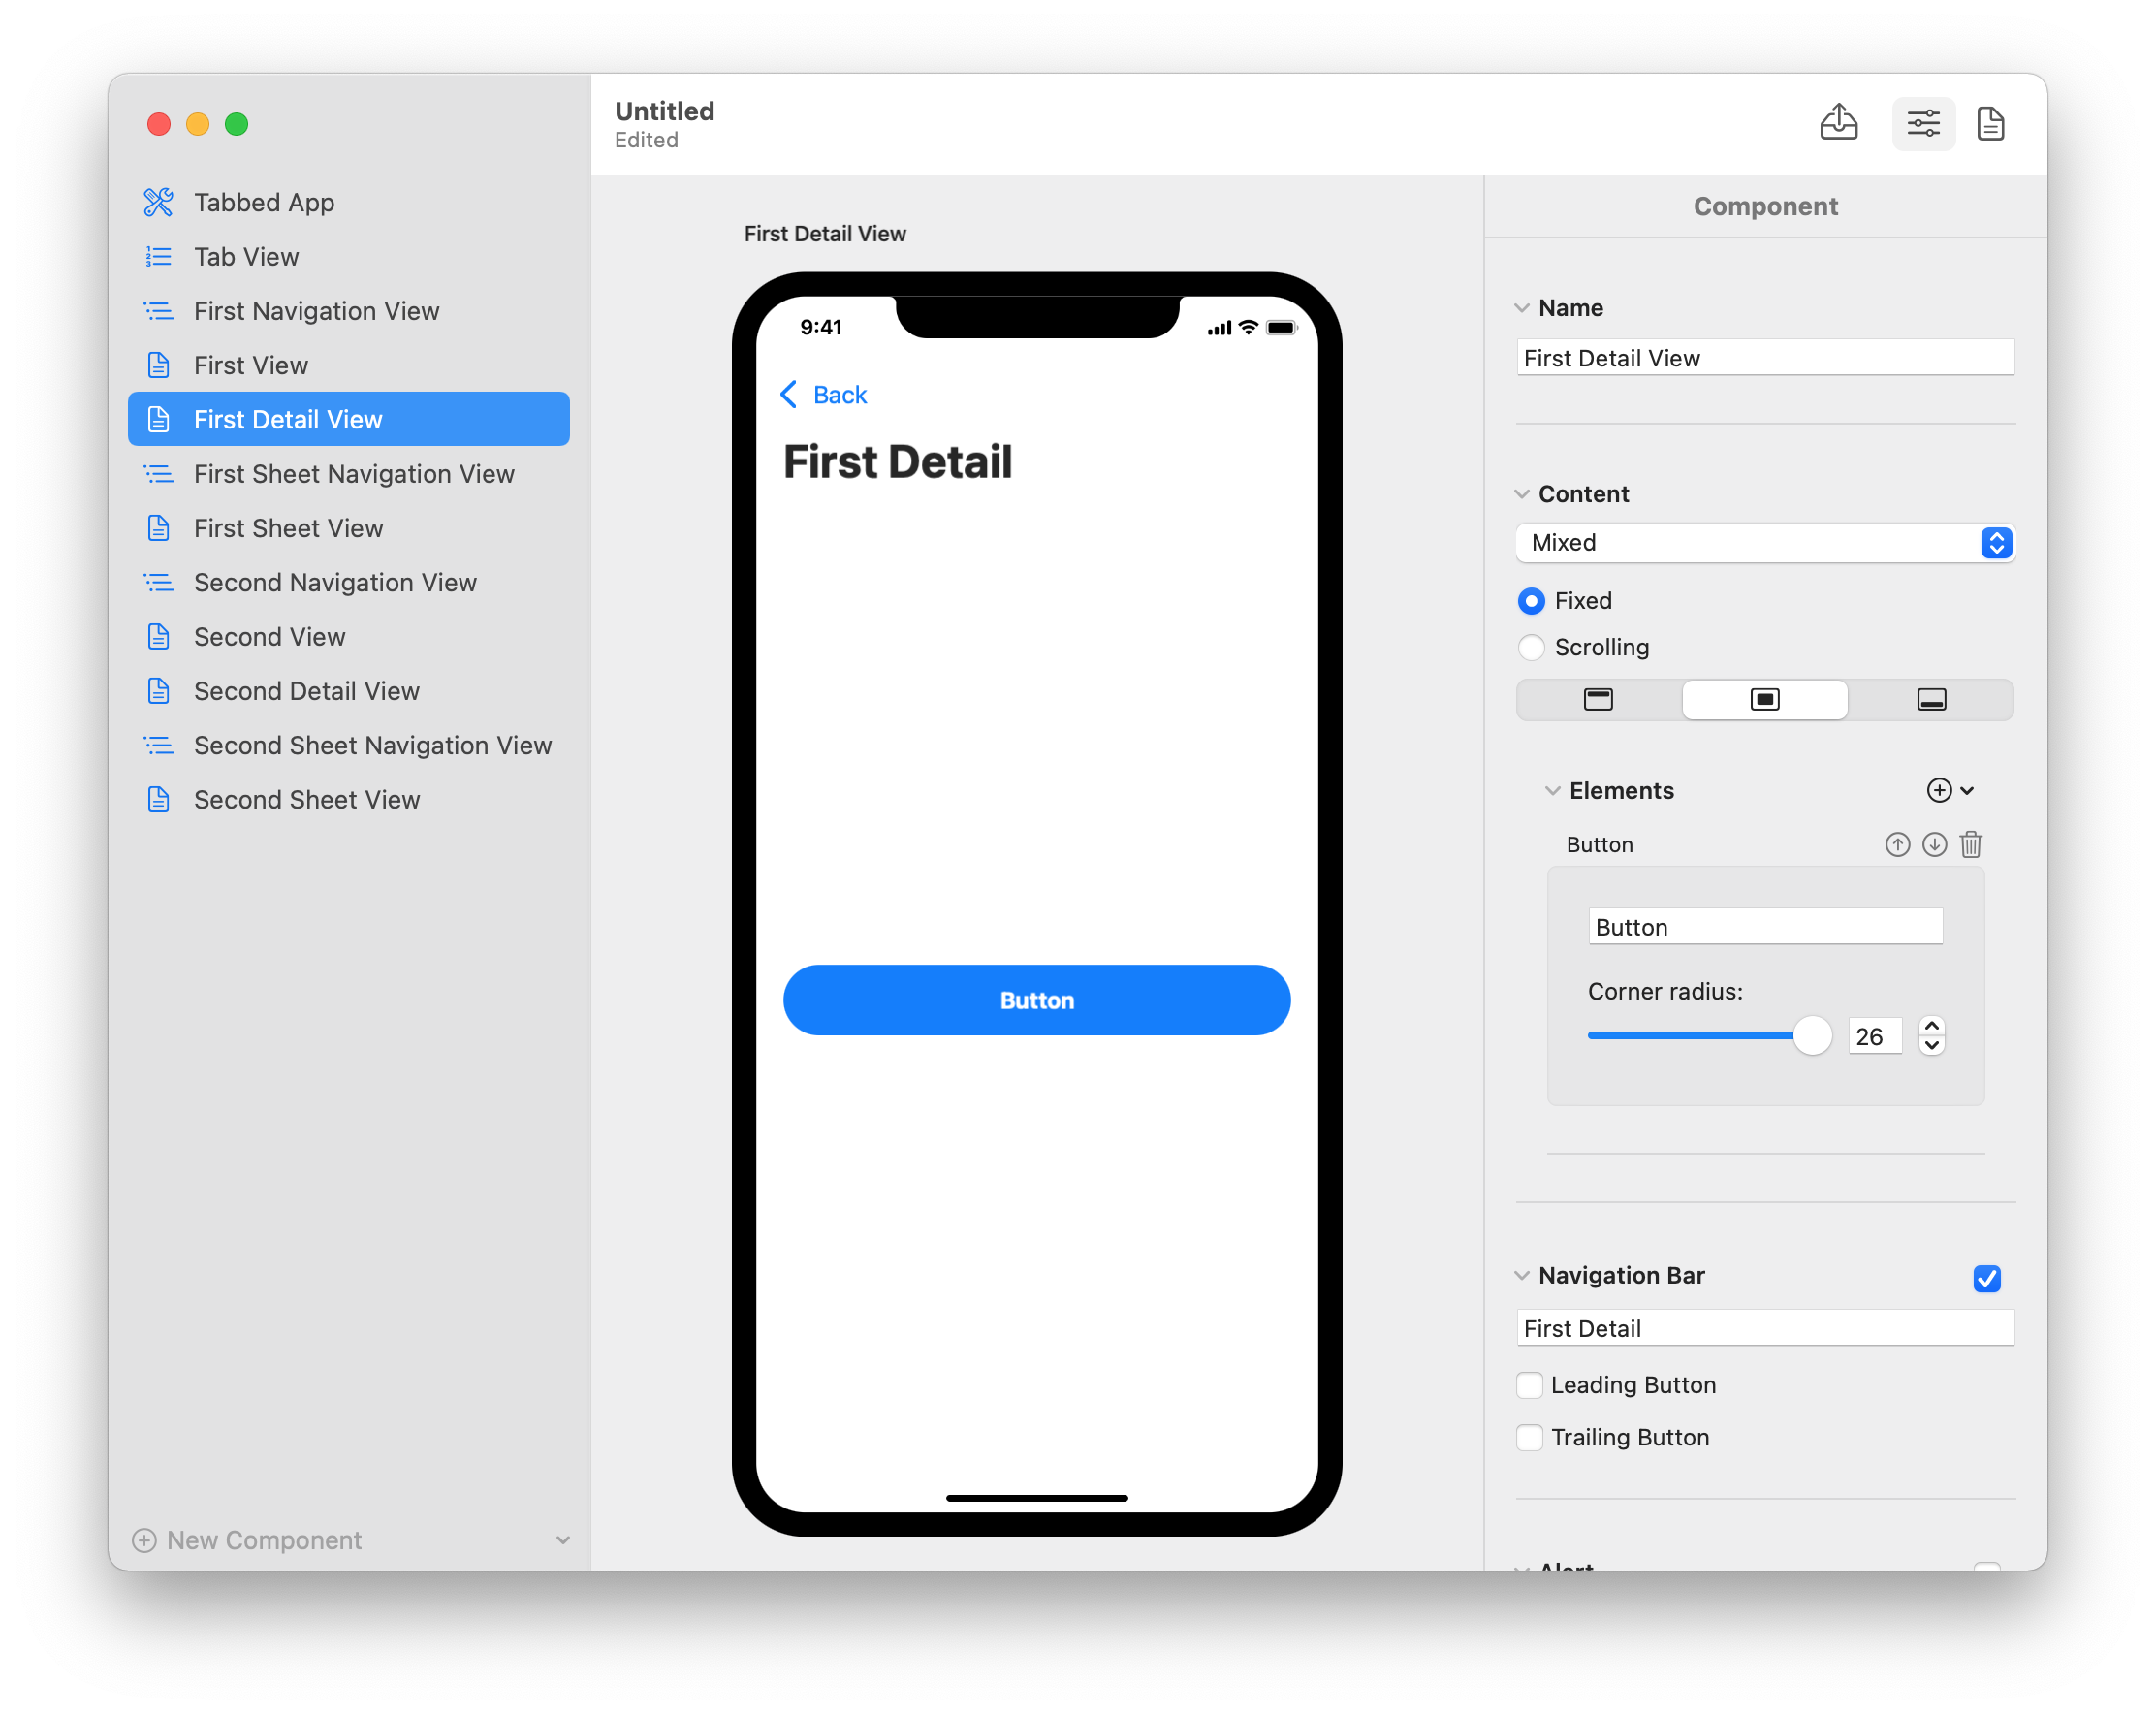
In version 2.2 of Vulcan, I added rounded buttons to content components.
This is the implementation of the symbolicate(with:) method for my ContentComponent.Button type.
extension ContentComponent {
	struct Button: Identifiable, Codable, ContentElement {
		private(set) public var id: ComponentID
		var text: String
		var cornerRadius: Int
	}
}

extension ContentComponent.Button: Symbolizable {
	func symbolicate(with table: SymbolTable, parentName: SymbolTable.Name) -> SymbolTable {
		let name = table.newSymbolName(withBase: parentName.adding("RoundedButton"))
		let button = template("RoundedButton")
			-+ ("#name#", name.local)
			-+ ("#text#", text)
			-+ ("#cornerRadius#", "\(cornerRadius)")
		let extensionCode = template("Extension")
			-+ ("#type#", parentName.full)
			-+ ("#code#", button >> 1)
		return table.adding(
			SymbolTable.Symbol(
				name: parentName.adding("RoundedButton"),
				contentCode: "RoundedButton()",
				extensionsCode: [extensionCode]),
			with: id)
	}
}
This code is not much different than what we already saw. It opens the template file for rounded buttons and replaces a few placeholders. Then, it opens the template file for Swift extensions and puts the button’s code inside of it.
This is the result:
extension ContentView {
	struct RoundedButton: View {
		var body: some View {
			Button(action: {}, label: {
				Text("Button")
					.bold()
					.padding(.vertical, 16.0)
					.frame(maxWidth: .infinity)
					.background(Color.accentColor)
					.foregroundColor(.white)
					.cornerRadius(26.0)
					.padding(.horizontal, 20.0)
			})
		}
	}
}
Notice how the result is the logical opposite of the code that generates it.
In the generated SwiftUI code, the RoundedButton struct is inside the ContentView extension. Hierarchically, the extension is an ancestor of the type.
But the symbolicate(with:) approaches this upside down. It first creates the code for the type and then puts it inside the extension.
This method is still pretty short, so such inversion is not much of a problem.
But I have several other types where code generation is made of many steps, making code hard to read. I often have to jump to the bottom of a method and work backward to build a mental model.
Creating declarative Domain-Specific Languages with Result Builders
The developers working on Swift introduced result builders to fix such inverted hierarchies. You can read in the proposal that the motivation is to create declarative Domain-Specific Languages that match a domain’s hierarchy.
Result builders allow you to compose types hierarchically, listing the children of a node inside a trailing closure. The compiler then takes the content of the closure and transforms it into an array for you.
The structure of your code reflects the structure of your data. This is what makes the resulting DSL declarative. Moreover, your code looks like the common Swift constructs to which you are used, like if statements and for loops.
The code above, which uses my custom operators, is instead imperative. It handles data in the opposite direction of its natural hierarchy.
In fact, SwiftUI is a declarative DSL created using result builders.
For example, if you look at the documentation of the initializer of the VStack type, you will see that its content parameter is “A view builder that creates the content of this stack.”
View builders are result builders for SwiftUI views.
VStack {
	Text("Lorem")
	Text("ipsum")
	Text("dolor")
}
In the code above, the view builder closure creates an array of three Text views and passes it to the VStack type.
But you don’t see that array. Instead, you simply list the content of a VStack one view at a time, with no square brackets or commas.
And result builders also accept optionals, if statements, and for loops.
Defining the building blocks of a declarative Domain-Specific Language
To create a DSL in your app using result builders, you must first decide what its building blocks are.
In SwiftUI, views are the primary building block, so they often use the ViewBuilder type. But SwiftUI also has other result builders, namely, SceneBuilder, CommandsBuilder, TableRowBuilder, and TableColumnBuilder.
We already saw that the main building blocks of my code generation DSL are templates and replacements. In reality, code generation is more complex than that, so the two actual building blocks are:
- Emitters, which emit code that could contain placeholders. The
Templatetype is just one type of emitter. Other examples are theEmitterGroup, which strings together the code of the contained emitters, and theExtensionEmitter, which puts the code of an emitter inside a Swift extension. - Substitutes, which replace placeholders in the code generated by emitters. The
Replacementtype is just one substitute of the many I have. Other examples are theDeletiontype, which deletes a placeholder, or theConditionalReplacementtype, which replaces a placeholder only if a condition is true, deleting it otherwise.
You might have noticed that some parts of my DSL are built upon basic blocks.
- The
ExtensionEmitteris just aTemplatethat opens the file with the Swift extension code template. - The
ConditionalReplacementcombines theReplacementandDeletiontypes to a boolean condition.
Building more blocks upon the existing ones makes the DSL more expressive and removes repetition. I create such blocks whenever I repeat some code, as I would do using standard methods.
Creating a declarative DSL with Result Builders
After defining the building blocks of your DSL, you need concrete types for Swift’s result builders.
If your DSL is simple, these types can be simple structures. More often than not, though, the types you use for result builders are protocols.
And indeed, in SwiftUI, the View type is a protocol, allowing you to assemble all kinds of views in disparate layouts. My Emitter and Substitute types are protocols as well.
protocol Emitter {
	func emit() -> String?
}

protocol Substitute {
	var placeholders: [String] { get }
	func replacement(for placeholder: String) -> String
}
Emitters emit code as a String. Substitutes get a list of placeholders and generate a substitution for each one.
Once you have the types for your building blocks, the easiest way to create result builders is to copy and paste the template code you find in the Swift evolution proposal and fill in the blanks.
If you look at the HTMLBuilder example down that page, you will see that it matches my implementation.
@resultBuilder
struct EmitterBuilder {
	typealias Expression = Emitter
	typealias Component = [Emitter]

	static func buildExpression(_ expression: Expression) -> Component { [expression] }
	static func buildBlock(_ children: Component...) -> Component { children.flatMap { $0 } }
	static func buildBlock(_ component: Component) -> Component { component }
	static func buildOptional(_ children: Component?) -> Component { children ?? [] }
	static func buildEither(first child: Component) -> Component { child }
	static func buildEither(second child: Component) -> Component { child }
	static func buildArray(_ components: [Component]) -> Component { components.flatMap { $0 } }
}
I also have a SubstituteBuilder type for substitutes. I omitted it because it looks the same.
With these, we can now define the concrete building blocks of our DSL. Here is, as an example, my Template type.
struct Template: Emitter {
	let name: String
	let substitues: [Substitute]
	var bundle = Bundle.module

	init(_ name: String, @SubstituteBuilder substitutes: (() -> [Substitute]) = { [] }) {
		self.name = name
		self.substitues = substitutes()
	}

	func emit() -> String? {
		var code = bundle.loadTemplate(named: name, withExtension: "tmpl")
		for substitute in substitues {
			for placeholder in substitute.placeholders {
				guard !placeholder.isEmpty else { continue }
				let text = "#\(placeholder)#"
					+ (substitute.isInline ? "" : "\n")
				code = code -+ (text, substitute.replacement(for: placeholder))
			}
		}
		return code
	}
}
As you would expect, a template takes a filename and a list of substitutes through a @SubstituteBuilder closure. Notice that the substitutes are simply stored as an array.
The emit() method then opens the corresponding template file and replaces its placeholders with the code generated by each substitute.
I have many other emitters and substitute structures, but their implementation is not essential. What is crucial is that now we have a declarative DSL.
extension ContentComponent.Button: Symbolizable {
	func symbolicate(with table: SymbolTable, parentName: SymbolTable.Name) -> SymbolTable {
		let name = table.newSymbolName(withBase: parentName.adding("RoundedButton"))
		let emitter = ExtensionEmitter(typename: parentName.full) {
			Template("RoundedButton") {
				Replacement("name") { name.local }
				Replacement("text") { text }
				Replacement("cornerRadius") { "\(Int(cornerRadius))" }
			}
		}
		return table.adding(
			SymbolTable.Symbol(
				name: parentName.adding("RoundedButton"),
				contentCode: "RoundedButton()",
				extensionsCode: [emitter.code()]),
			with: id)
	}
}
The code is now more readable and follows the structure of the generated SwiftUI code.
Conclusions
This article showed some of the many advanced Swift techniques that I use in my projects.
The main point of advanced techniques is that they make your code faster to write, more readable, and more maintainable.
- The MVC and MVVM patterns allow me to keep the architecture of my app well-organized, with a clear separation of responsibilities.
- Swift Packages allow me to develop and test my code in isolation.
- Namespacing gives all my types a clear hierarchy and makes it easier for me to navigate my code.
- Data migration allows my users to open any document in the latest version of Vulcan, no matter how old.
- Custom operators allow me to abbreviate commonly repeating operations.
- And, finally, result builders allow me to generate code using a DSL that matches the final result.
These are only a few of the advanced techniques and principles I use, but I can neither list them all here nor go deeply into any of them.
I put them all in The iOS Architect, my advanced course on iOS apps with a scalable and testable architecture.
SwiftUI App Architecture: Design Patterns and Best Practices
It's easy to make an app by throwing some code together. But without best practices and robust architecture, you soon end up with unmanageable spaghetti code. In this guide I'll show you how to properly structure SwiftUI apps.
Matteo has been developing apps for iOS since 2008. He has been teaching iOS development best practices to hundreds of students since 2015 and he is the developer of Vulcan, a macOS app to generate SwiftUI code. Before that he was a freelance iOS developer for small and big clients, including TomTom, Squla, Siilo, and Layar. Matteo got a master’s degree in computer science and computational logic at the University of Turin. In his spare time he dances and teaches tango.
Brilliant!