
Most modern iOS apps need to run code asynchronously.
Async functions can be suspended and resumed later, allowing your app to keep its UI responsive while working on long tasks, like making REST API calls.
In this article, we will see how to run asynchronous functions in Swift and iOS apps using async/await.

FREE GUIDE - SwiftUI App Architecture: Design Patterns and Best Practices
MVC, MVVM, and MV in SwiftUI, plus practical lessons on code encapsulation and data flow.
DOWNLOAD THE FREE GUIDETable of contents
Chapter 1
What is async and await in Swift?
Async await is a mechanism used to create and execute asynchronous functions in Swift.
- async indicates that a function or method is asynchronous and can pause its execution to wait for the completion of another process.
- await marks a suspension point in your code where execution may wait for the result of an async function or method.
Using async await in Swift is as simple as marking asynchronous functions with the async keyword and calling them using the await keyword.
In this chapter:
How to write an async function in Swift
To declare an asynchronous function in Swift, write the async keyword after the function name and before its return type. An asynchronous function can also throw errors like a normal function. It is marked with the async throws keywords in such cases.
import Foundation

func fetchImageData() async throws -> Data {
	let data = // ... Download the image data ...
	return data
}
Most of the time, inside asynchronous functions, you will call other async methods from Foundation or other Apple frameworks. However, whenever one of your functions calls another asynchronous method, it must also be declared as async.
How to use await in Swift
You place the await keyword wherever you need to call an async function. The await keyword creates a suspension point where the execution of your code may pause until the asynchronous function or method returns.
One of the most common examples of asynchronous code in Swift and iOS is downloading data with URLSession. Compared to the speed of code running on a device, transferring data over the internet is a slow process, which requires your function to wait until the download is complete.
As an illustration, let’s download an image using a URL from the Dog API.
func fetchImageData() async throws -> Data {
	let url = URL(string: "https://images.dog.ceo/breeds/mountain-swiss/n02107574_1387.jpg")!
	let (data, _) = try await URLSession.shared.data(from: url)
	return data
}
The data(from:delegate:) method of URLSession is declared as async throws, so we must call it using try await. And since our function does not catch errors in a do-catch statement, it must also be declared as async throws.
Async await replaces callbacks with completion closures
The introduction of async await in Swift 5.5 replaced completion closures in asynchronous functions. Before Swift concurrency, callbacks were necessary to resume execution when asynchronous functions finished.
If you’ve worked with asynchronous functions before async await, chances are your code resembled something like this:
func fetchImageData(completion: @escaping (Result<Data, Error>)) {
	let url = URL(string: "https://images.dog.ceo/breeds/mountain-swiss/n02107574_1387.jpg")!
	let task = URLSession.shared.dataTask(with: url) { data, response, error in
		if let error = error {
			completion(.failure(error))
			return
		}
		completion(.success(data))
	}
	task.resume()
}
This approach presents several drawbacks:
- Closures are hard to read, making it more difficult to follow the execution path than async await functions.
- It’s easy to make mistakes. In intricate functions, it’s easy to forget to invoke the completion closure before returning or to call it multiple times.
- You might create retain cycles. Referencing the
selfinstance of an object in a closure requires weak self references. - It’s not possible to use Swift’s error handling. Handling errors via the
Resulttype requires switching over its cases. Before theResulttype was available, developers used tuples and optionals, exacerbating these issues. - Sequencing asynchronous function calls is more intricate. This often results in a problem known as the pyramid of doom, sometimes also called callback hell.
At the end of this article, I’ll illustrate how to transition an existing project to adopt async await and replace completion closures.
Chapter 2
Why do we need asynchronous functions in Swift and iOS apps?
The benefits of async functions become evident only when you understand how apps run in iOS. Code that takes too long to execute can negatively affect your app’s performance.
When learning Swift programming, all your programs run from start to finish without interruption. Even when you split an extensive program using structures and classes, its code runs sequentially.
However, interactive iOS apps do not have a clear “start” and “end”. When running, an iOS app idly waits for input, such as the user tapping a button or data arriving from the network.
When such an input arrives, it triggers an event in the app that causes your code to run. The user interface must be updated as the code changes the app’s internal state.
In this chapter:
FREE GUIDE - SwiftUI App Architecture: Design Patterns and Best Practices
MVC, MVVM, and MV in SwiftUI, plus practical lessons on code encapsulation and data flow.
DOWNLOAD THE FREE GUIDEBlocking the main run loop for too long makes your app unresponsive
The CPU of a device can only process instructions sequentially. Modern operating systems, like iOS, utilize complex techniques for time-sharing, multitasking, and threading), enabling the execution of code concurrently on a CPU that can only run instructions sequentially.
You can read about these techniques, but it’s not mandatory. iOS apps employ a much simpler model. When an iOS app runs, it consistently cycles through a run loop consisting of three phases:
- Receiving input events.
- Executing code (possibly yours).
- Updating the UI.
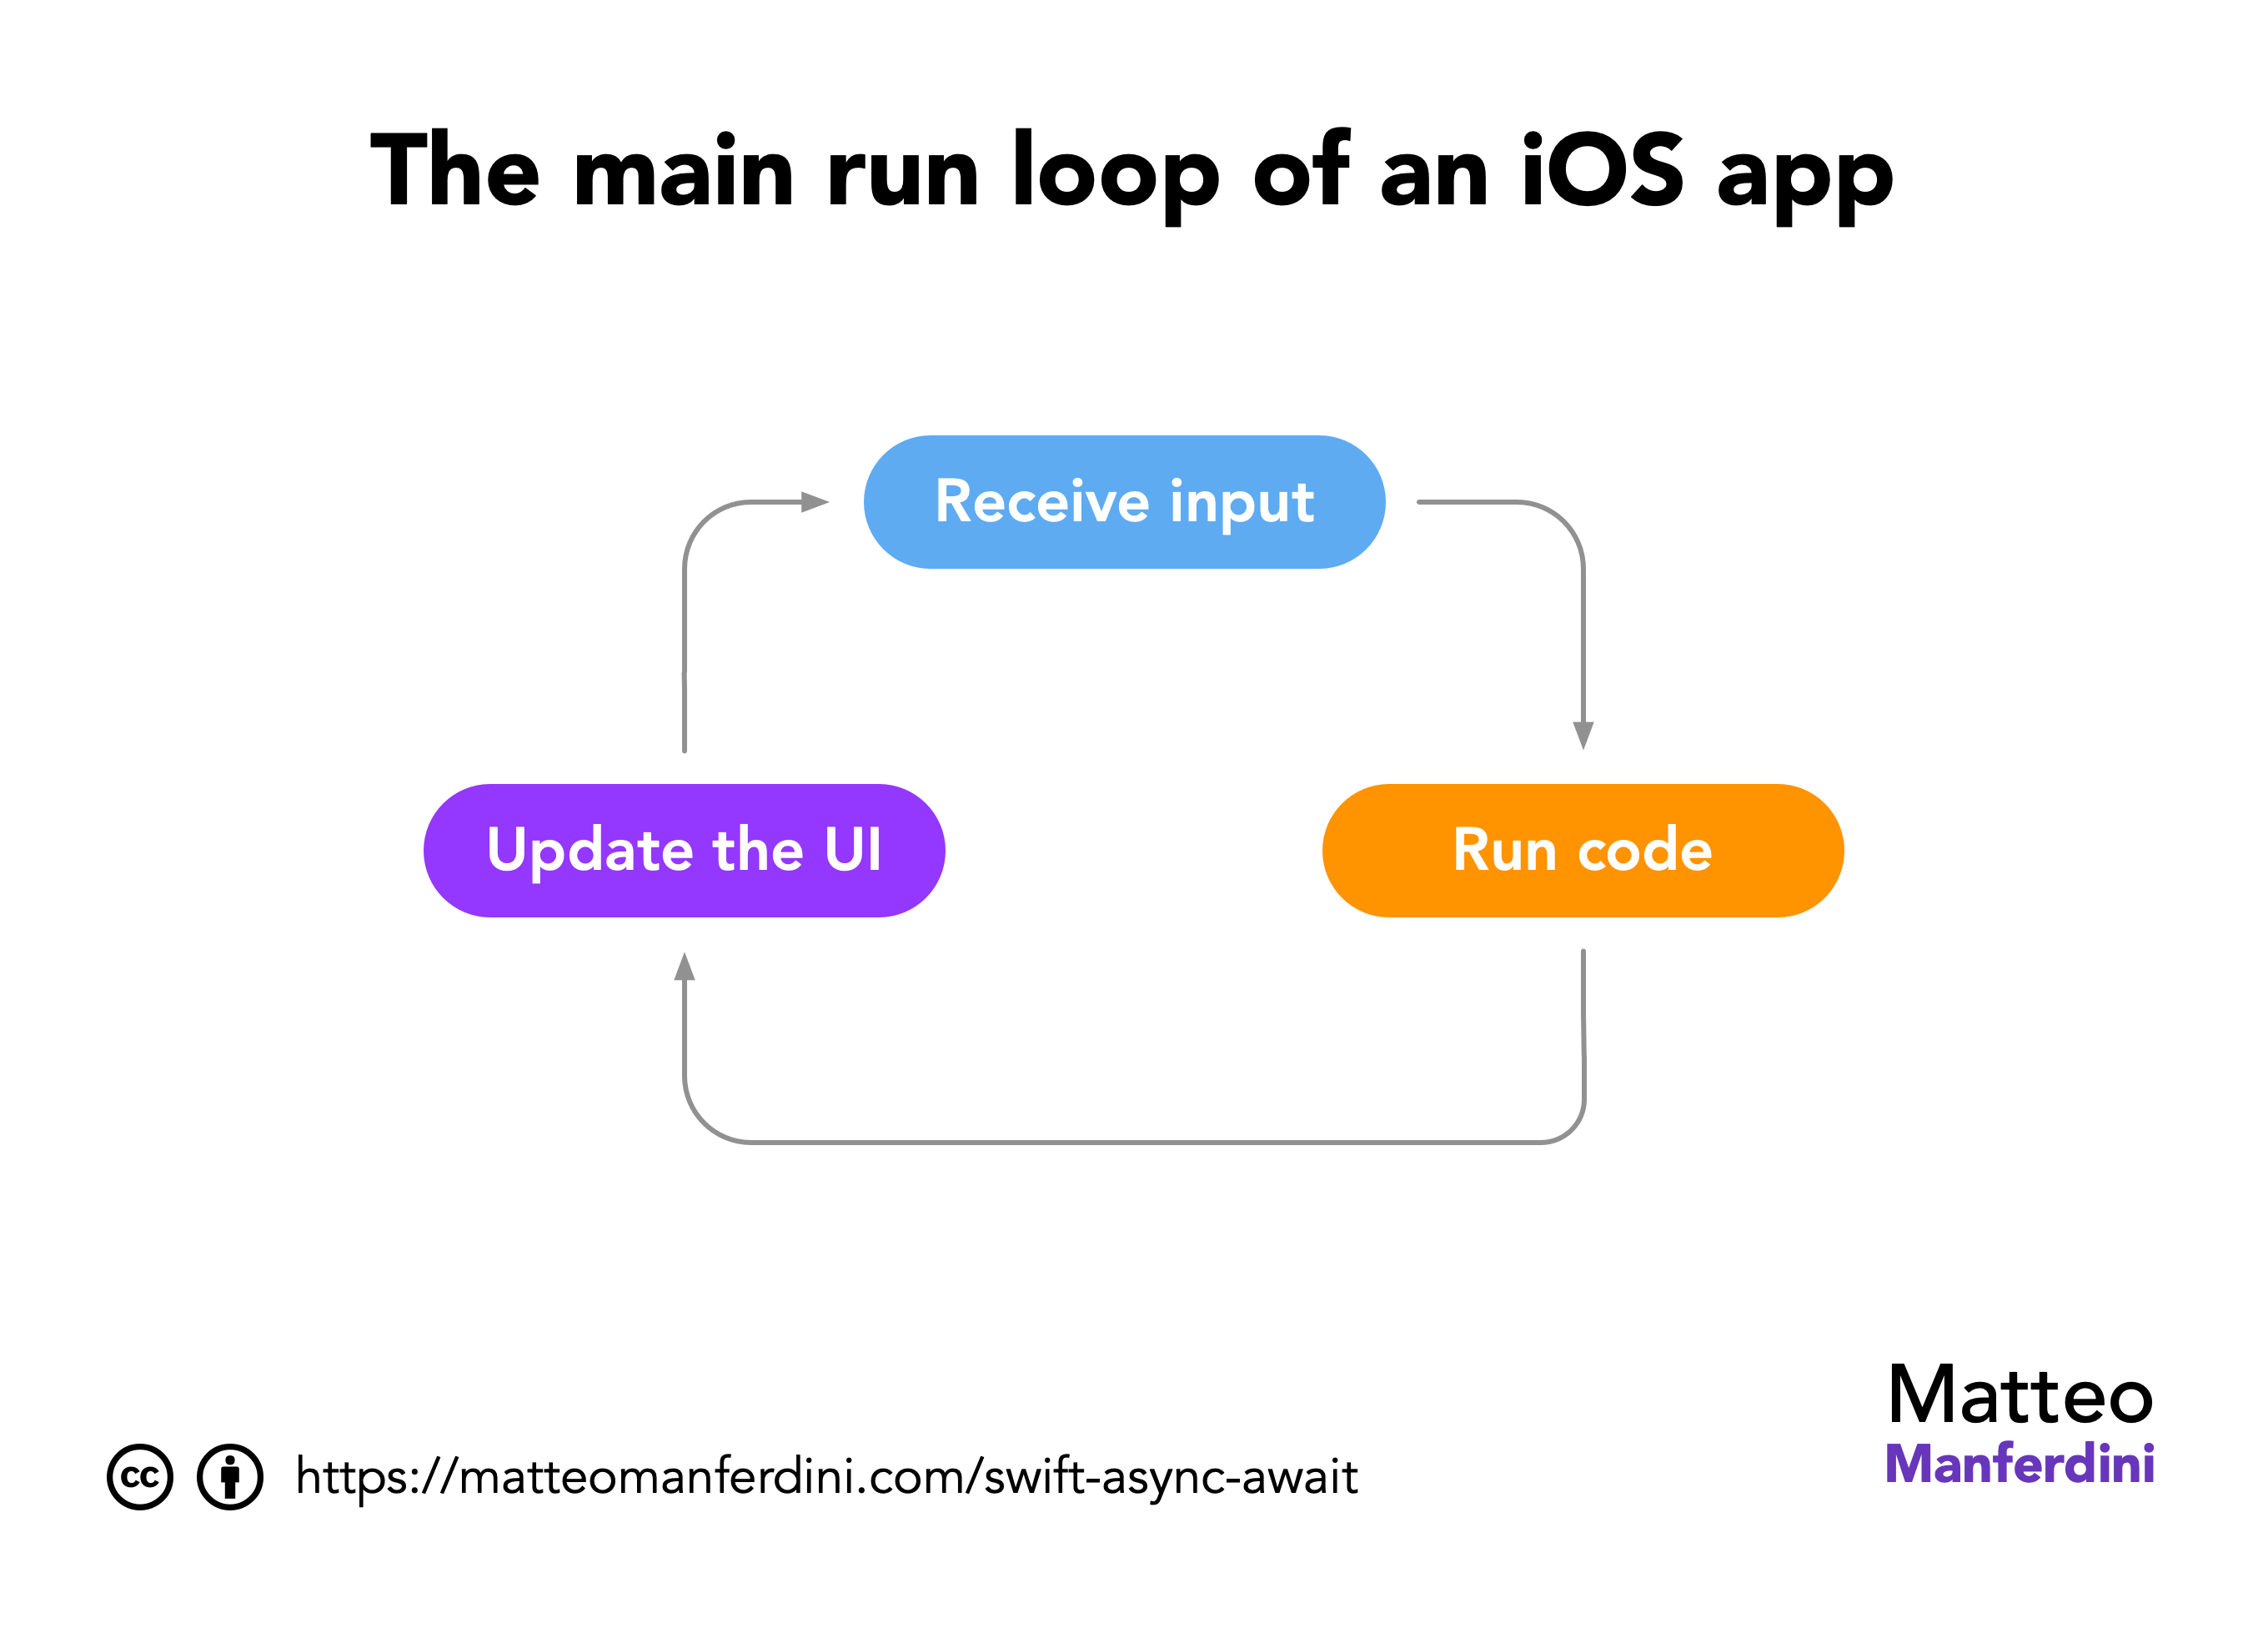
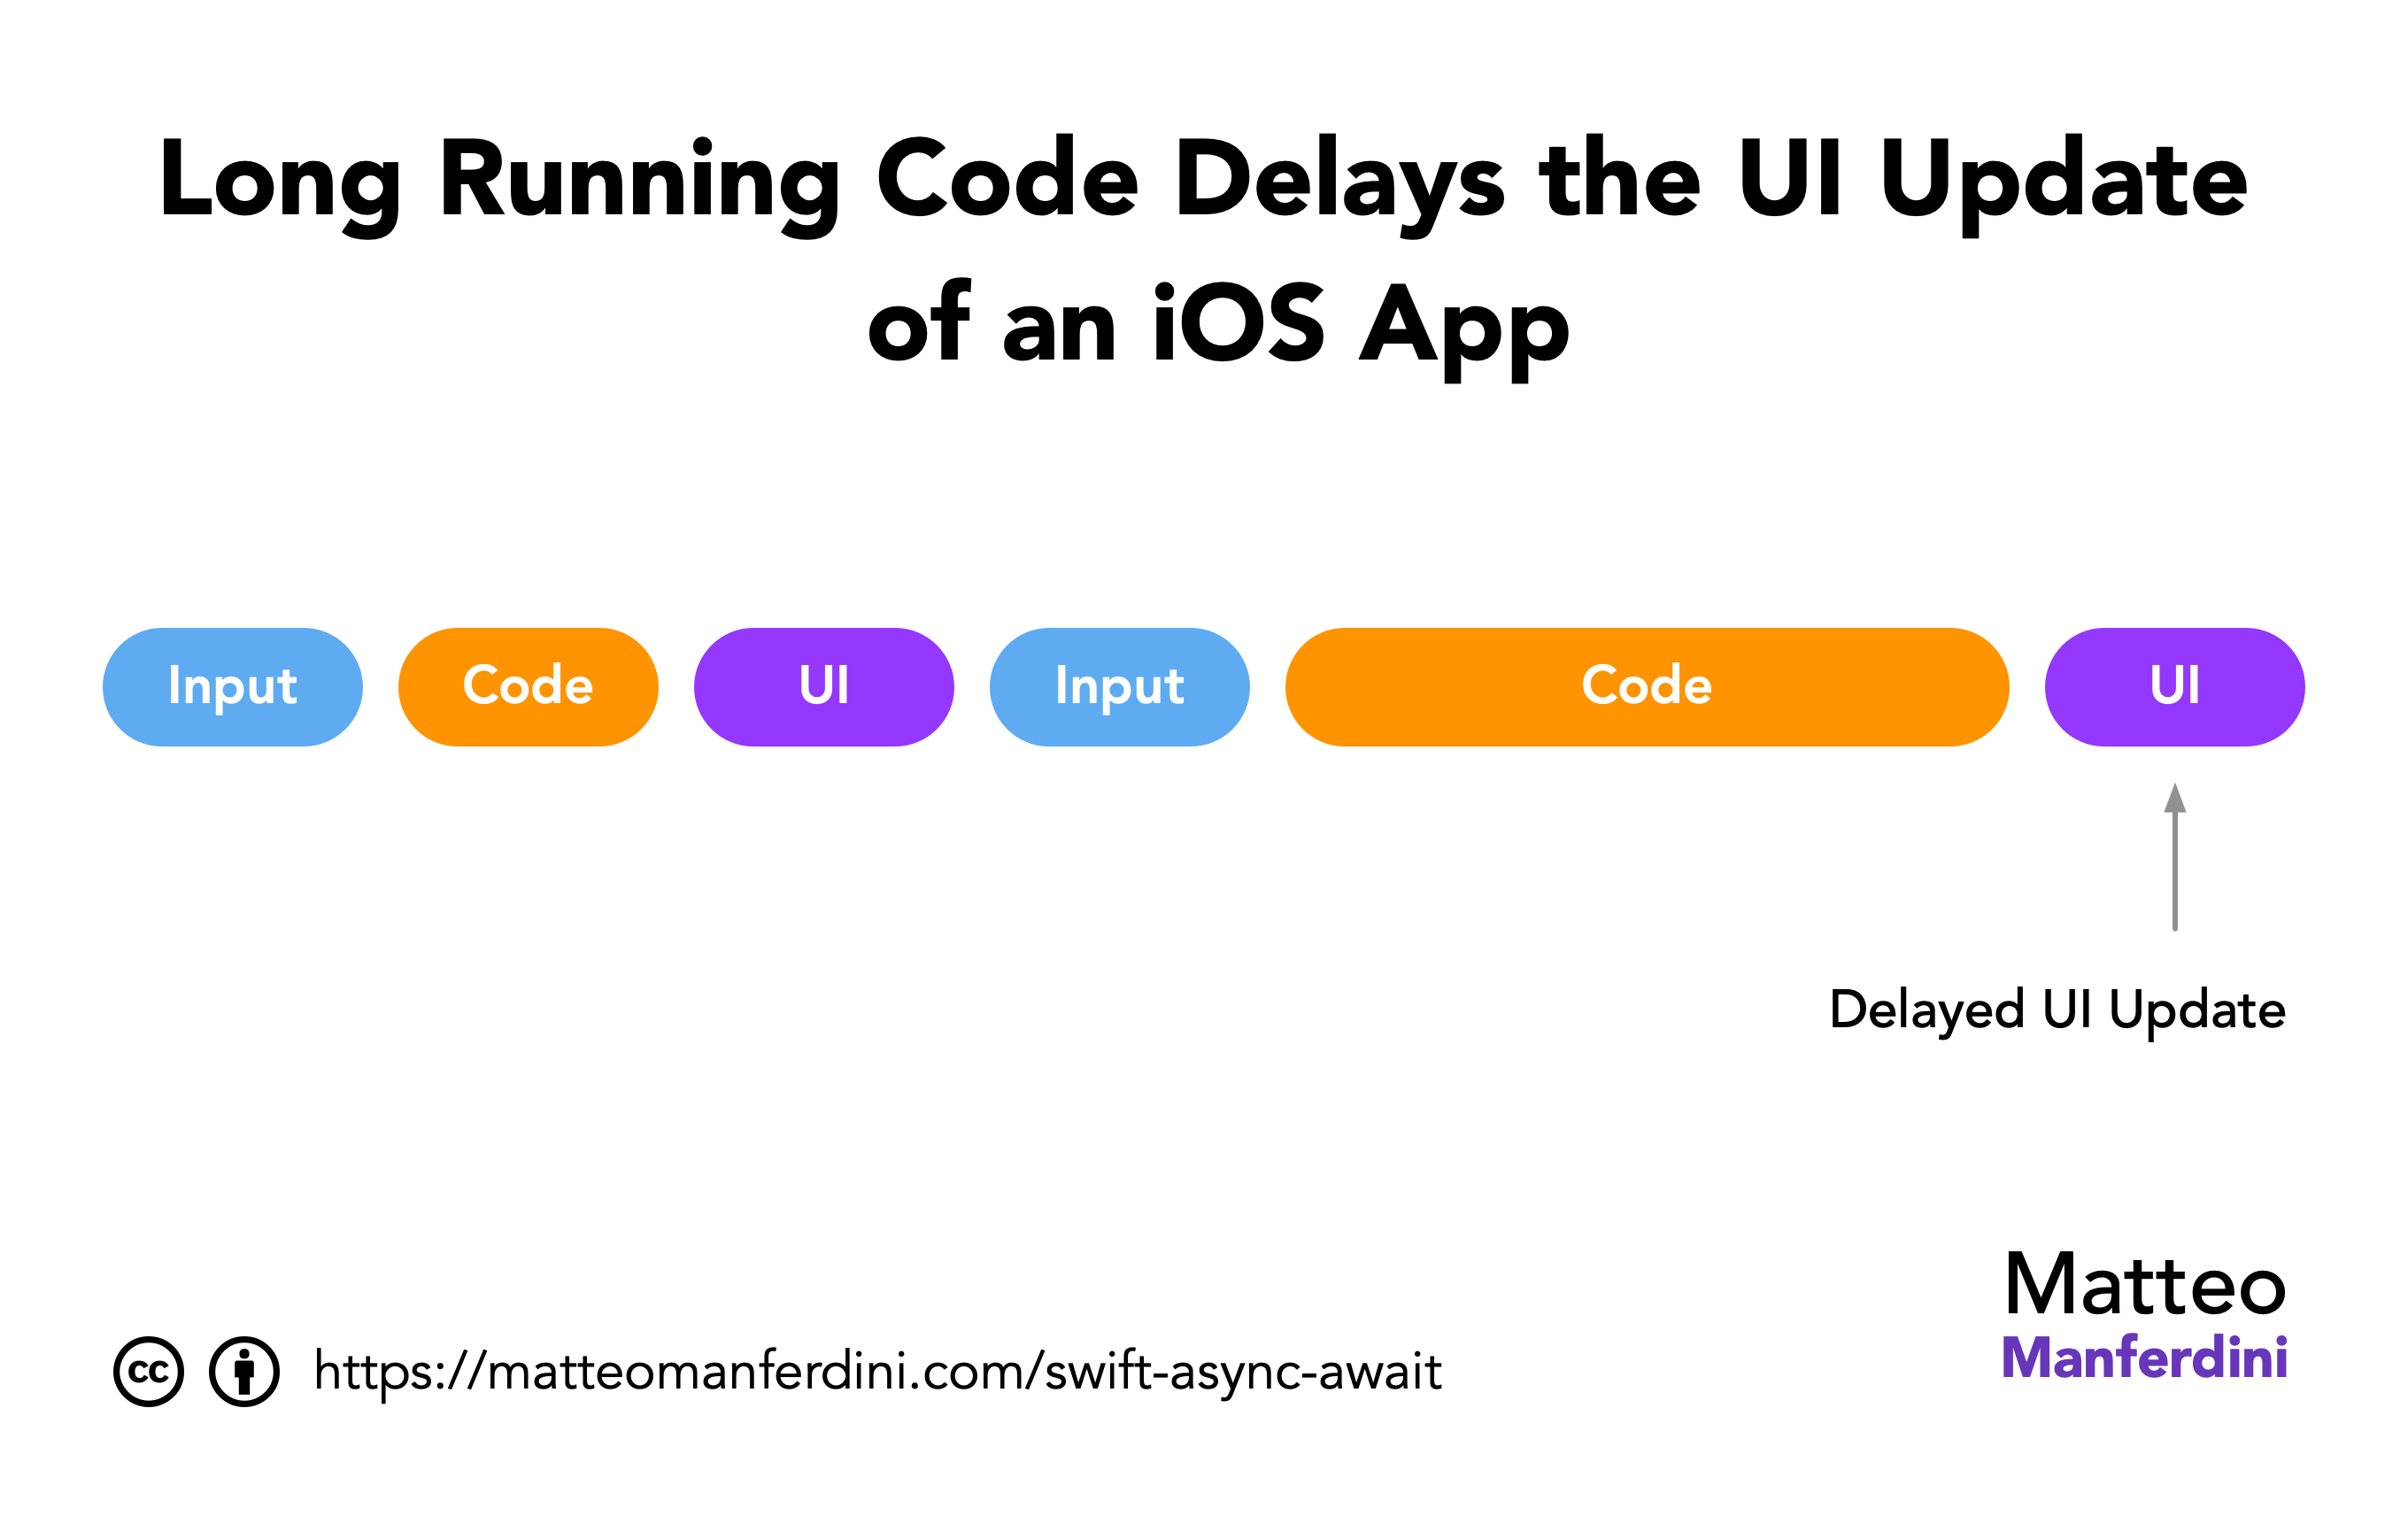
The cycle runs so swiftly that the app appears to respond instantly to user input. However, this system has a limitation: if some code takes too long to execute, it delays the cycle’s subsequent UI update and input phases. Consequently, your app may feel sluggish, freeze briefly, and lose input.
This is precisely why we need Swift concurrency and asynchronous functions.
Asynchronous functions can perform long tasks without blocking the app’s main run loop
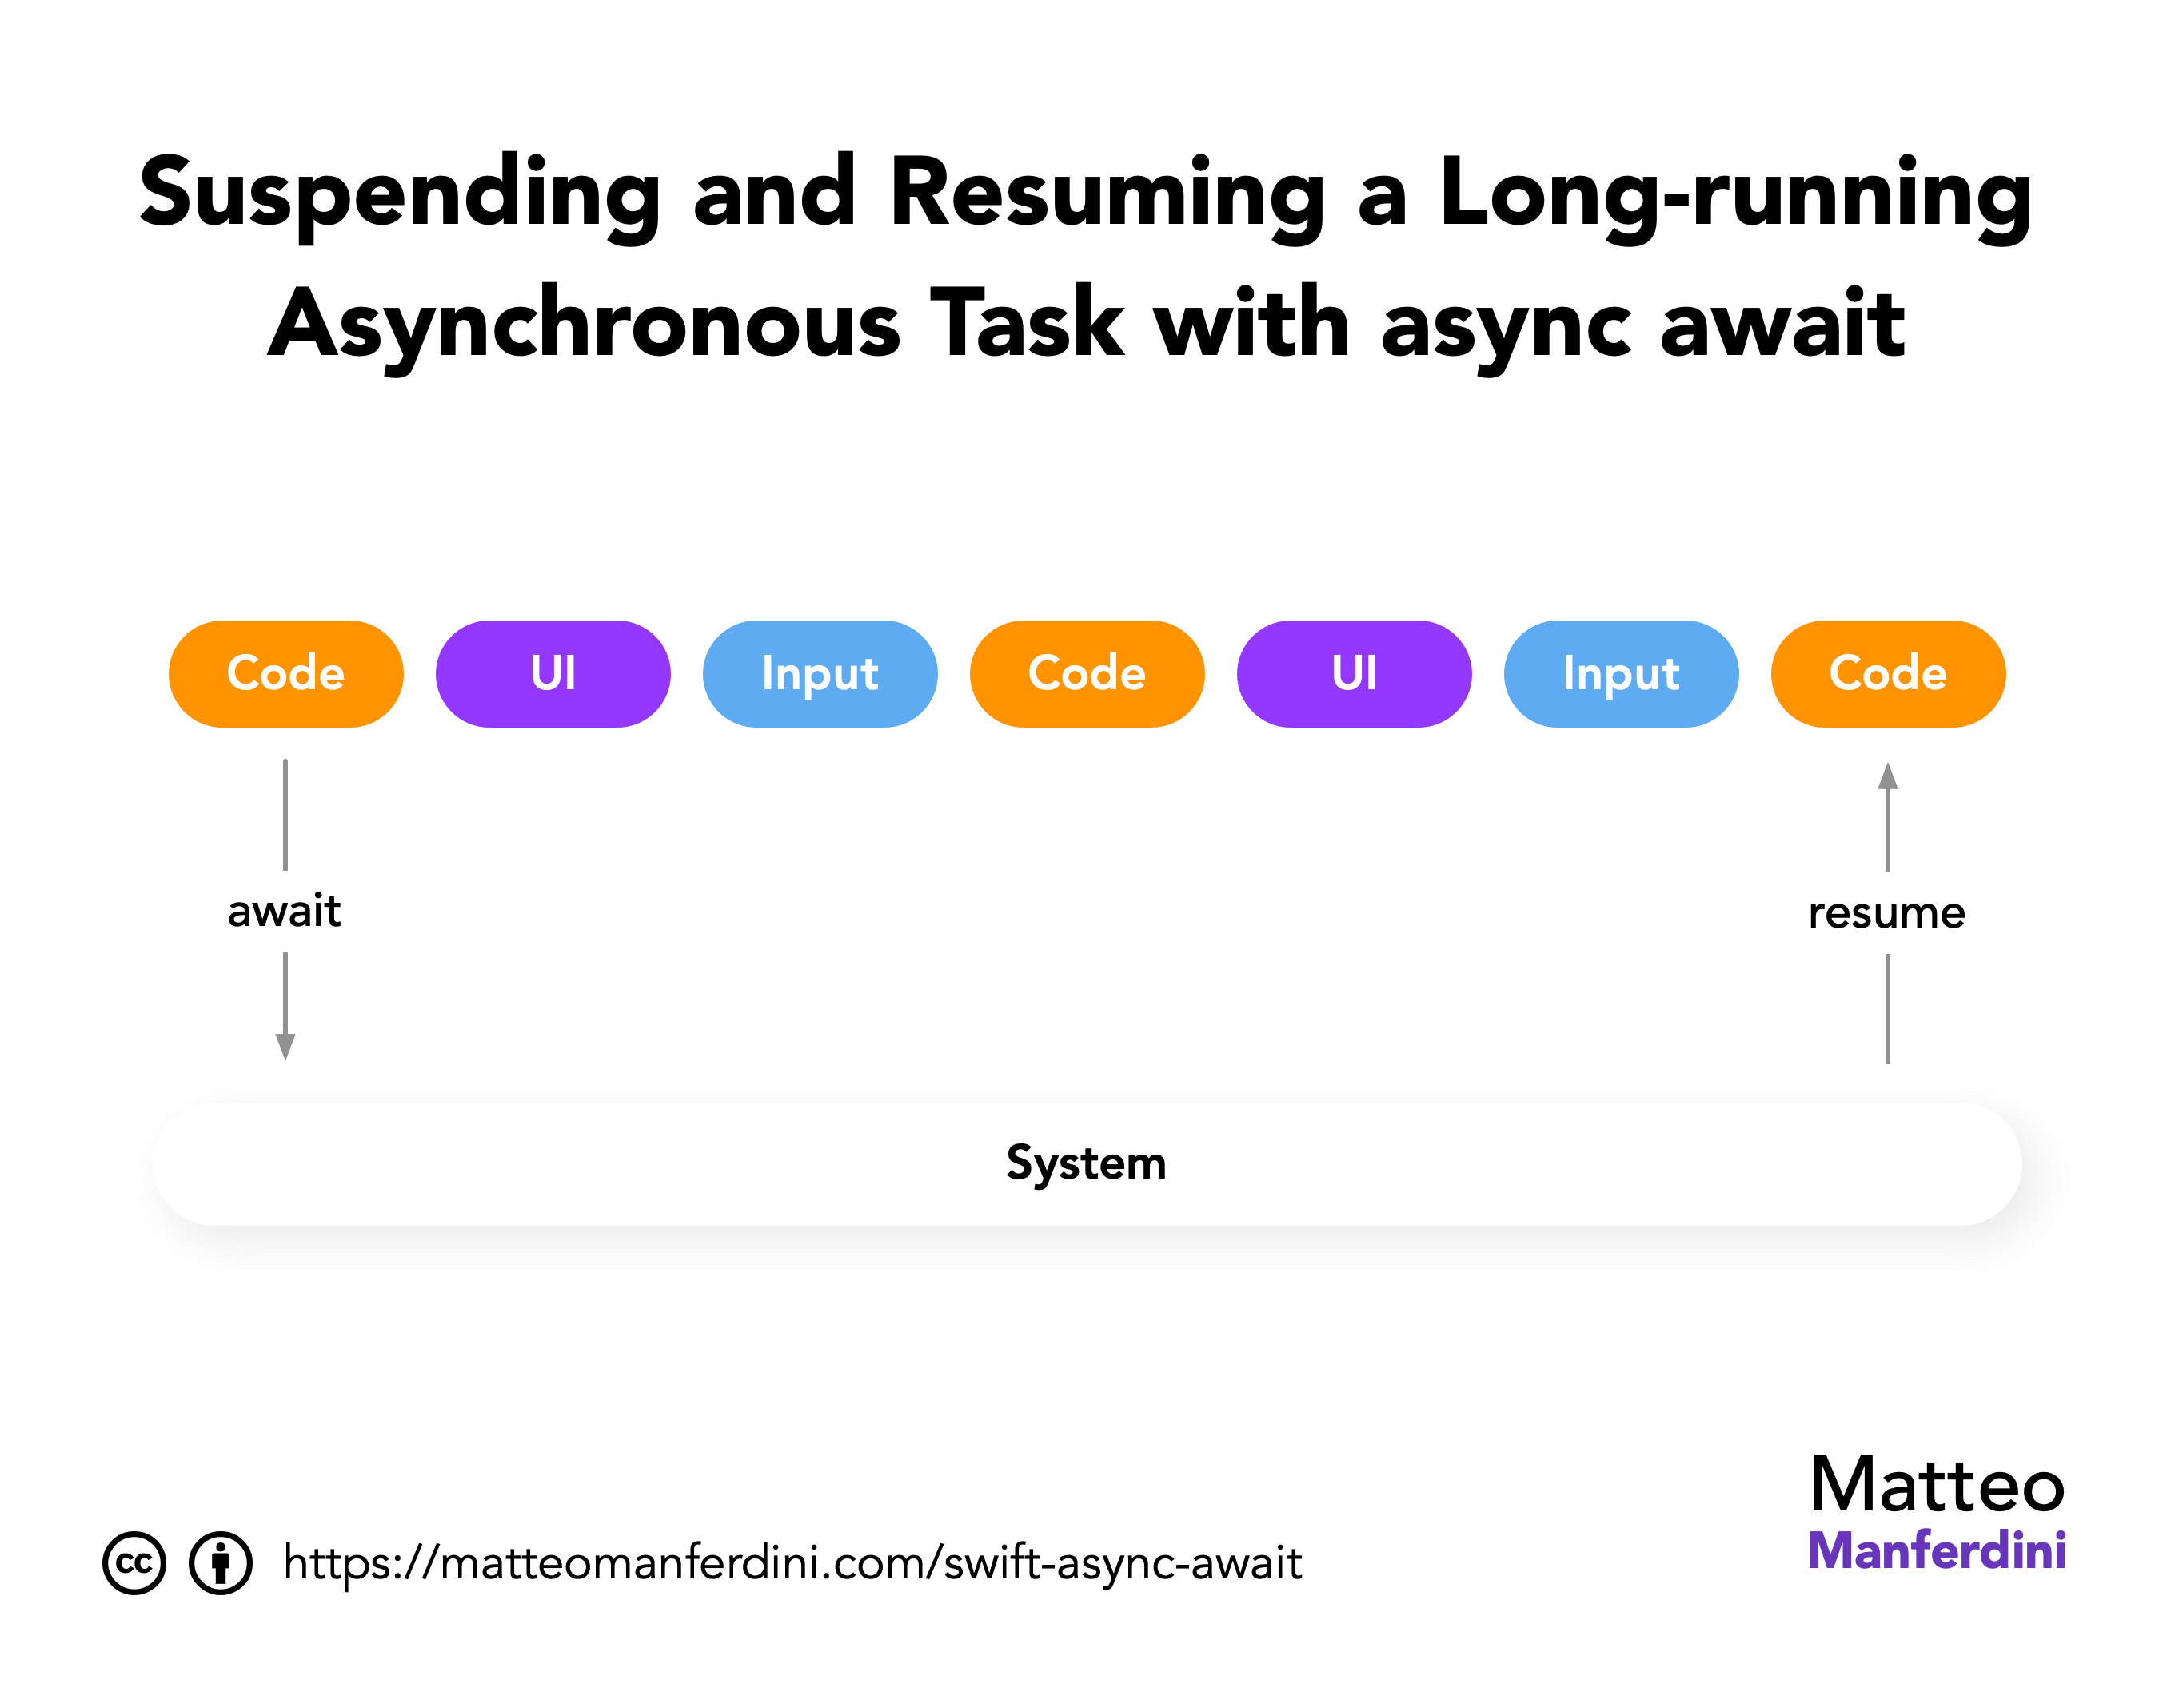
When you call an asynchronous function, your code gets suspended, leaving the app’s main run loop free.
Meanwhile, the work performed by the asynchronous function runs “in the background”. The specifics of how this operates at a lower level are not crucial.
What matters is that the code running in the background can take as much time as it needs without impacting the app’s main run loop. When it finishes and returns a result, the system resumes your code where it left off and continues executing it.
Code can take a long time to execute for two reasons:
- It must complete a slow process, such as fetching data from a large database, collecting data from a device sensor, or transmitting data over a network connection.
- It needs to run a computationally expensive algorithm, for example, a sorting algorithm on a large set of data, a search algorithm like A*, or a decision algorithm like Minimax.
Chapter 3
Structured and unstructured concurrency in Swift
Asynchronous functions are just one of the building blocks of Swift concurrency. Tasks are another critical piece.
Conceptually, a task is a unit of work that can be run asynchronously. More specifically, an instance of the Task type provides an environment where you can execute asynchronous functions or methods.
Tasks can be arranged hierarchically, allowing you to run several tasks in parallel. This approach is called structured concurrency, and it helps manage operations that affect all the children of a task, such as suspension and cancellation. The easiest way to create child tasks is by using the async let keywords, which we will see below.
Swift also allows you to explicitly create and manage tasks according to your program’s needs. This approach, in turn, is called unstructured concurrency. The most common use of unstructured tasks is to call an asynchronous function from synchronous code, something you need in Swift programs and SwiftUI apps, which are inherently synchronous.
In this chapter:
FREE GUIDE - SwiftUI App Architecture: Design Patterns and Best Practices
MVC, MVVM, and MV in SwiftUI, plus practical lessons on code encapsulation and data flow.
DOWNLOAD THE FREE GUIDECalling async functions sequentially
In the fetchImageData() function we created above, I hardcoded the URL of a specific image. However, the Dog API’s random image endpoint returns URLs inside a JSON object. We can decode this JSON data using a Codable structure.
struct Dog: Identifiable, Codable {
	let message: String
	let status: String

	var id: String { message }
	var url: URL { URL(string: message)! }
}
We can create a new async function to retrieve the URL for a random dog image and then download its data.
func fetchDog() async throws -> Dog {
	let dogURL = URL(string: "https://dog.ceo/api/breeds/image/random")!
	let (data, _) = try await URLSession.shared.data(from: dogURL)
	return try JSONDecoder().decode(Dog.self, from: data)
}

func fetchImageData() async throws -> Data {
	let url = try await fetchDog().url
	let (data, _) = try await URLSession.shared.data(from: url)
	return data
}
Now, the fetchImageData() function makes two asynchronous calls sequentially. The await keyword suspends the function until the called async function finishes.
Thanks to the async await concurrency model, the structure of our code resembles that of synchronous functions. This makes it easy for the reader to follow the execution flow of the code, even with several asynchronous calls, as it maintains the same structure as synchronous code.
This is especially beneficial if you are familiar with the old model of using nested closures for asynchronous callbacks, which often resulted in callback hell. In the last section of the article, I will demonstrate how to replace those in an existing project.
Running several asynchronous functions in parallel using structured concurrency
Sometimes, you’ll need to run asynchronous tasks in parallel to optimize the use of the CPU’s cores or internet bandwidth.
You can run a discrete number of asynchronous functions simultaneously by using async in front of let when declaring a constant.
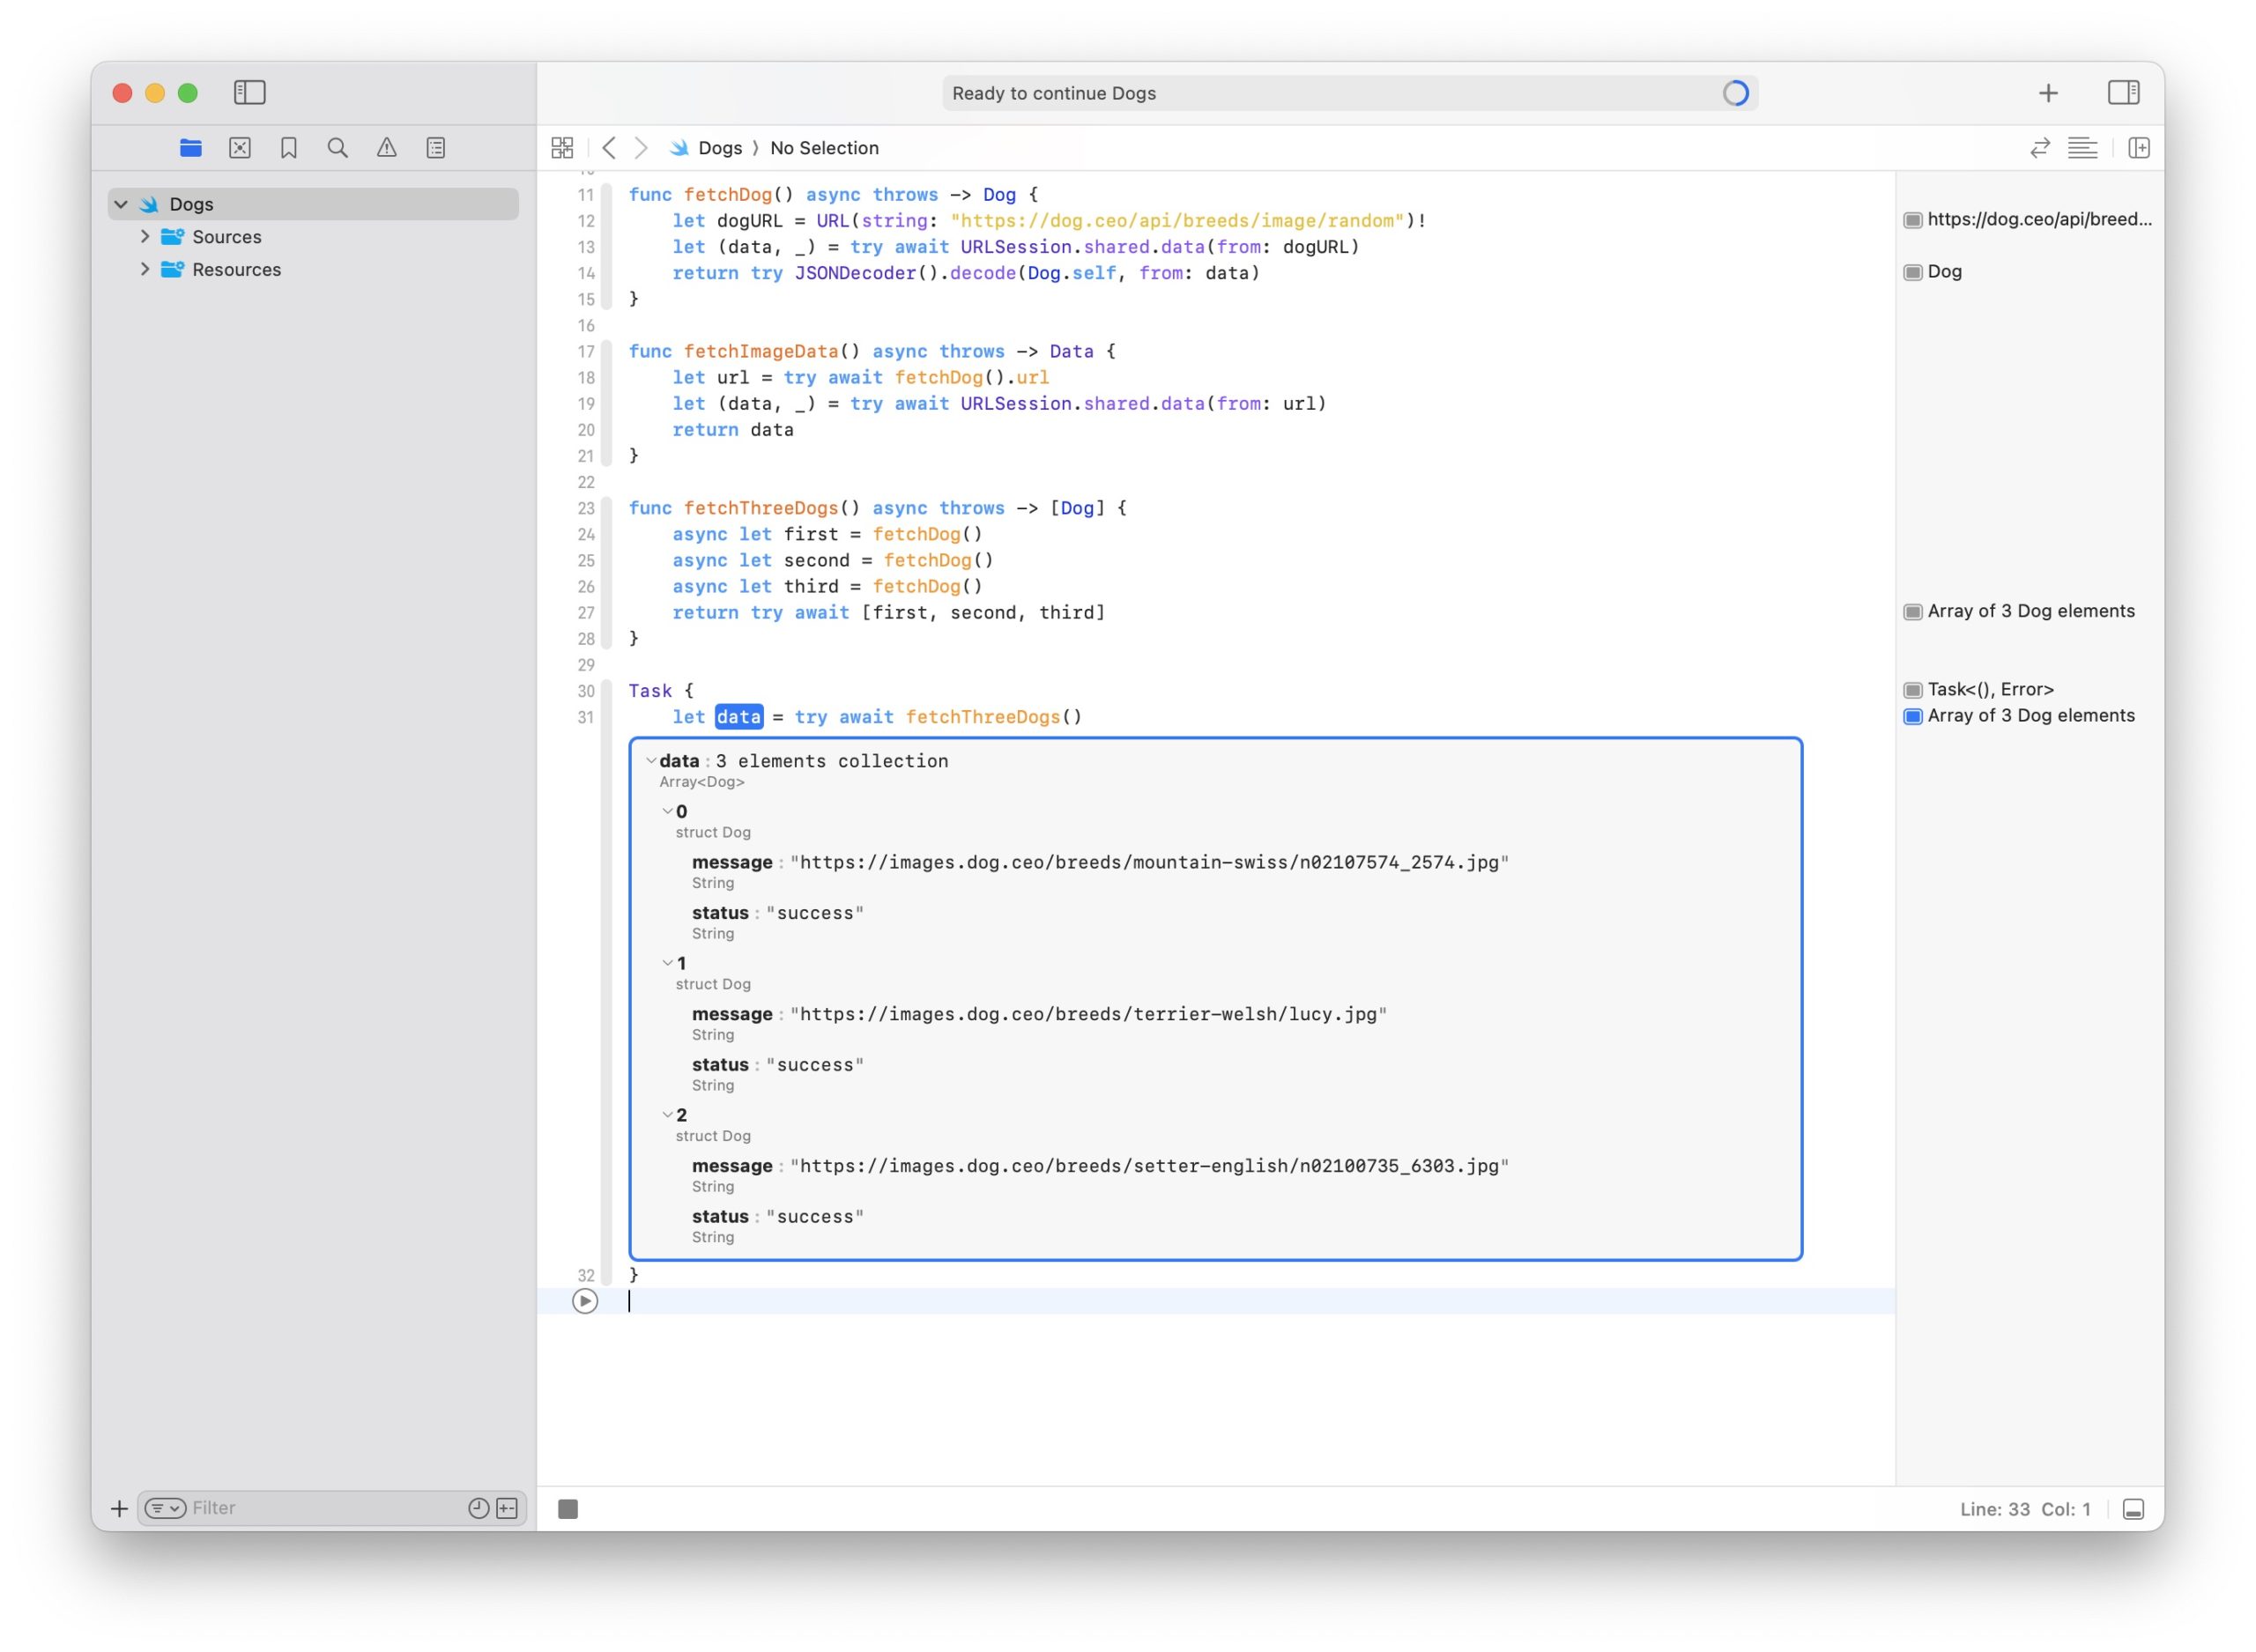
For example, let’s fetch the JSON data for three dogs simultaneously from the remote API.
func fetchThreeDogs() async throws -> [Dog] {
	async let first = fetchDog()
	async let second = fetchDog()
	async let third = fetchDog()
	return try await [first, second, third]
}
Notice that we didn’t use the await keyword for each asynchronous call of the fetchDog() function.
The async let keywords do not create a suspension point like await. Instead, execution proceeds normally after starting each asynchronous call.
We only use await at the end of the function when we need the content of all three constants to create the final array. Execution is suspended at that point only and resumes when all three results arrive.
Creating unstructured tasks to call async methods from synchronous code
Most of the Swift code you will write is synchronous, i.e., it runs from start to end without suspending to wait for other code to complete.
However, every function that calls an async function must also be declared async, and so on, soon reaching the top of our program, which must be synchronous.
If you try to call an asynchronous function inside a synchronous one, the compiler will stop you with the error: ‘async’ call in a function that does not support concurrency.

You can try and use the fix proposed by Xcode, making the surrounding function async, but you have only moved the problem to another function.
Running asynchronous code in the sendable closure of a task
So, we need a way to call async methods from synchronous code.
We achieve this by running async functions inside a Task.
Task {
	let data = try await fetchThreeDogs()
}
A task is a unit of work that can be run asynchronously. All asynchronous code must run inside some task. You either create tasks explicitly, like in the code above, or you are provided one by the system.
For example, the async let syntax I showed above creates a child task for you. More commonly, in a SwiftUI app, the task(priority:_:) view modifier provides a task for your asynchronous code.
The initializer of the Task structure takes a sendable closure inside of which you can run asynchronous code using await, just as you would do inside an async function.
The Task type also offers methods to cancel and suspend the asynchronous work performed inside a task.
The code surrounding a task remains synchronous, so the main execution is not suspended at the Task initialization but proceeds past it as usual. The suspension only happens at the await keyword inside the closure.
The Task type allows you to run async functions in any synchronous code, e.g., inside a Swift playground or a command-line Swift program.
However, you will rarely need to do so. Far more common is calling async methods from SwiftUI, which we will explore next.
Chapter 4
Using async await in SwiftUI
Any networked SwiftUI app must call asynchronous functions at various stages in its lifecycle. While it’s not considered good practice to place async methods inside a SwiftUI view directly, many of these functions must still be triggered from SwiftUI code.
You can find the code for this article in this GitHub repository.
In this chapter:
FREE GUIDE - SwiftUI App Architecture: Design Patterns and Best Practices
MVC, MVVM, and MV in SwiftUI, plus practical lessons on code encapsulation and data flow.
DOWNLOAD THE FREE GUIDECalling async methods when a SwiftUI view appears on screen
In SwiftUI apps, it is a standard practice to trigger network requests when a view appears to populate it with content.
As we have seen, you can use the Task type to call async methods in synchronous code. This allows you to place it inside a SwiftUI event view modifier like onAppear(perform:).
Such a practice is so common that SwiftUI specifically provides the task(priority:_:) modifier for this purpose. With this modifier, you can omit the Task type and call an async function directly.
struct ContentView: View {
	@State private var dogs: [Dog] = []

	var body: some View {
		List(dogs) { dog in
			// ...
		}
		.task {
			dogs = (try? await fetchThreeDogs()) ?? []
		}
	}
}

extension ContentView {
	func fetchDog() async throws -> Dog {
		let dogURL = URL(string: "https://dog.ceo/api/breeds/image/random")!
		let (data, _) = try await URLSession.shared.data(from: dogURL)
		return try JSONDecoder().decode(Dog.self, from: data)
	}

	func fetchThreeDogs() async throws -> [Dog] {
		async let first = fetchDog()
		async let second = fetchDog()
		async let third = fetchDog()
		return try await [first, second, third]
	}
}
The advantage of using the .task modifier over the .onAppear modifier is not just its brevity. The .task modifier keeps track of the task it creates and automatically cancels it when the view disappears from the screen.
This feature is helpful for automatically canceling any network request in progress when the user navigates back to a previous screen in an iOS app.
Using AsyncImage to download and display remote images
We can utilize the fetchImageData() function we created earlier to retrieve the data for each dog image and present them in the List.
However, this task is quite common, and SwiftUI offers a more convenient solution with the AsyncImage view, which enables asynchronous image downloading and display.
struct ContentView: View {
	@State private var dogs: [Dog] = []

	var body: some View {
		List(dogs) { dog in
			AsyncImage(url: dog.url, content: { image in
				image
					.resizable()
					.aspectRatio(contentMode: .fit)
			}, placeholder: {
				ProgressView()
			})
		}
		.listStyle(.plain)
		.task {
			dogs = (try? await fetchThreeDogs()) ?? []
		}
	}
}
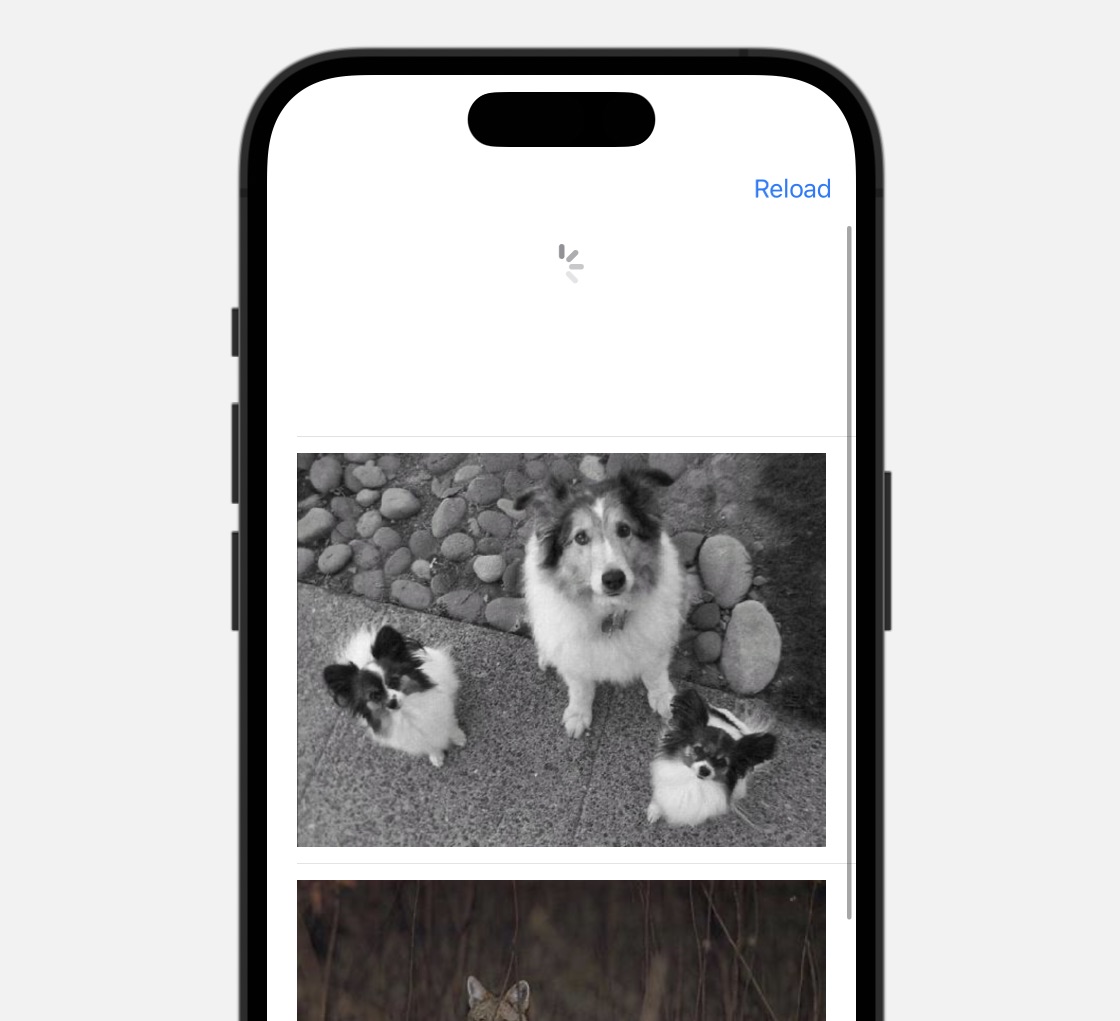
The AsyncImage view takes a simple URL and automatically creates a Task instance to download its content, displaying it once the network transfer is complete. It also allows a placeholder view to be shown while the download progresses.
Calling an async method when the user pulls to refresh or taps on a button
Besides fetching content when a view appears on the screen, another standard case for calling async methods in SwiftUI is after user interaction.
To achieve this, you must create a Task in the trailing closure of a view that receives actions, such as Button, or the trailing closure of an action view modifier, for example, refreshable(action:).
struct ContentView: View {
	@State private var dogs: [Dog] = []

	var body: some View {
		List(dogs) { dog in
			// ...
		}
		.listStyle(.plain)
		.task { await refresh() }
		.refreshable {
			Task { await refresh() }
		}
		.toolbar {
			Button("Reload") {
				Task { await refresh() }
			}
		}
	}
}

extension ContentView {
	func fetchDog() async throws -> Dog {
		// ...
	}

	func fetchThreeDogs() async throws -> [Dog] {
		// ...
	}

	func refresh() async {
		dogs = (try? await fetchThreeDogs()) ?? []
	}
}
To avoid repetition, I have moved the async call to fetchThreeDogs() into the refresh() async method.
You can test the functionality directly inside a SwiftUI preview. Don’t forget to add a NavigationStack to your preview code if you want the navigation bar with the Refresh button to appear in the Xcode canvas.
#Preview {
	NavigationStack {
		ContentView()
	}
}
Moving all the async methods into a view model
While a SwiftUI view often needs to call asynchronous methods, that does not mean those methods should be part of the view type.
It is a good practice to keep the responsibilities of your app separate. Specifically, when fetching data for a single view, asynchronous networking code should be placed inside a view model, which also holds the state for the view.
@Observable class ViewModel {
	var dogs: [Dog] = []

	func fetchDog() async throws -> Dog {
		let dogURL = URL(string: "https://dog.ceo/api/breeds/image/random")!
		let (data, _) = try await URLSession.shared.data(from: dogURL)
		return try JSONDecoder().decode(Dog.self, from: data)
	}

	func fetchThreeDogs() async throws -> [Dog] {
		async let first = fetchDog()
		async let second = fetchDog()
		async let third = fetchDog()
		return try await [first, second, third]
	}

	func refresh() async {
		dogs = (try? await fetchThreeDogs()) ?? []
	}
}
The view’s only tasks are to display the data and trigger the network requests.
struct ContentView: View {
	var viewModel = ViewModel()

	var body: some View {
		List(viewModel.dogs) { dog in
			// ...
		}
		.listStyle(.plain)
		.task { await viewModel.refresh() }
		.refreshable {
			Task { await viewModel.refresh() }
		}
		.toolbar {
			Button("Reload") {
				Task { await viewModel.refresh() }
			}
		}
	}
}
Chapter 5
Async await vs. completion closures and Combine
Concurrency with async await should be your primary choice for any new project. However, you might have an existing project using the old callback-based asynchronous approach.
Starting in Xcode 13.2, Swift concurrency is deployable back to iOS 13 and macOS Catalina 10.15, allowing your app to support at least two prior iOS versions, as is customary in iOS development.
The following section is for you if you need to work with older OS versions or codebases written before the introduction of concurrency in Swift 5.5 at WWDC 2021.
Async await offers several benefits over asynchronous closures:
- Async/await leads to code that is more concise and easier to read, avoiding the “callback hell” problem of nested closures.
- With async/await, functions are guaranteed to return a single result, while completion closures might be called multiple times or might not be called at all.
- Swift concurrency uses a cooperative thread pool behind the scenes, avoiding thread explosion and excessive context switching. This is done transparently, so developers do not need to worry about threading.
In this chapter:
FREE GUIDE - SwiftUI App Architecture: Design Patterns and Best Practices
MVC, MVVM, and MV in SwiftUI, plus practical lessons on code encapsulation and data flow.
DOWNLOAD THE FREE GUIDEUsing callback-based asynchronous functions with completion closures
Before Swift concurrency, asynchronous functions used completion closures as callbacks. A typical example is downloading data using the old dataTask(with:completionHandler:) method of URLSession.
Writing our fetchDog() function using that approach is much more complicated than using async await.
struct HTTPError: Error {
	let statusCode: Int
}

func fetchDog(completion: @escaping (Result<Dog, Error>) -> Void) {
	let dogURL = URL(string: "https://dog.ceo/api/breeds/image/random")!
	let task = URLSession.shared.dataTask(with: dogURL) { data, response, error in
		if let error = error {
			completion(.failure(error))
			return
		}
		if let response = (response as? HTTPURLResponse), response.statusCode != 200 {
			completion(.failure(HTTPError(statusCode: response.statusCode)))
			return
		}
		do {
			let dog = try JSONDecoder().decode(Dog.self, from: data!)
			completion(.success(dog))
		} catch {
			completion(.failure(error))
		}
	}
	task.resume()
}
Our three-line-long function is now a readability nightmare.
Asynchronous methods with a callback don’t suspend execution, so they require a completion closure that gets executed when the data transfer is completed.
The closure of the dataTask(with:completionHandler:) method of URLSession receives the data, the response, and any eventual error as parameters. Consequently, you must check all parameters and handle each case appropriately.
Being asynchronous, our fetchDog(completion:) function also needs to take a completion closure as a parameter. And since throwing errors in escaping closures does not work our completion closure requires a Result parameter which we can use to report success or errors to the caller.
Therefore, we must be careful and not forget to call the completion closure in every control-flow branching with a .success or .failure value. Forgetting these calls will result in code paths that do nothing when the asynchronous call is finished.
Replacing completion closures with async await
While using async await is better, if you have a project full of callback-based asynchronous functions, you might not have the time to rewrite them all to use Swift concurrency.
You can use continuations to wrap your old callback-based asynchronous functions and provide an async alternative instead of rewriting them all from scratch.
Xcode also helps you in the process. ⌥-click on the function name, and you will find three options in the Refactor contextual menu.
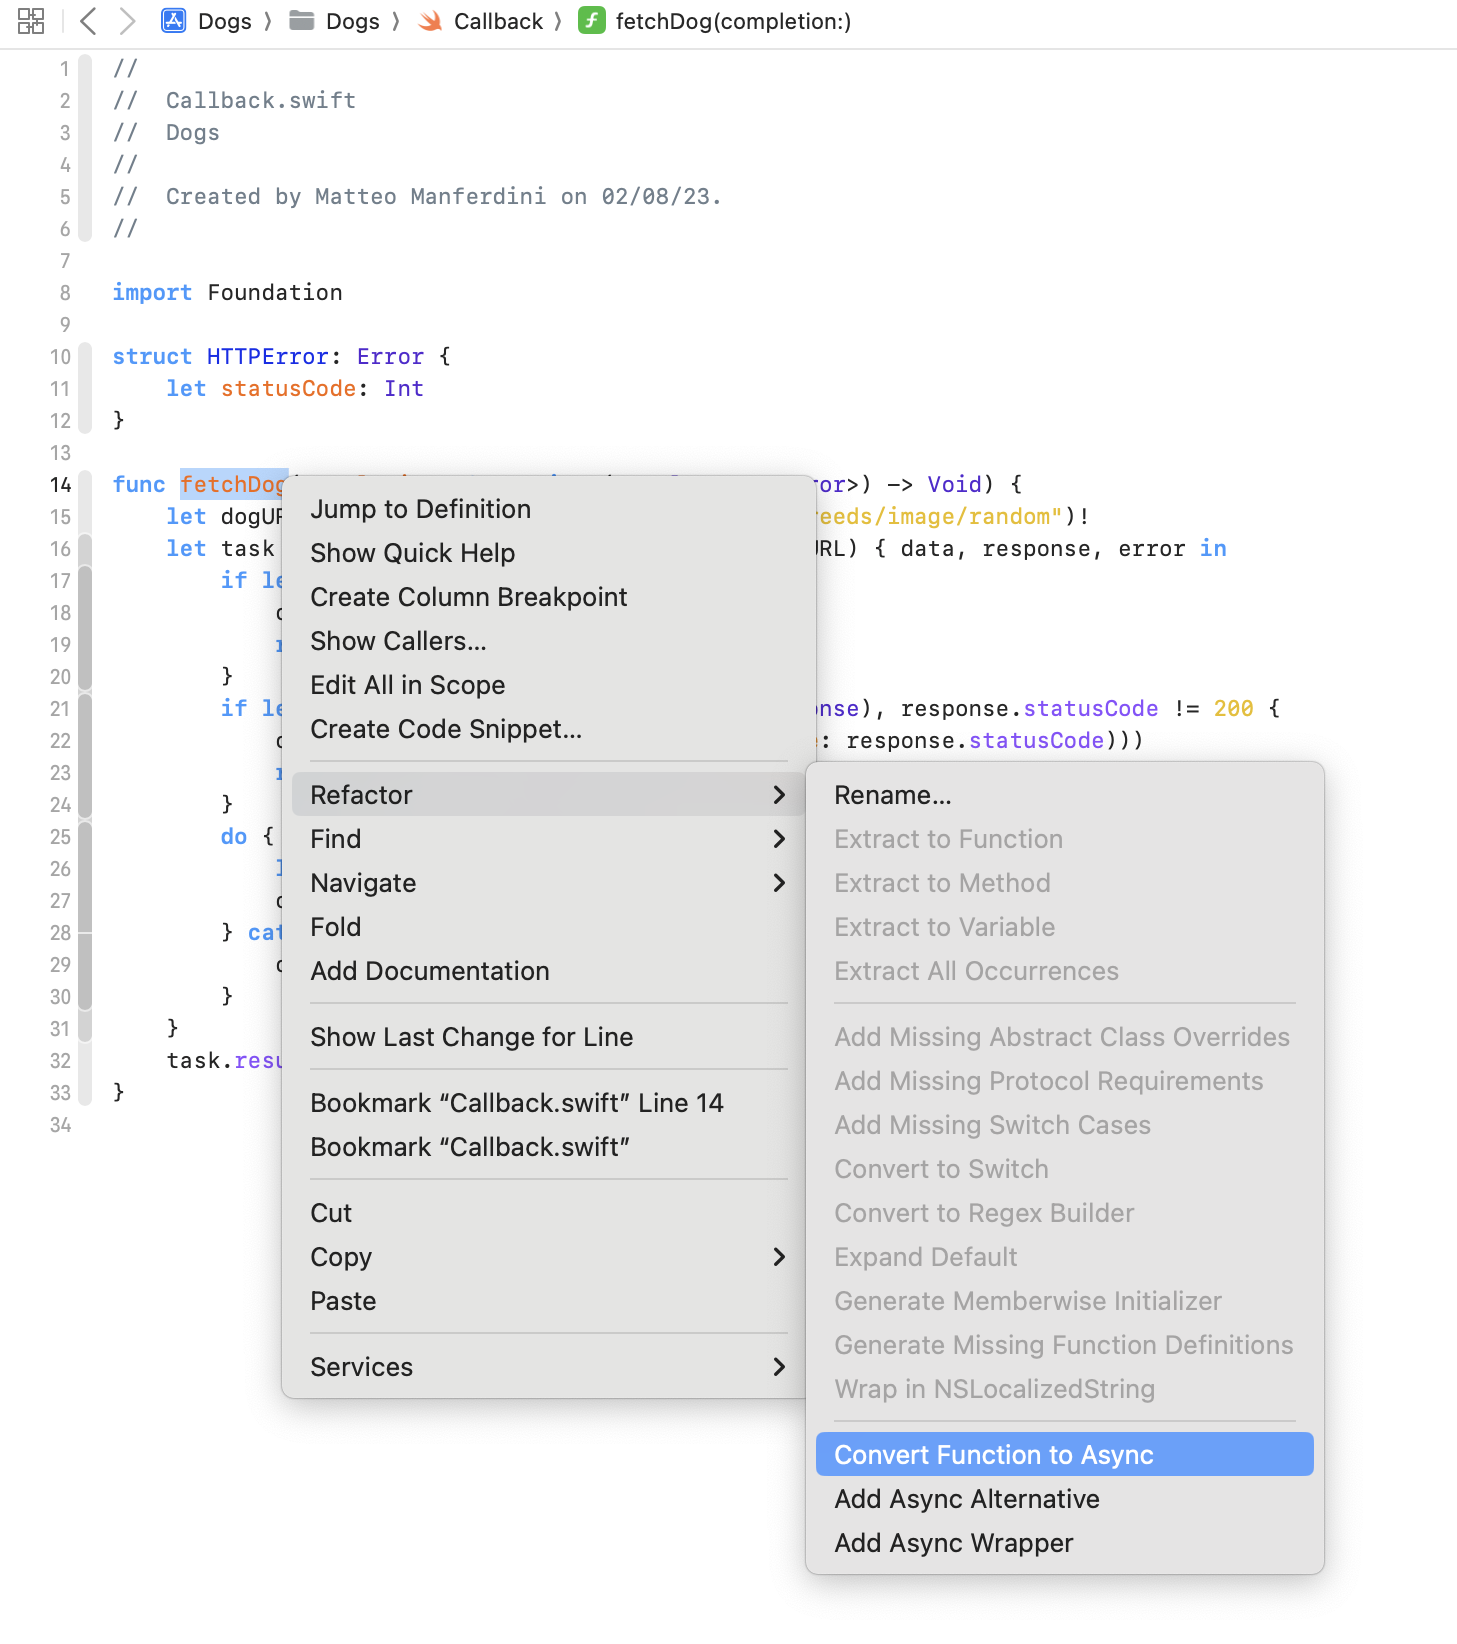
Convert Function to Async
func fetchDog() async throws -> Dog {
	let dogURL = URL(string: "https://dog.ceo/api/breeds/image/random")!
	return try await withCheckedThrowingContinuation { continuation in
		let task = URLSession.shared.dataTask(with: dogURL) { data, response, error in
			if let error = error {
				continuation.resume(with: .failure(error))
				return
			}
			if let response = (response as? HTTPURLResponse), response.statusCode != 200 {
				continuation.resume(with: .failure(HTTPError(statusCode: response.statusCode)))
				return
			}
			do {
				let dog = try JSONDecoder().decode(Dog.self, from: data!)
				continuation.resume(with: .success(dog))
			} catch {
				continuation.resume(with: .failure(error))
			}
		}
		task.resume()
	}
}
This menu option performs the following tasks:
- It modifies the function declaration by adding the
asynckeyword and, if necessary, thethrowskeyword. Additionally, it removes the completion closure. - The function wraps the code that utilizes an asynchronous method with a callback closure inside a call to either
withCheckedContinuationorwithCheckedThrowingContinuation. - It substitutes every call to the callback closure with a call to the
resumemethod of thecontinuationparameter.
However, there is a limitation to this option. It does not automatically update any code that calls the old version of the function. Consequently, your project will fail to compile, and you must manually fix those parts.
This option is helpful if you prefer to immediately replace all instances of the old function with the new Swift concurrency approach. Meanwhile, you can retain the old internal implementation that achieves the desired outcome. Later on, you can refactor the internal implementation of the function to use Swift concurrency as well.
Add Async Alternative
@available(*, renamed: "fetchDog()")
func fetchDog(completion: @escaping (Result<Dog, Error>) -> Void) {
	Task {
		do {
			let result = try await fetchDog()
			completion(.success(result))
		} catch {
			completion(.failure(error))
		}
	}
}


func fetchDog() async throws -> Dog {
	let dogURL = URL(string: "https://dog.ceo/api/breeds/image/random")!
	return try await withCheckedThrowingContinuation { continuation in
		// ...
	}
}
This menu option performs the following tasks:
- It transforms the old function in the same way as the Convert Function to Async menu option.
- It also adds a new function with the old signature, which internally utilizes a
Taskto invoke the new async function. - The function with the old signature is preceded by an
@availableattribute indicating that the method was renamed. However, the default attribute added by Xcode does not emit any warning or error.
Use ‘ deprecated ‘ to mark all calls to the old version with a warning. Alternatively, use’ unavailable’ if you want the compiler to generate an error.
@available(*, deprecated, renamed: "fetchDog()")
Select this option to retain all calls to the old version while using the new async version in your new code. This approach allows you to gradually refactor the function’s new version, ensuring that your entire codebase will utilize the latest implementation, even if it still uses closures at the call site.
Add Async Wrapper
@available(*, renamed: "fetchDog()")
func fetchDog(completion: @escaping (Result<Dog, Error>) -> Void) {
	let dogURL = URL(string: "https://dog.ceo/api/breeds/image/random")!
	let task = URLSession.shared.dataTask(with: dogURL) { data, response, error in
		// ...
	}
	task.resume()
}

func fetchDog() async throws -> Dog {
	return try await withCheckedThrowingContinuation { continuation in
		fetchDog() { result in
			continuation.resume(with: result)
		}
	}
}
This menu option performs the following tasks:
- It preserves the old version of the function unaltered.
- It introduces a new
asyncversion that wraps the old one inside a call towithCheckedContinuationorwithCheckedThrowingContinuation.
This approach is the opposite of the previous one. Utilize this option if you wish to maintain your existing code unchanged. It will keep using the old implementation while you incorporate Swift concurrency for new code. This will make your old and new code diverge, so be sure you have a good reason never to refactor old code to use Swift concurrency.
Did Swift concurrency kill Combine?
My short answer is yes. Combine might continue to power frameworks behind the scenes, but iOS developers mainly used it to chain asynchronous calls or perform them in parallel. It is now much easier to do with async await.
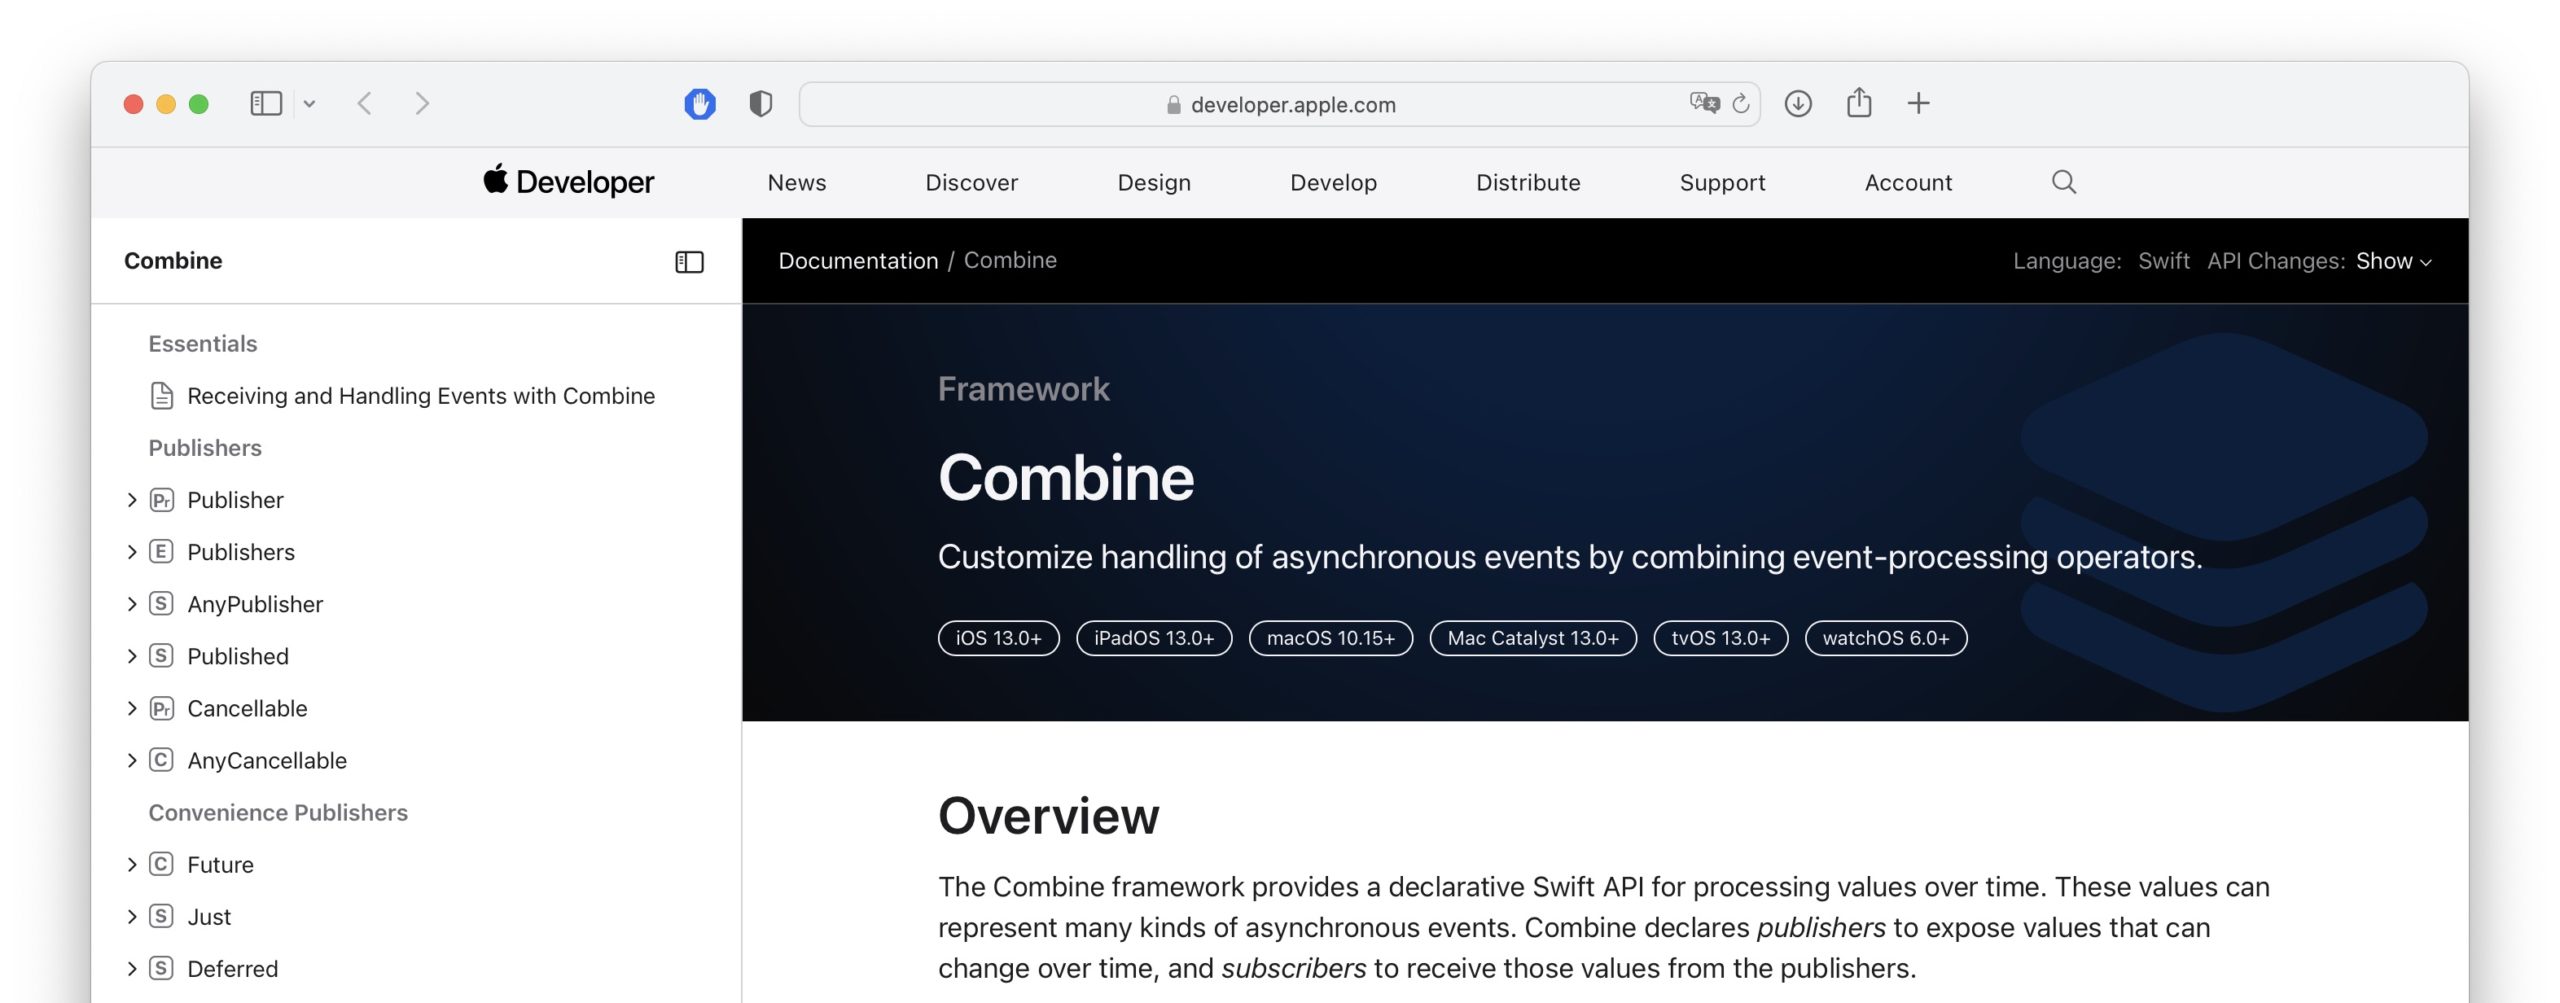
Combine is a native functional reactive programming framework for Apple platforms. The proponents of FRP often highlight that Combine has several uses and is not only beneficial for asynchronous code.
While that is true to some extent, in iOS, FRP frameworks like Combine or RxSwift have primarily been used for asynchronous code. This statement is not controversial; it is explicitly spelled out in Apple’s documentation.
Asynchronous events are now better implemented using async await. You can use AsyncStream and the Swift Async Algorithms package if you need to combine asynchronous event sequences.
FRP and Combine were never as popular in iOS development as some blogs might lead you to think.
One way to gauge Combine’s popularity is to compare the number of questions about Combine on Stack Overflow to the number of questions about SwiftUI or async await. You can also compare their trends on Google.
I have also seen bloggers that wrote much about Combine in the past refocus on Swift concurrency.
Conclusions
In this article, we have seen how to use async await in Swift to run asynchronous functions, especially network requests, both sequentially and in parallel.
We also looked at how to bridge between synchronous and asynchronous code, including how to run async methods in SwiftUI apps.
In any complex app, simply calling asynchronous functions is not enough. It is also essential to know where to do it in an app’s architecture. You can read more bout it in my article on REST APIs and get my free guide to MVC and MVVM in SwiftUI in the box below.
SwiftUI App Architecture: Design Patterns and Best Practices
It's easy to make an app by throwing some code together. But without best practices and robust architecture, you soon end up with unmanageable spaghetti code. In this guide I'll show you how to properly structure SwiftUI apps.
Matteo has been developing apps for iOS since 2008. He has been teaching iOS development best practices to hundreds of students since 2015 and he is the developer of Vulcan, a macOS app to generate SwiftUI code. Before that he was a freelance iOS developer for small and big clients, including TomTom, Squla, Siilo, and Layar. Matteo got a master’s degree in computer science and computational logic at the University of Turin. In his spare time he dances and teaches tango.