
Since the introduction of SwiftUI, the MVVM pattern has become more relevant than ever. Many developers believe this particular pattern aligns well with the SwiftUI data flow.
MVVM incorporates good ideas but also introduces problems due to varying interpretations of the pattern and its perceived rigidity.
In this article, we’ll explore how MVVM fits into SwiftUI, how to leverage its advantages, and how to navigate its challenges.

FREE GUIDE - SwiftUI App Architecture: Design Patterns and Best Practices
MVC, MVVM, and MV in SwiftUI, plus practical lessons on code encapsulation and data flow.
DOWNLOAD THE FREE GUIDETable of contents
Chapter 1
What is MVVM?
MVVM is an architectural pattern that helps you structure the code of a SwiftUI app by dividing it into three distinct roles.
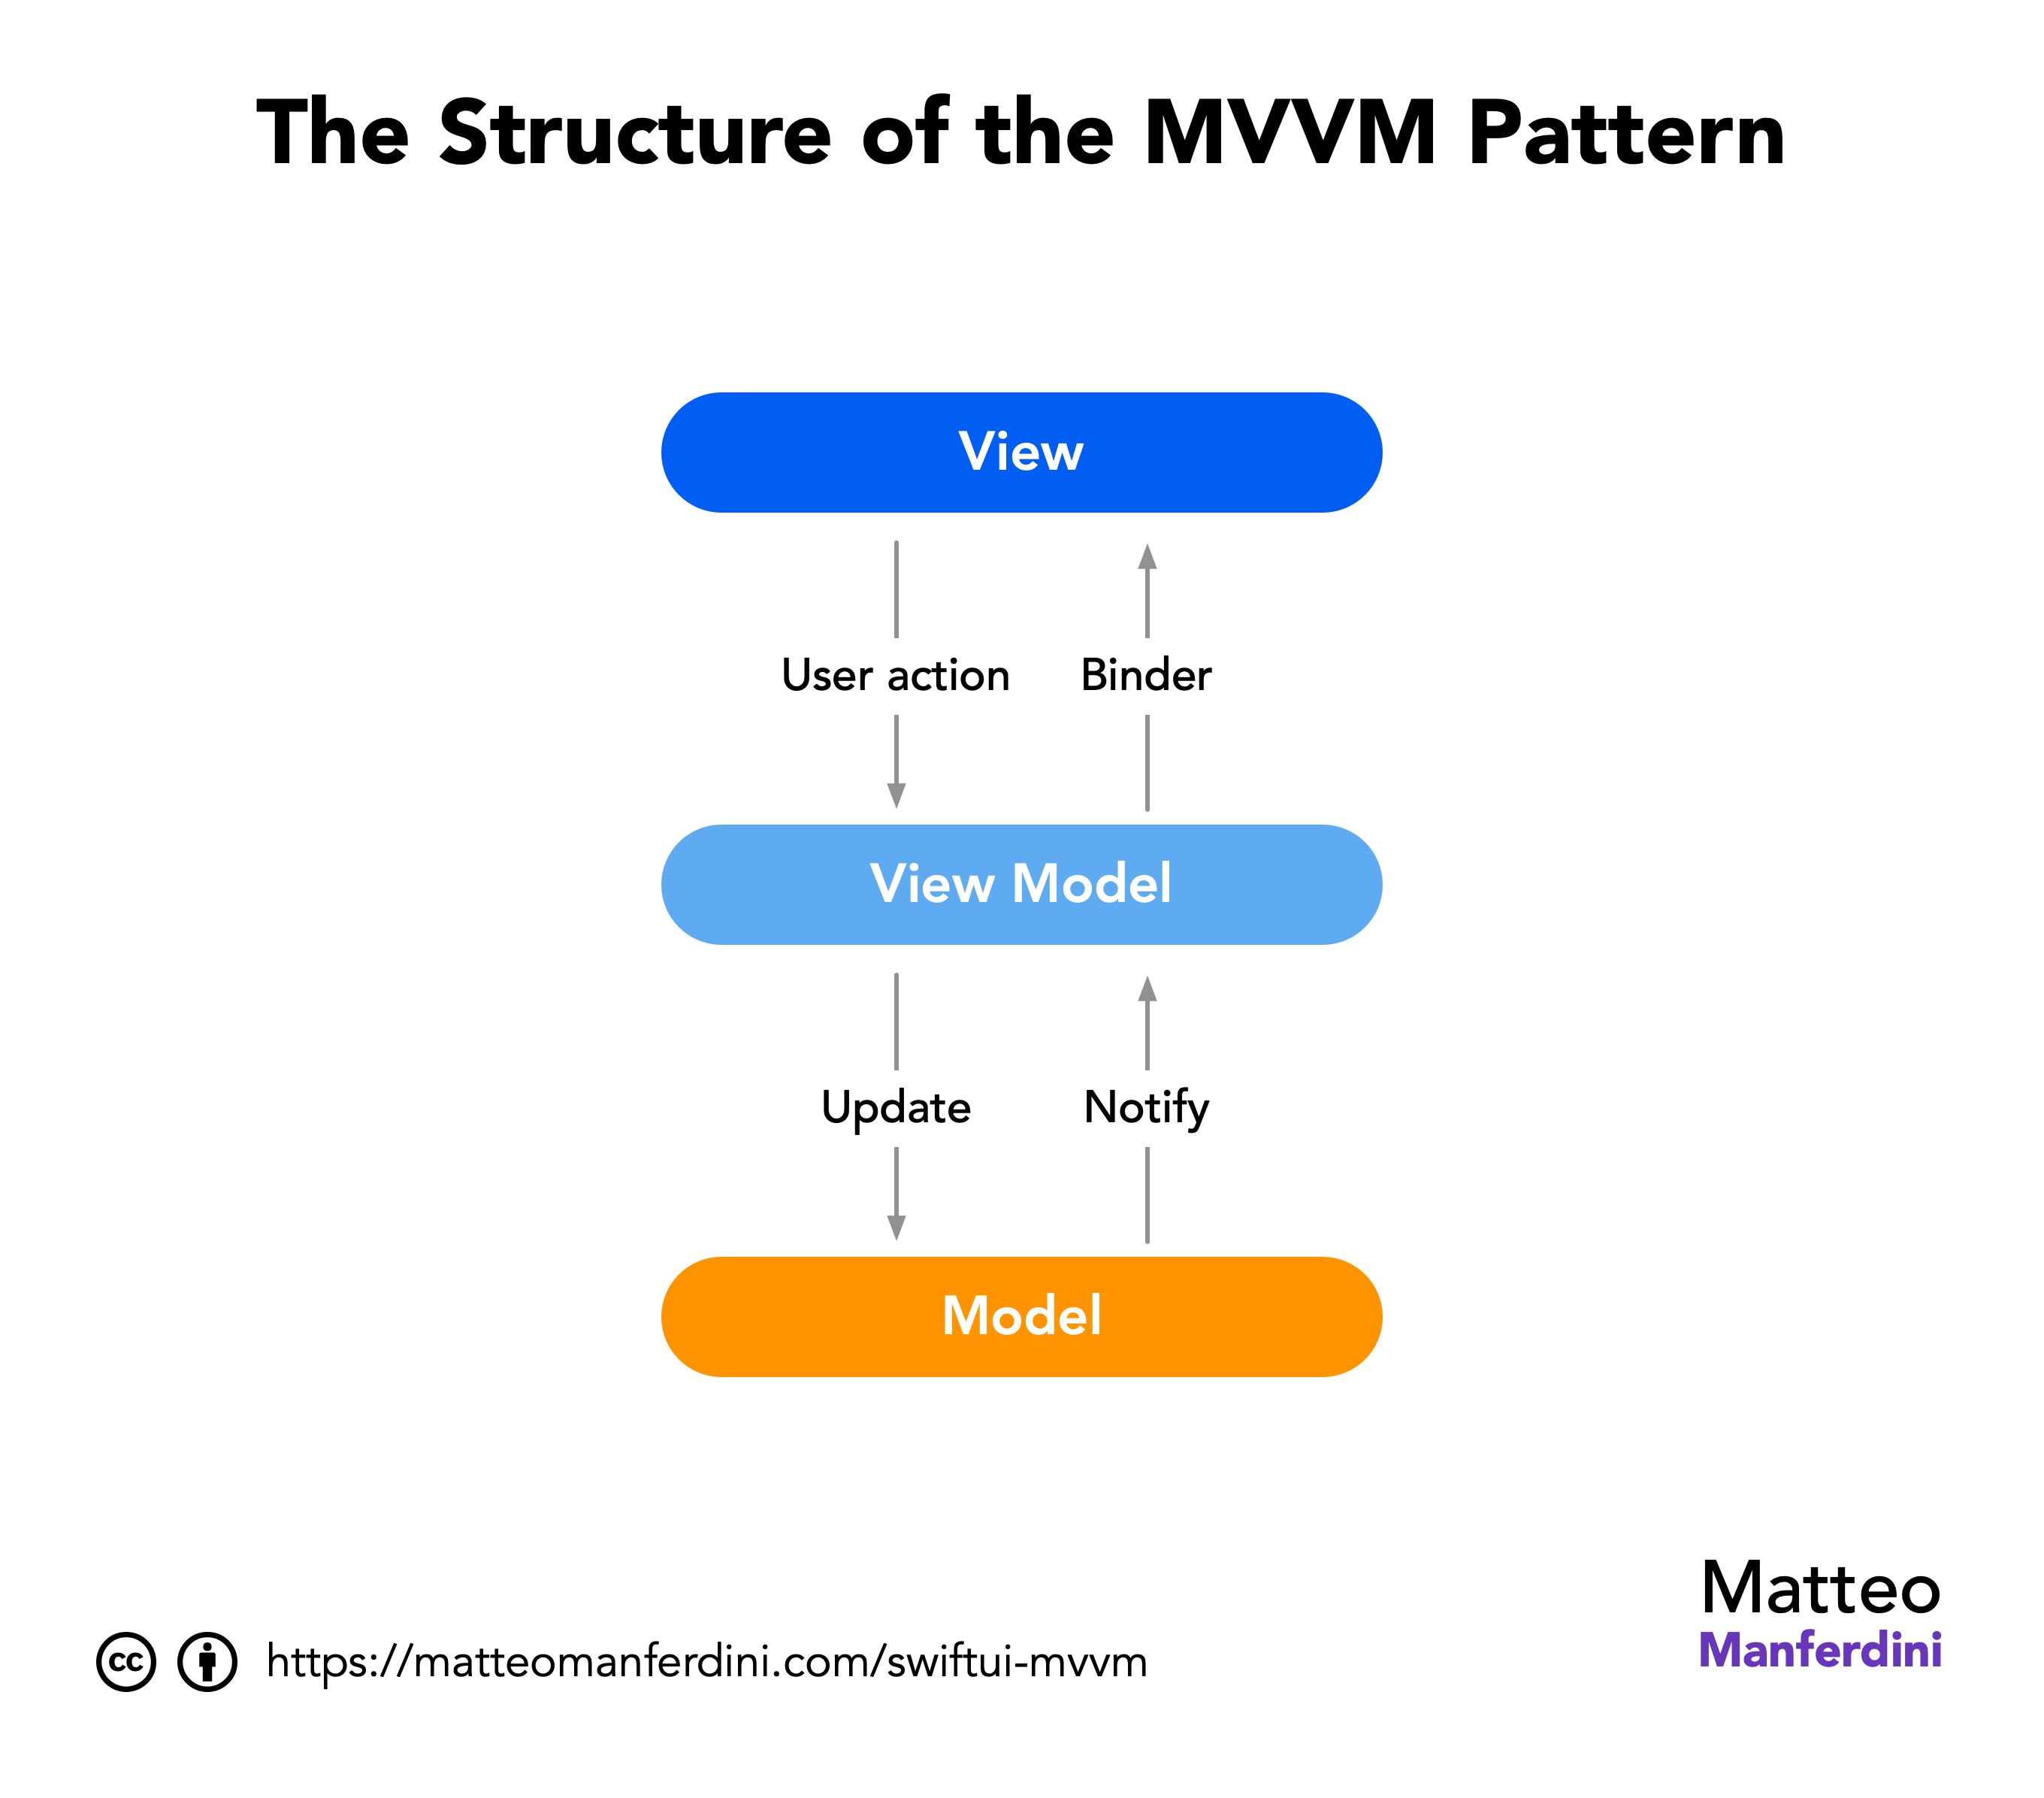
- The model represents the app’s data and its business logic.
- The view displays information to the user and enables interaction.
- The view model acts as a bridge between the view and model layers. It contains a view state and handles most of its logic.
The binder is a crucial component of MVVM. It synchronizes the view and view model layers, eliminating related boilerplate code.
The MVVM pattern is not exclusive to SwiftUI or iOS. Microsoft architects initially developed it, and it was integrated into iOS development years after the initial iOS SDK release.
In this chapter:
How MVVM works in SwiftUI
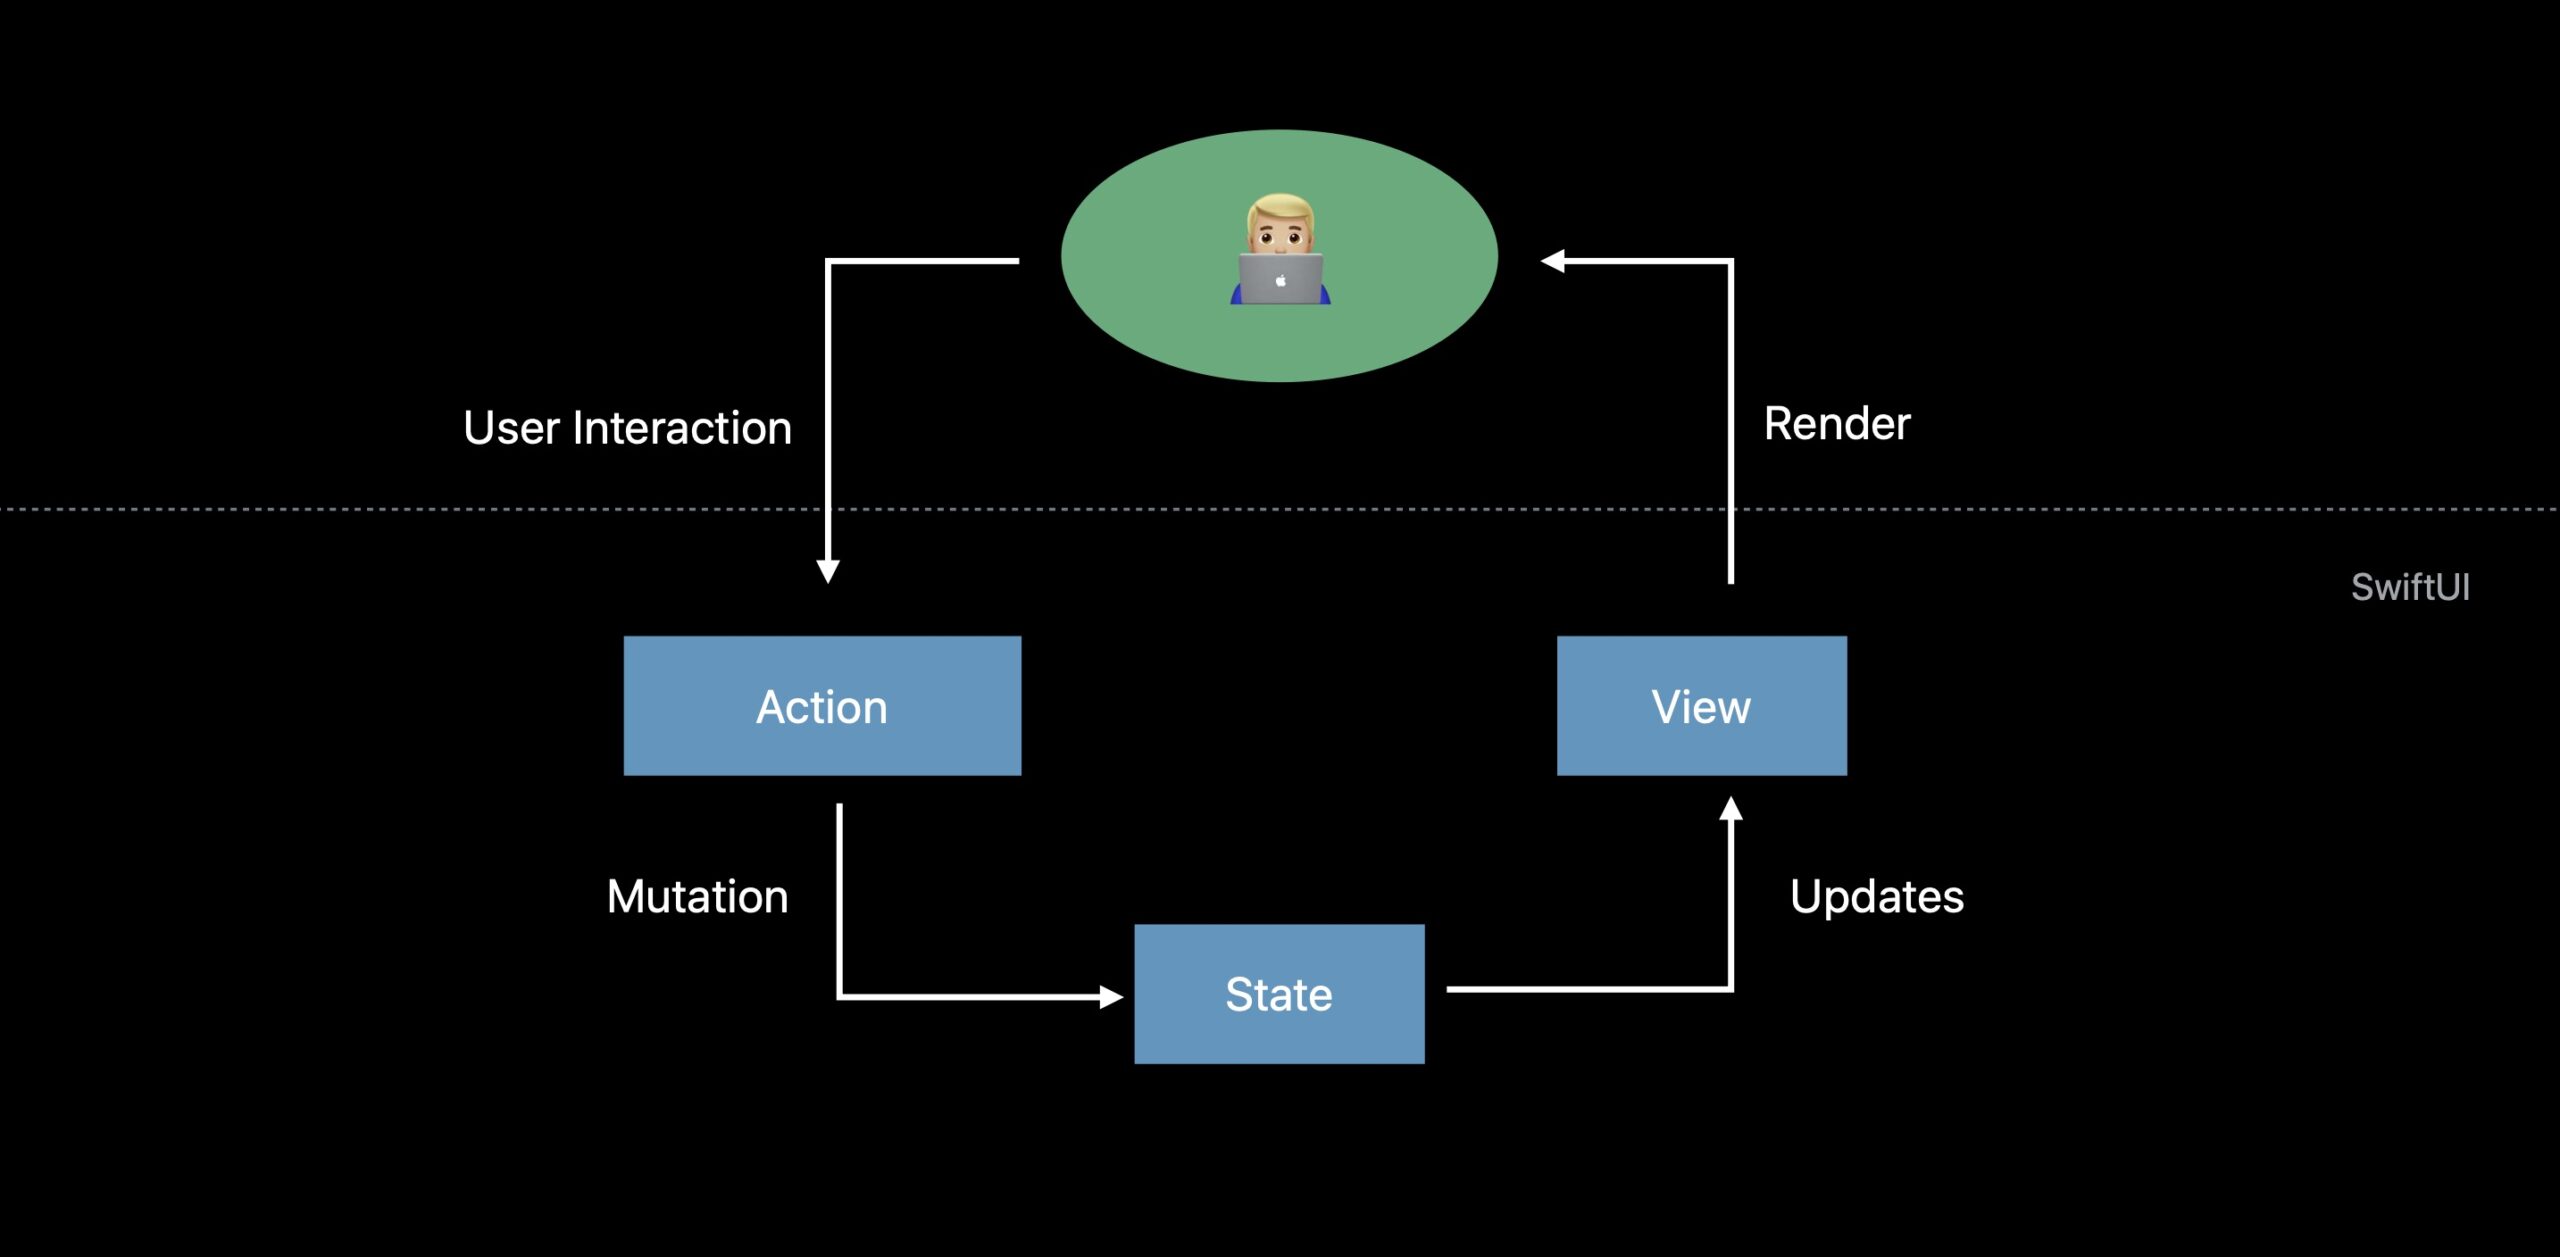
Apple doesn’t explicitly endorse any architectural pattern over another. However, SwiftUI is particularly fitted to the MVVM architecture.
- It offers numerous data-independent views that seamlessly align with the view layer of the MVVM pattern.
- It provides mechanisms to bind views to data and automatically update the user interface when the underlying data changes.
A SwiftUI view model is usually implemented as an @Observable class held by a view within a @State property. It is connected to SwiftUI views that allow data input and user interaction through the @Binding property wrapper or action closures.
import SwiftUI

struct ContentView: View {
	@State private var viewModel = ViewModel()

	var body: some View {
		// Views connected to the viewModel property
	}
}

@Observable class ViewModel {
	// Properties and methods
}
Best practice
While it is possible to implement a view model using a Swift struct, that is rarely a good option.
View models often interact with the global app state, permanent storage, and networking. These all need reference semantics and are usually implemented with objects.
Putting references inside value types is generally not recommended, so it’s always better to implement a view model as an @Observable class.
Do you need a view model for every SwiftUI view?
The MVVM pattern’s detractors commonly misunderstand it and believe it creates a large amount of useless boilerplate code because it requires attaching a view model to every view.
However, the problem is caused only by a too-strict adherence to MVVM prescriptions, which can cause problems with any other pattern.
Not all views require view models. Specifically, pure views, i.e., modular views that simply display information like Text or Image do not require a view model.
View models should be restricted to root views only when doing so has real benefits. You can read more about these concepts in my free guide on MVC and MVVM in SwiftUI.
Why you should use MVVM in your SwiftUI apps
The clearly defined roles in the SwiftUI MVVM architecture respect the separation of concerns design principle, which is crucial for maintaining well-organized and easily understandable/testable code.
Unfortunately, there’s a misconception among inexperienced developers that MVVM is an obsolete pattern and is no longer necessary in SwiftUI. However, multilayer architectural patterns like MVVM are unavoidable.
SwiftUI manages only the view layer. Without architectural patterns, code accumulates within views, violating fundamental software design principles like the SOLID principles. This results in massive monolithic views with code that is hard to reuse, maintain, and unit test.
The fact that SwiftUI automatically handles view updates does not justify abandoning software development best practices that have existed for decades across various platforms.
You might have seen an anonymous rant against MVVM on Apple’s forums that Google persistently puts at the top of search results.

Skimming through the thread, you can find gems like:
Don’t do Clean / SOLID anti-patterns, be an OOP engineer
developers must stop follow SOLID and “Uncle Bob” bad practices
Agile, SOLID and over testing works like a cancer for development teams.
No wonder that he then supports the so-called MV pattern. If you want to follow that advice, help yourself, but don’t say you weren’t warned.
Chapter 2
Implementing the MVVM Pattern in a SwiftUI App
To see an example of MVVM in SwiftUI, we will build a small app for Hacker News, a news website for developers similar to Reddit, which is known for its (debatable) quality. We will use its web API to fetch the top 10 news stories from the best stories page.
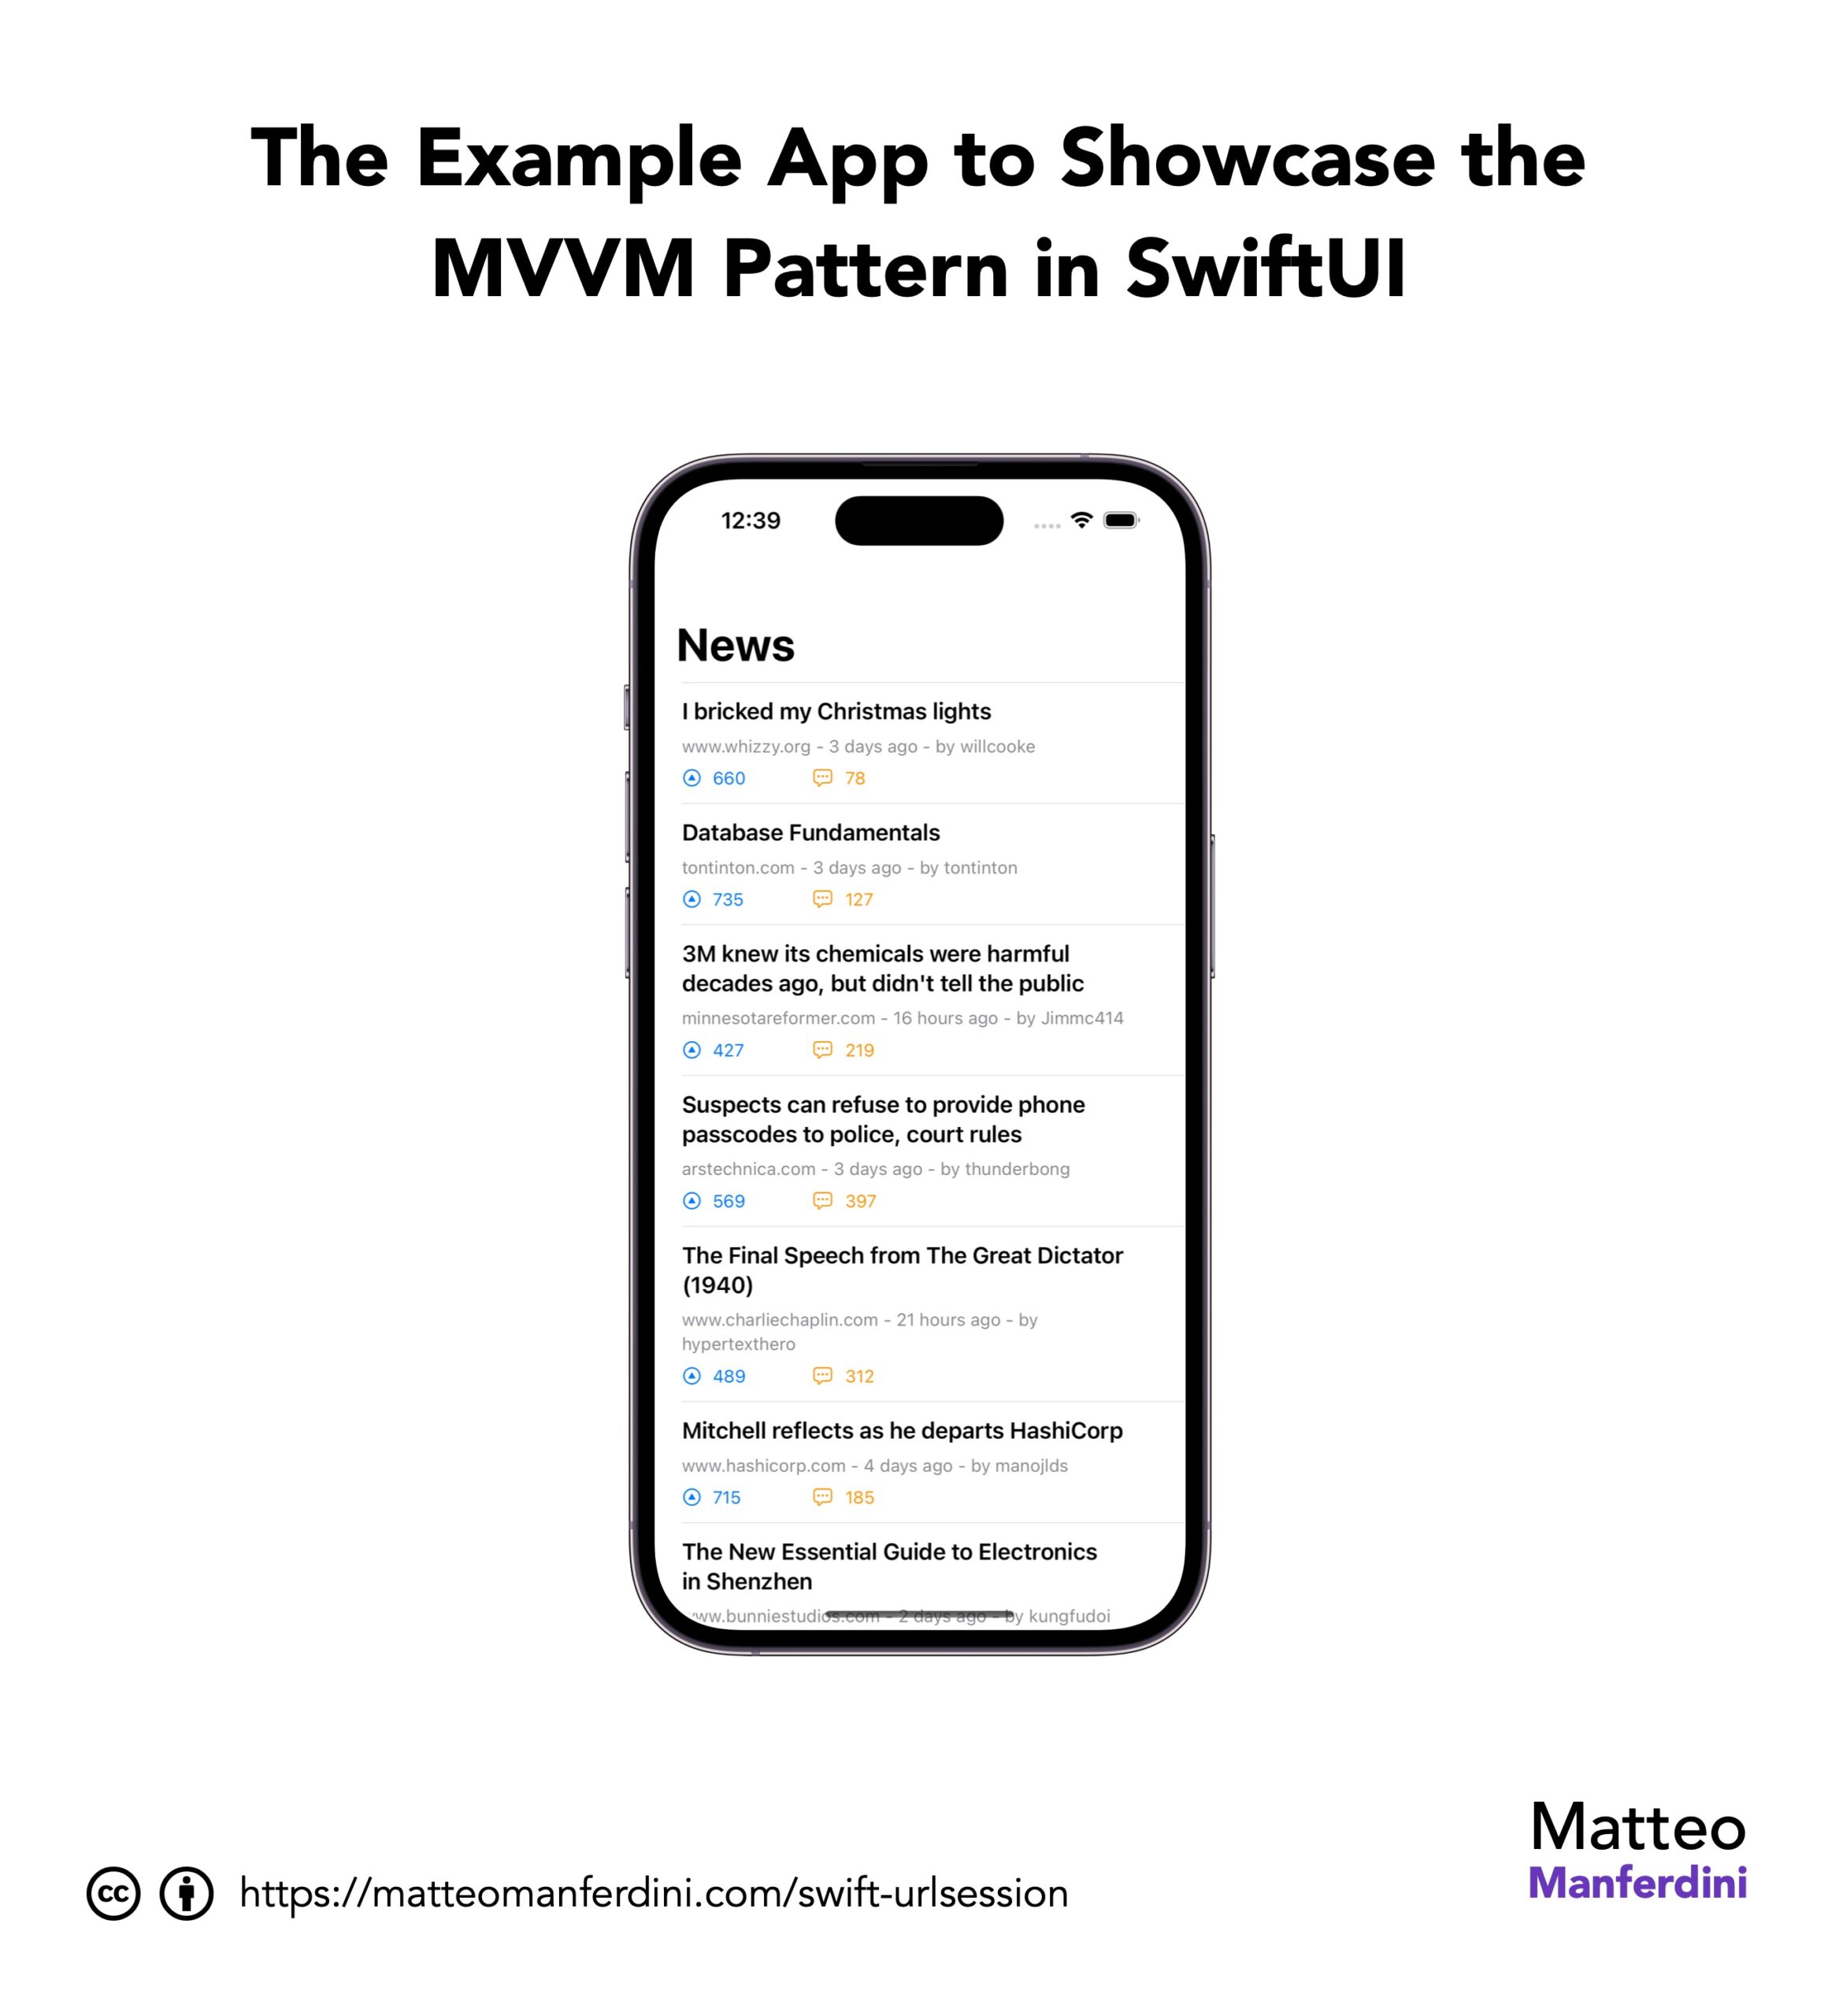
You can find the complete Xcode project on GitHub.
In this chapter:
FREE GUIDE - SwiftUI App Architecture: Design Patterns and Best Practices
MVC, MVVM, and MV in SwiftUI, plus practical lessons on code encapsulation and data flow.
DOWNLOAD THE FREE GUIDECreating model types to represent the app’s data and business logic
We will start by implementing our app’s model layer. Model types only contain the domain business logic, i.e., the app’s data and the code that manipulates it. They are agnostic of data storage, networking, and user interface presentation.
The Hacker News API uses an item entity to represent all its data, e.g., stories, comments, jobs, etc. Therefore, creating a corresponding Swift type is straightforward:
struct Item: Identifiable {
	let id: Int
	let commentCount: Int
	let score: Int
	let author: String
	let title: String
	let date: Date
	let url: URL
}

extension Item: Decodable {
	enum CodingKeys: String, CodingKey {
		case id, score, title, url
		case commentCount = "descendants"
		case date = "time"
		case author = "by"
	}
}
Since the returned data is in JSON format, our Item struct conforms to the Decodable protocol and provides coding keys to map the JSON fields to our properties. You can read more in my article on parsing JSON in Swift.
Model types should not merely act as empty data containers. Data transformation code is an example of business logic belonging to the model layer of MVVM.
Note
Typically, the model layer comprises Swift value types (structures and enumerations). However, that’s not a hard rule. For example, model types must be represented using classes when using SwiftData or Core Data.
Implementing reusable views decoupled from model types
Reusable content views constitute the second layer of MVVM that we will explore. Let’s start with a view representing a single entry in the top 10 most upvoted Hacker News posts.
struct Entry: View {
	let title: String
	let footnote: String
	let score: Int
	let commentCount: Int

	var body: some View {
		VStack(alignment: .leading, spacing: 8.0) {
			Text(title)
				.font(.headline)
			Text(footnote)
				.font(.footnote)
				.foregroundColor(.secondary)
			ZStack(alignment: Alignment(horizontal: .leading, vertical: .center)) {
				Label(score.formatted(), systemImage: "arrowtriangle.up.circle")
					.foregroundStyle(.blue)
				Label(commentCount.formatted(), systemImage: "ellipses.bubble")
					.foregroundStyle(.orange)
					.padding(.leading, 96.0)
			}
			.font(.footnote)
			.labelStyle(.titleAndIcon)
		}
	}
}

#Preview {
	Entry(
		title: "If buying isn't owning, piracy isn't stealing",
		footnote: "pluralistic.net - 3 days ago - by jay_kyburz",
		score: 1535,
		commentCount: 773
	)
}
The crucial aspect is that our view is entirely independent of our Item structure. Instead, it employs simple Swift types like Int and String.
Notice that the Entry view does not have separate stored properties for
- the domain name of the website;
- the date of the story;
- the author.
It merely displays this information as a footnote text. This helps maintain types as loosely coupled as possible, minimizing the impact of changes on existing code.
Writing a view model that encapsulates the app’s logic for a single app screen
The full view must display a list of stories. Most developers typically place the required state and networking code here. However, according to the MVVM pattern, that code belongs in a view model.
To retrieve the best stories from the API, we need to call endpoints:
- The best stories endpoint returns an array of IDs.
- Then, we use the first ten IDs to get data from the story endpoint.
extension ContentView {
	@Observable @MainActor class ViewModel {
		var stories: [Item] = []

		func fetchTopStories() async throws {
			let url = URL(string: "https://hacker-news.firebaseio.com/v0/beststories.json")!
			let (data, _) = try await URLSession.shared.data(from: url)
			let ids = try JSONDecoder().decode([Int].self, from: data)
			stories = try await withThrowingTaskGroup(of: Item.self) { group in
				for id in ids.prefix(10) {
					group.addTask { try await self.fetchStory(withID: id) }
				}
				var stories: [Item] = []
				for try await item in group {
					stories.append(item)
				}
				return stories
			}
		}

		private func fetchStory(withID id: Int) async throws -> Item {
			let url = URL(string: "https://hacker-news.firebaseio.com/v0/item/\(id).json")!
			let (data, _) = try await URLSession.shared.data(from: url)
			let decoder = JSONDecoder()
			decoder.dateDecodingStrategy = .secondsSince1970
			return try decoder.decode(Item.self, from: data)
		}
	}
}
Note
I usually place view model classes inside an extension for the respective view.
The fully scoped name of the class above is ContentView.ViewModel, which is the same name I would have used without scoping. However, this allows the shorter ViewModel type name to be used inside the ContentView.
The ViewModel class is @Observable, so any update to its stories property will trigger an update in the connected view. Placing this code outside of SwiftUI views simplifies testing.
The fetchTopStories() and fetchStory(withID:) methods employ Swift’s async await and URLSession to download data from the Hacker News API. Furthermore, the fetchTopStories() method utilizes a task group to parallelly retrieve the data for each story, creating distinct subtasks for each fetchStory(withID:) call.
In this simple example, I’ve placed all the networking code within the view model. However, for a more sophisticated SwiftUI app, a preferable approach to reusing code is constructing a separate Swift networking infrastructure for REST API calls.
SwiftUI view models before the Observation framework
Before the release of the Observation framework, view model classes conformed to the ObservableObject protocol, exposing their properties through the @Published wrapper. Moreover, the @StateObject wrapper was necessary inside SwiftUI views.
If your app doesn’t require support for iOS versions before 17, it’s recommended to migrate your codebase to use the Observation framework.
Adding a view model to a SwiftUI view and triggering events
The final step in implementing MVVM in our SwiftUI app is connecting the view model to a view.
struct ContentView: View {
	@State private var model = ViewModel()

	var body: some View {
		List(model.stories) { story in
			Entry(story: story)
		}
		.listStyle(.plain)
		.navigationTitle("News")
		.task {
			try? await model.fetchTopStories()
		}
	}
}

extension Entry {
	init(story: Item) {
		title = story.title
		score = story.score
		commentCount = story.commentCount
		footnote = (story.url.host() ?? "")
		+ " - \(story.date.formatted(.relative(presentation: .numeric)))"
		+ " - by \(story.author)"
	}
}

#Preview {
	NavigationStack {
		ContentView()
	}
}
The ContentView type holds the ViewModel instance in a @State property. It then initiates network requests by invoking the fetchTopStories() method within its .task modifier and uses a List to show the contents of the stories property of the view model.
Note
In the above example, the ViewModel object can be easily instantiated as the default value of the viewModel stored property because it has no dependencies.
When that’s the case, the view model initialization requires a different pattern. Particular care must be taken when using MVVM with SwiftData, where a proper understanding of how SwiftUI works can greatly simplify instantiation and dependency injection.
The Entry extension allows us to conveniently initialize the view using an Item value within the NewsView even though the Entry view initializer uses simple Swift value types.
Remember to include a NavigationStack in the app structure to display the navigation bar when running the app in the iOS simulator.
@main
struct HackerNewsApp: App {
var body: some Scene {
WindowGroup {
ContentView()
}
}
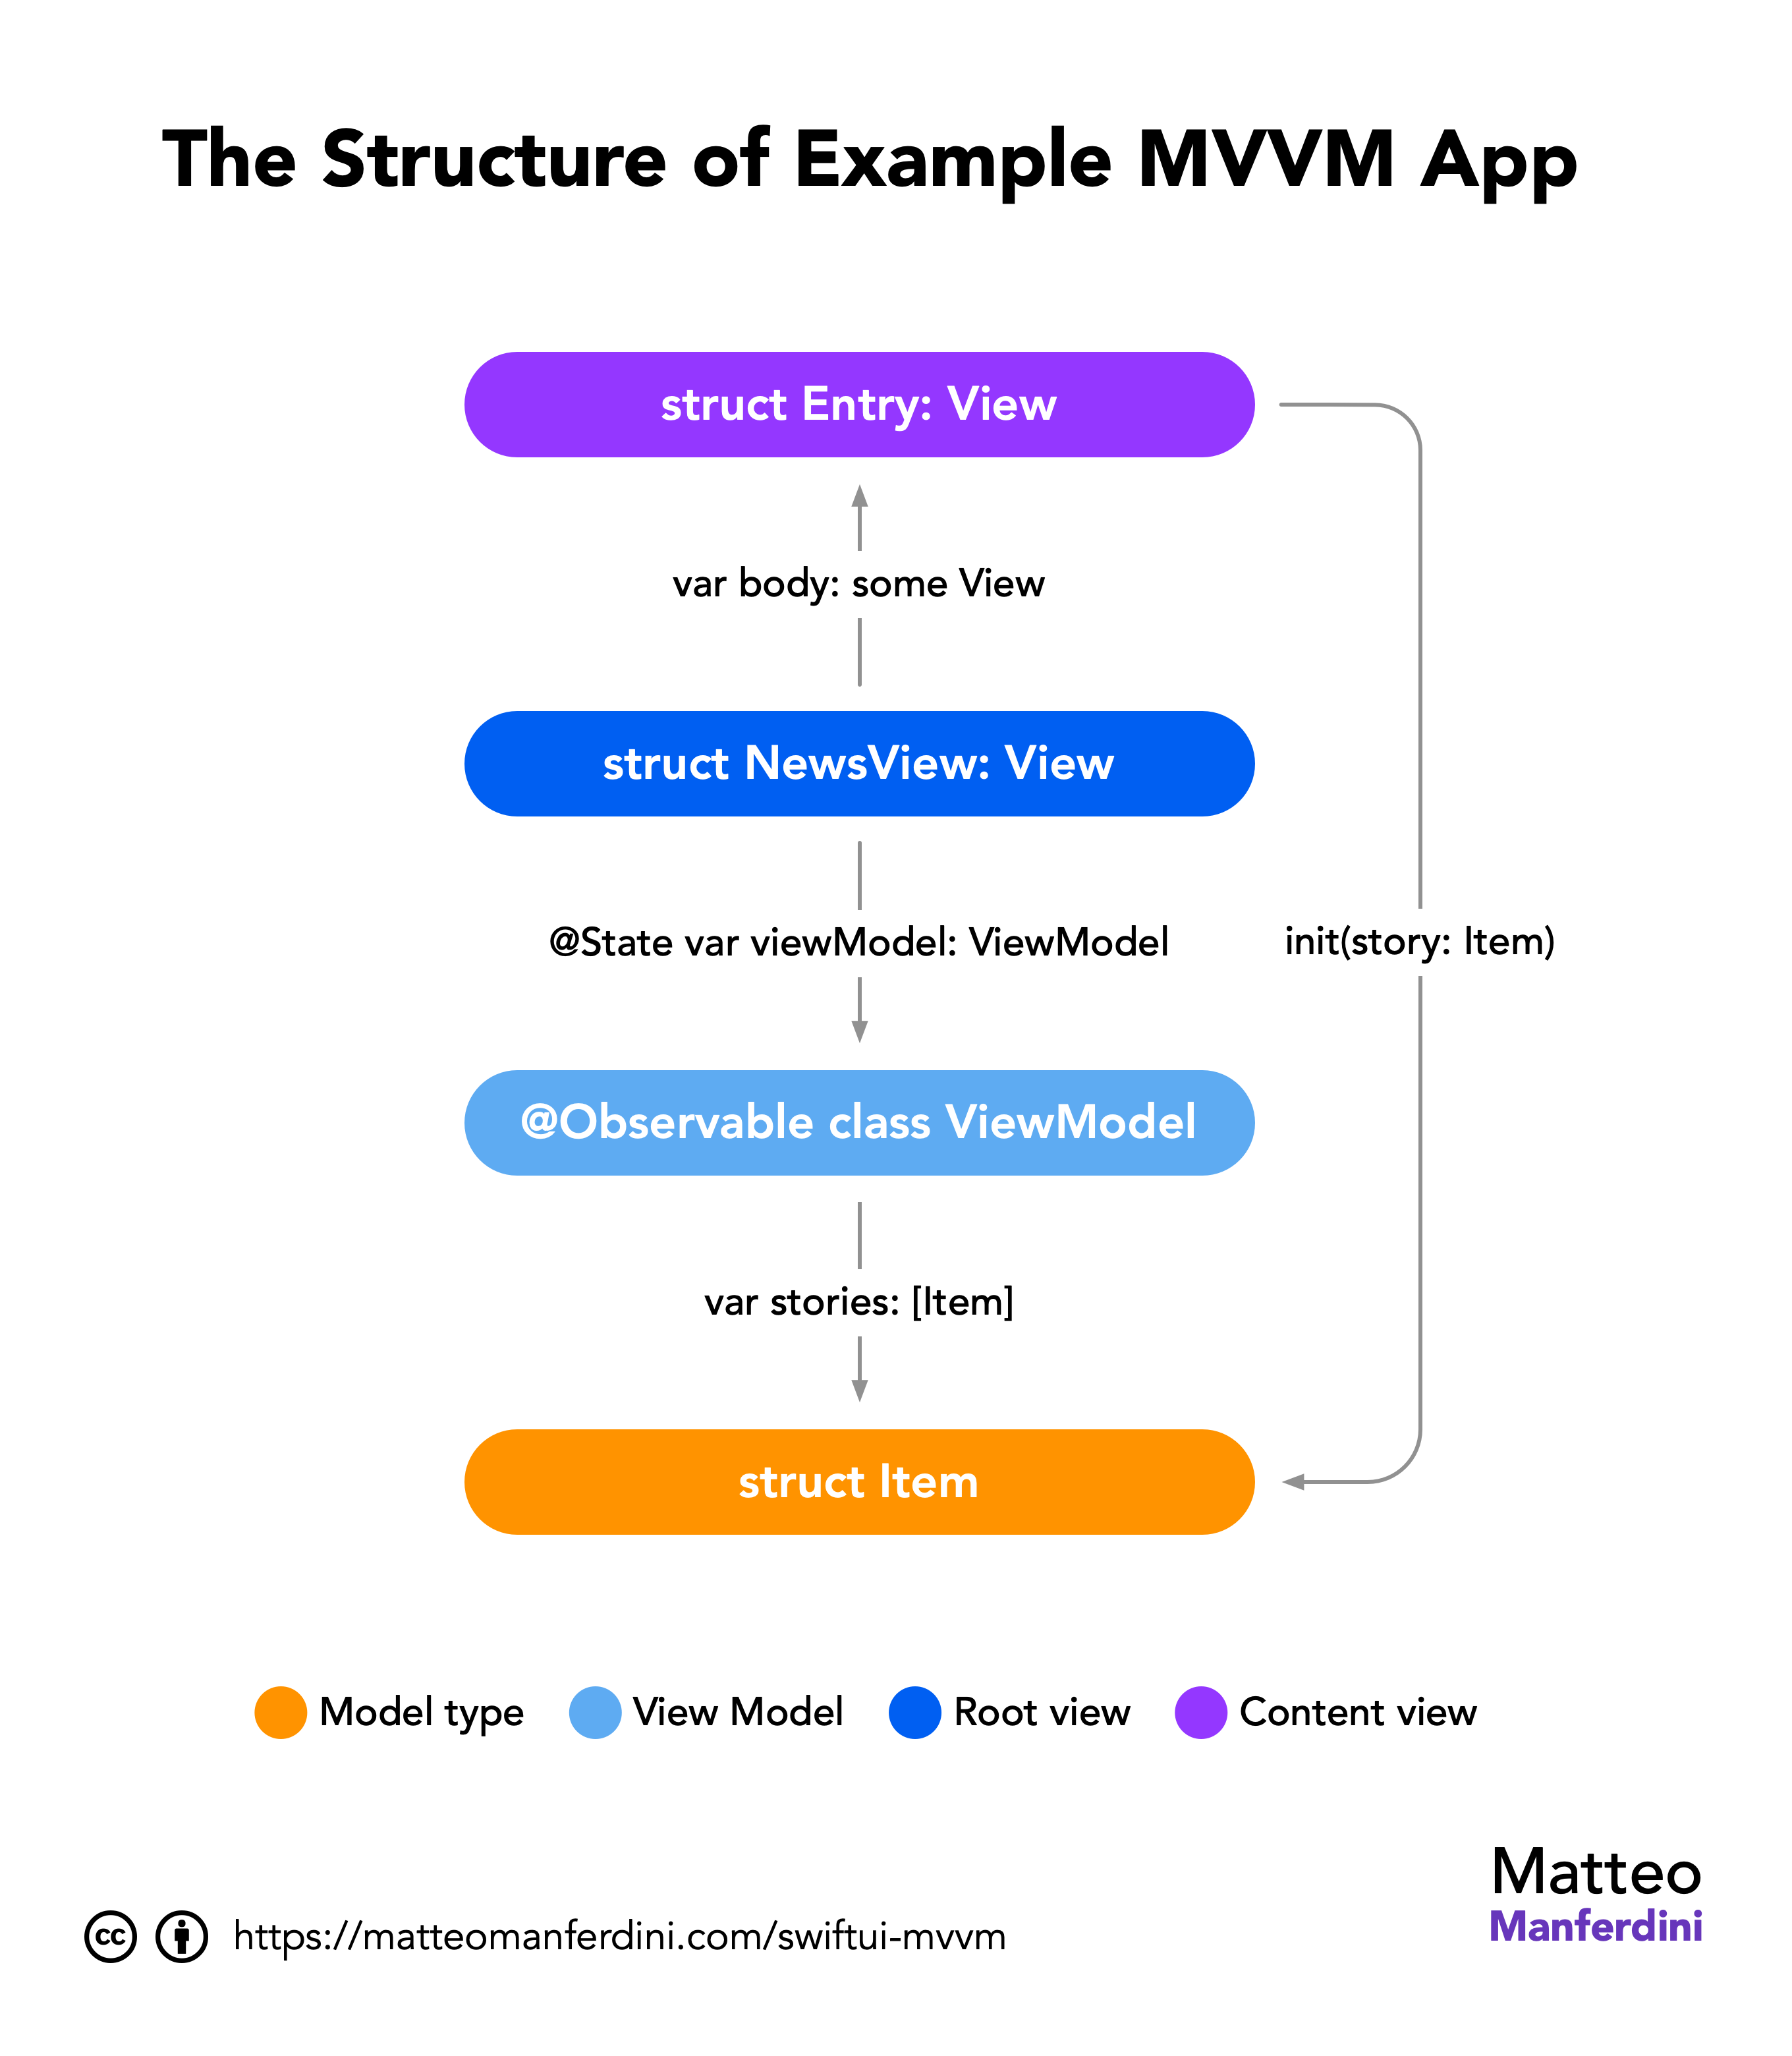
}You might notice a distinction between the Entry and ContentView types. While the former remains wholly decoupled from other app layers, the latter is linked to the ViewModel class and, consequently, to the Item structure.
The ContentView is what I call a root view. Although technically part of the view layer, it shoulders more responsibilities than a pure view, which solely displays data and enables interaction.
You can read more about these concepts in my free guide on MVC and MVVM in SwiftUI.
Chapter 3
Alternative architectural patterns and similar ideas
MVVM isn’t the sole architectural pattern available in SwiftUI.
I’ll begin this section with a disclaimer: it will reflect my strong opinions and critical perspectives on these alternative patterns.
However, sometimes, valuable ideas emerge that can be integrated into your app’s architecture. So, take everything I discuss here with a grain of salt.
In this chapter:
FREE GUIDE - SwiftUI App Architecture: Design Patterns and Best Practices
MVC, MVVM, and MV in SwiftUI, plus practical lessons on code encapsulation and data flow.
DOWNLOAD THE FREE GUIDEMVVM vs. MVC: Local view models and global controllers
MVVM and all other patterns are just variations of MVC, so the latter cannot be considered an alternative. When comparing the MVC pattern diagram, it’s apparent, even to non-experts in graph theory, that MVVM and MVC are nearly identical.
The fundamental disparity between MVC and MVVM in SwiftUI lies in the emphasis on controllers, objects shared across several views, versus view models, which are local objects controlling the behavior of a single view—usually representing a single screen in an iOS app.
However, in MVVM, the necessity for shared objects persists. These are often implemented as singletons, subsequently accessed by individual view models.
I consider singletons an anti-pattern, so I combine the MVVM and MVC patterns in my apps, modeling the view logic through view models and sharing controllers via dependency injection.
import SwiftUI

struct ContentView: View {
	@State private var viewModel: ViewModel?
	@Environment(Controller.self) private var controller

	var body: some View {
		Text("Hello, World!")
			.task {
				viewModel = ViewModel(controller: controller)
			}
	}
}

@Observable class ViewModel {
	private let controller: Controller

	init(controller: Controller) {
		self.controller = controller
	}
}

@Observable class Controller {
	// ...
}
In such cases, view models must be initialized inside the task(priority:_:) view modifier, as recommended in Apple’s documentation.
Any developer complaining that you cannot access environment objects from view models or that passing them through an initializer is “too painful” should not be trusted.
The Model-View pattern and the Elm architecture
The MV pattern (Model-View) seems to be a new contender to MVVM. Some developers assert that MVVM isn’t necessary for SwiftUI and that an app should primarily comprise views and the model.
I consider the MV pattern to be an anti-pattern. It goes against pretty much every software design principle and makes code untestable. This is a high price for the supposed benefit of having a little less boilerplate code.
This concept is occasionally likened to the Elm architecture and often stems from a slide in Apple’s initial SwiftUI presentation.
These show a complete lack of knowledge about design patterns and best practices, paired with the arrogance that a new UI framework somehow necessitates throwing away decades of hard-learned lessons.
Trygve Reenskaug used the same diagram for the MVC pattern 40 years earlier, and it can be easily found on Wikipedia.

Apple developers claim that SwiftUI is architecture-agnostic. However, there is no escaping that any architectural design pattern rests its foundations on MVC.
When you poke, the MV pattern reveals the need for objects shared across views through singletons or as SwiftUI environment objects. You might label those handlers, managers, stores, services, or any other fancy name, but fundamentally, they remain controllers.
Moreover, forgoing a well-defined design pattern leads to these objects lacking distinct roles. Throwing away layers when the general approach has always been adding more results in a messy codebase and model types that encompass responsibilities belonging to other layers.
The Clean Swift architecture and the VIP and VIPER patterns
A family of patterns, including VIP (View-Interactor-Presenter) and VIPER (View-Interactor-Presenter-Entity-Router), stems from what’s commonly known as Uncle Bob’s Clean Architecture.
Much could be said about these patterns, but as I said above, they are all a rehash of MVC with shuffled roles.
One significant flaw of theirs is the proliferation of protocols and generics. While these are necessary in complex apps, every abstraction incurs a cognitive cost. Abstractions should only be used when truly beneficial, not merely because a pattern prescribes them.
However, they cab also introduce ideas worth exploring. For example, the router idea from VIPER can be integrated into MVVM in the form of coordinators to better manage the navigation of a complex SwiftUI app.
The influences of Redux and the Swift composable architecture
Among the options discussed here, The Composable Architecture (TCA) seems to be gaining popularity, especially with support from a dedicated open-source library.
I believe Redux-like architectural patterns, such as TCA, are a terrible choice. They impose functional programming paradigms onto a language and a framework that are not functional but heavily reliant on imperative code and state.
The primary issue with this approach is that it concentrates the entire application state within a single monolithic structure, resulting in tightly coupled code.
Moreover, any change to the data in such a structure can trigger view updates across the entire view hierarchy, even in views unrelated to the updated state components.
Another problem arises from reducers, which introduce substantial boilerplate code typically implemented using numerous Swift switches. This code blatantly violates the Open-closed principle.
Conclusions
The MVVM pattern introduces a crucial architectural idea: the necessity of dedicated objects for views in an iOS app, namely the view models of MVVM.
This article covers only a portion of an app’s architecture. As previously mentioned, complex apps often require global objects.
Relying solely on the MVVM pattern proves overly restrictive. Attempting to force all code into view models will likely lead to complications.
Additionally, a strict adherence to MVVM fails to address specific problems. For instance, why is the NavigationStack in the above example located in the main App structure? What happens in apps with intricate navigation?
Furthermore, adding objects to views can easily disrupt Xcode previews.
An extra layer—the root layer—is required to resolve these issues. For more information, access my free guide below.
SwiftUI App Architecture: Design Patterns and Best Practices
It's easy to make an app by throwing some code together. But without best practices and robust architecture, you soon end up with unmanageable spaghetti code. In this guide I'll show you how to properly structure SwiftUI apps.
Matteo has been developing apps for iOS since 2008. He has been teaching iOS development best practices to hundreds of students since 2015 and he is the developer of Vulcan, a macOS app to generate SwiftUI code. Before that he was a freelance iOS developer for small and big clients, including TomTom, Squla, Siilo, and Layar. Matteo got a master’s degree in computer science and computational logic at the University of Turin. In his spare time he dances and teaches tango.
Thank you for a very good article!
Excellent article.
What is your opinion of clean-swift?
Thank You. Good article.
Can you give advice? How code will look if flight will change at another place and FlightCardView should update data? Who will observed changes?
Maybe do you have a article for this question? :)
Thank you for the article.
One thing I’m still confused about in your example, is FlightCardView a model or a view controller? What is confusing me is the fact that the view outlets are contained within the FlightCardView class. I can see them all as a struct within FlightCardView but FlightCarView also appears to be changing the view when it places string data in the text properties outlets. In your diagram you show the view reading data from the view mall but it seems like the view model is pushing data into the view. Could you clarify this?
FlightCardView is neither a model nor a view controller. It’s a view, as the name implies.
Outlets can be placed anywhere, even inside of views. So, yes, FlightCarView makes changes, because it’s the superview containing all other views (labels, etc.)
You can get an example of a full app here: http://matteomanferdini.com/ultimate-course-making-professional-ios-apps/
Great article, thank you. I had some hesitations with the MVVM model but I like your approach.
Thanks for this amazing article, Matteo!
I’m curious about one thing: in the example project, your View owns the ViewModel. I thought the MVVM architecture said your ViewController should owns it instead.
Greetings.
What are your thoughts on UIKit independence in ViewModels? If a view has a UIImageView, should the ViewModel have a UIImage property? a Data property? Probably not a string url, because then networking code has slipped into your view / view model layer.
Thanks, this was really helpful. I found myself making several of the errors mentioned here. I have a question: under this pragmatic approach, how would you update views after a model change? In this code example, let’s say you receive a push notification about flight departure time change, how would you go from updating the model up to the view that is displaying it?
This approach works well for simple views like labels, but how do you apply this methodology when you have more complex/dynamic views, such as UITextFields? You need to send along a delegate. I suppose you could have the view controller be the delegate and pass a reference through via the view model, but that starts to get messy, especially if there are multiple text fields that you need to distinguish between.
One of the points of this approach is indeed to avoid having the view model as a delegate, or respond to any other kind of message or notification.
What you propose depends on what you are trying to accomplish.
For example, if you need to respond to delegate messages from some control just to make layout adjustments in the UI, you should create a custom view class which then acts as a delegate.
UI is the domain of views. If there is no other consequence, there is no point in propagating it to the view controller layer.
In other cases though it might be necessary to have the view controller as a delegate. If that starts to become messy, it means you probably have to create a seaprate model controller. A very comon case is a data source for a table view. A good practice is to always create a separate model controller for that.
I show that in this article: http://matteomanferdini.com/uitableview/
Very nice article, thank you. Now suppose I have a UILabel of which the font color changes with the value it is showing. Maybe indicating the flight delay time: for instance, no delay: green, < 30 min: orange, > 30 min: red. Where would the logic to determine the color go, in the view or view-model?
Good question.
In general, keeping logic in a structure keeps it more testable. It’s easier to write a unit test for a structure, than it is to write it for a view.
So I would put this logic in the view model. It also makes sense form the point of view of formatting data: you are turning a time interval into a color.
Finally, the delay logic is app’s logic. The view does not care about how much delay is in any category. It just cares about the category.
Very good!!! Thank you for sharing. A doubt, in case we have a registration view (for insertion of information), how the view model would behave? The view model would be responsible for the transformation the view to the model? We would have:
private extension FlightInfoViewController {
func convertViewModelToModel() -> Flight {
viewModel.airportSymbols = airportSymbolsLabel.text
viewModel.departureDay = departureDayLabel.text
viewModel.departureAirport = departureAirportLabel.text
…
…
}
}
And this model would be used in the model controller to persist the data. Is this approach correct?
Yes, you would use a view model to make the reverse transformation as well.
In fact, you should use the same view model. Chances are you can even reuse some of the code.
Just add another initializer to the ViewModel struct, which takes the formatted values coming from the view and transforms them back into data you can use in the model controllers of your app.
You send this back to the view controller using delegation in your view, like UITextFieldDelegate does. Then the view controller propagates it to model controllers.
I’m still confused how to code the reverse view model (see question below). I put a small gist here: https://gist.github.com/koenvanderdrift/b90f7c8236e08ab129b3dc41615a0619 – does that makes sense?
Yes, that is correct, althoug yours is a very simple case where there is no tranformation in either direction, so the approach is not really needed.
I made an example here: https://gist.github.com/matteom/a180115027b22b56926028ab035e20e0
Beware that I typed it in a playground but I didn’t run it. It compiles, but there might be some mistakes. It’s only to show the concept.
Who is responsible for @IBActions and who should act as a delegate for the subviews in the custom view? For instance, I have a form with a submit button which should only be enabled when all input fields are valid. In the MVC approach, the VC as a UITextField delegate would validate the input, enable/disable the button and act when the button is tapped. But who’s responsibility is this in your MVVM approach? Since the VM “does not receive callbacks and notifications” and “does not update views”, that leaves the VC and the custom view?
Hi, thank you for a grate article! I really love your perception – MVVM pattern is an extension of the MVC pattern. Also, I have few questions. According to your comment – ‘Validation happens in the view controller and attached model controllers, but only for the data itself.’ – you means that it belongs to view controller or to model controller. For example, I’m talking about validation for input text field – password.
As ViewModel responsible to format the presented ‘output’ – data for View, if so it sounds to me logical that ViewModel also should to perform a validation on incoming ‘input’ – data of the Views.
1. What do you think about it. Where is the right place to put a validations, can you please explain it in more details where to put it and why it should be there.
2. On the other hand, in case of Login screen when I have a View with two empty input fields email and password and I implemented a validations in the Controller, it seems to me that I don’t need a ViewModel layer at all. Am I right?
P.S. I was looking for ultimate solution for validations and I found another inspiring article ‘Mixins and Traits in Swift 2.0 ‘ article by @mhollemans, that proposes to implement validations using protocol extensions. https://goo.gl/kAK4av
It depends what you mean by validation.
If you mean transforming formatted data on the screen to the model of your app, yes, that would go in the model.
There is a similar question in another comment, check the gist I made in reply: http://matteomanferdini.com/mvvm-pattern-ios-swift/#comment-3797462443
If validation means includes business logic, instead, that would not go in a view model, or you would spread it around your app and would have to duplicate it in other places.
In general, my approach to view models is to remove from view controller knowledge about the UI. Keep in ming that you don’t need always a view model. If data can be displayed as it is, then you would have no view model at all, as you said.
I personally don’t like design patterns that force you to implement types that are not needed.
Regrading the article you linked and the bigger picture: validation should *happen* in the view controller, but that does not mean that the view controller should contain that code.
In fact, I would also put in separate objects like the validators in the article you linked. The view controller should only dispatch execution between views, view models, and other objects.
Hi, big thanks for really great article. I have one question: If our views always owns it’s View Models, maybe it will be good to implement some protocol for this first like that:
protocol ModellableView {
associatedtype VModel
var model: VModel? {get set}
}
and implement our custom views like that:
class UserView: UIView, ModellableView {
typealias VModel = ViewModel
….
var model: VModel? {
didSet {
……
}
}
}
What benefits we’ll get from that implementation or this is not good aproach?
That would not produce any benefit. In the end, the view model of a view is a specific type and there is no real reason to abstract it.
Your protocol only expresses that the view has a viewModel property, but that the compiler knows anyway, so you just get some more code.
This king of approach (or in genera, abstraction) can be useful when you need to share code between types. But in this case, you added a few lines without reducing any other code in the app.
Hi Matteo, thank you so much for the great articles you share. I have a question about how would you hold some external functionality for models, for example each model have data representing an audio player, inside the model I would store the name and progress for example but where would you store the player instance itself so you can call functions on it? Is it something the model should be aware of? Or maybe a model controller? If you have reference to material deals with this question it would be wonderful. Thanks so much!
This is hard to anwer, since I would have to see the UI of the app and its business logic.
When you talk about audio player, it’s not clear to me why you would have more than one.
If your all plays audio files, you probably have a list of files (songs, podcast episodes, etc). For each one you might keep track of the listening position, to resume playback at the same place. That’s part of the model of the app, so these would be all structs. The “player” is the screen with controls to start and stop.
You might instad be writing a multitrack app, like a song mixing software or the like, where you see on the screen multiple tracks which can all play at the same time.
This would be indeed more complicated. The view controller would hold a list of reference to audio playing objects, which, in turn, play different tracks. You could consider these to be model controllers, if we want to use strict definitions.
But each player on the screen can be seen as a single view (probably a cell in a table view), with a view model containing all the data it needs. You would configure each view model using both the state of each single player and the properties of each audio files.
How would the MVVM pattern work with Core Data in SwiftUI? For example I want my VM to fetch data from the database or from the API if there is no data persisted. I know that with @FetchRequest you can fetch data directly from the view, how would that work in the MVVM pattern?
That depends a bit on the structure of your app, but in general, you should have a global controller that handles Core Data that you share as an environment object, so you don’t replicate that code. Then, single view models can interact with this controller.
Thank you for a great post! It would be great if you could include information about how to use CoreData with SwiftUI in this architecture. Should CoreData be abstracted out into its own layer or should you take advantage of the options to integrate it directly into the view with FetchRequest and FetchedResults.
Core Data really deserves an article on its own.
In short, yes, I would use the same architecture. That should not depend on the specific implementation details.
The unfortunate compromise of Core Data is that everything is an object. So you need to be more careful to avoid Core Data code leaking into all parts of your apps. But, in the end, SwiftUI bindings are references too, so it makes not much difference.
Regarding @FetchedRequest, it is convenient but makes me also raise an eyebrow. I rarely go against the platform, but I haven’t carefully considered this yet. On the surface, though, I can say that using it in my root views approach is definitely going to limit the eventual architectural problems that might create.
Good article.
However, how should we pass viewModel as dependency in SwiftUI class? Also when viewModel is protocol based?
I’m not sure I get your question. View models are usually not passed around, they are specific to a single view. If you need to share objects across views, use @EnvironmentObject. Have a look at this article on MVC and this one on SwiftUI’s data flow.
Great Example; however, What if you want to EDIT data in your detail view? How do you pass the elements of the ForEach into the detail view with a @Binding so that they can be edited? I would like to see an example of how to do MVVM with an editable detail view.
Both the List and ForEach types have an initializer that takes a binding to an array:
https://developer.apple.com/documentation/swiftui/list/init(_:editactions:rowcontent:)
https://developer.apple.com/documentation/swiftui/foreach/init(_:editactions:content:)
With that, each row in the list, i.e., a Story view, can receive a binding to an editable element.