SwiftUI offers several mechanisms to pass data between views.
Such abundance can make it hard to decide which data flow mechanism fits any particular situation.
Those decisions cannot be taken in isolation. As in many other cases, we need to keep an app’s architecture in mind to make the correct choice.
Contents

Chapter 1
Deciding which data flow mechanism to use in your apps

Chapter 2
Passing values down a view hierarchy

Chapter 3
Creating and updating state
Chapter 4
Working with objects and identity

Chapter 5
Traversing the view tree

Architecting SwiftUI apps with MVC and MVVM
GET THE FREE BOOK NOWChapter 1:
Deciding which data flow mechanism to use in your apps

Since the release of SwiftUI, many words have been spent on its data flow mechanisms. Given the plethora of property wrappers dedicated to the task, it can be unclear which one best fits a given situation.
Some approaches have emerged to guide developers in this decision. While they are a step forward, we can do better.
Apple’s diagram seems profound but is too generic
State and data flow through SwiftUI views are crucial decisions you continuously have to make in any app. This is complicated because SwiftUI offers several property wrappers for data, each with its peculiar behavior.
This is not a problem specific to SwiftUI, though. In UIKit, the most misunderstood topic was passing data between view controllers.
It’s not a surprise, then, that such confusion remains in SwiftUI. Moreover, there are some popular diagrams you find online that I find misleading.
The first one comes straight from Apple’s documentation and their introductory SwiftUI talk from WWDC 2019.
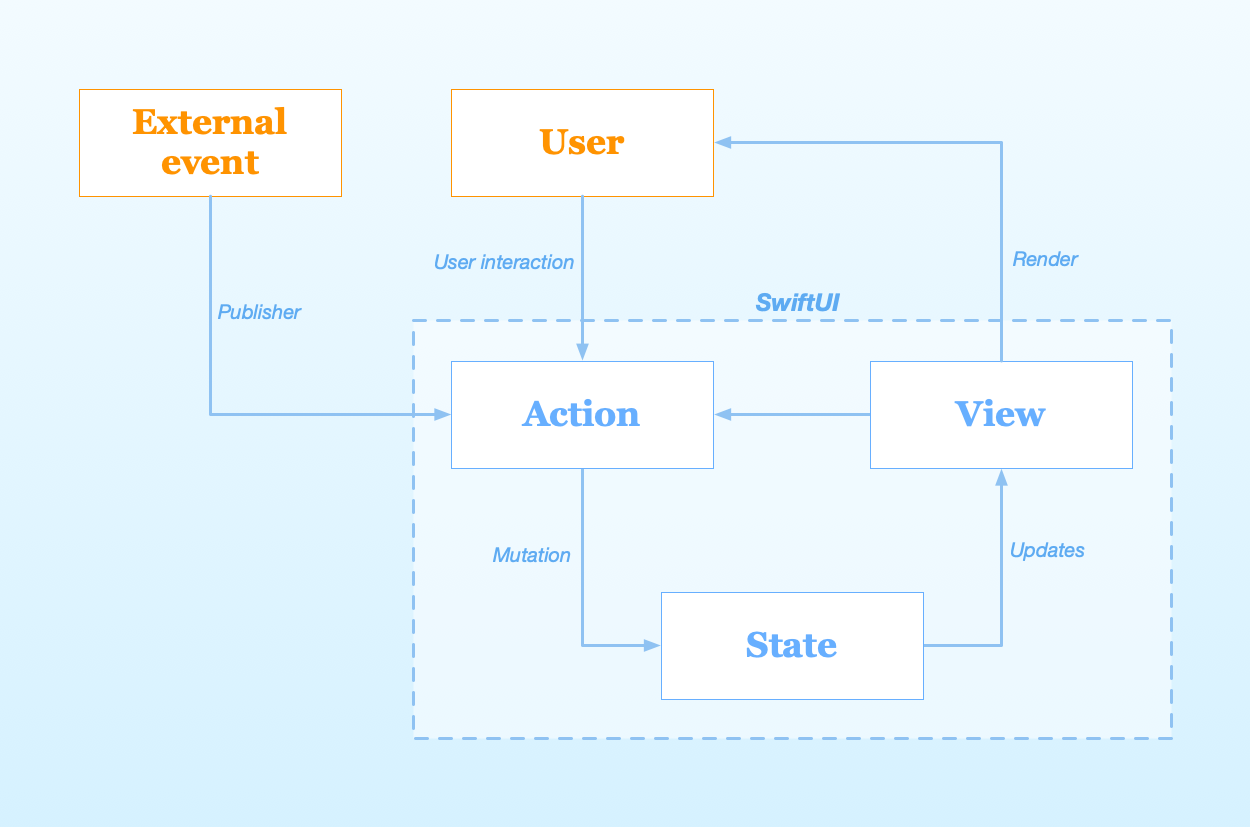
Many seemed to find this diagram enlightening at the time, which I find quite surprising. Some also seem to use it as a justification for their favorite architectural pattern.
I find that diagram as generic as it can be. You can apply it to pretty much any architecture on any platform.
There is always going to be a user (or some external event) that performs an action. Such action mutates some internal state, and, as a consequence, the user interface gets updated.
Notice how the chart does not tell you how many of these happen, so it does not tell you anything about SwiftUI’s data propagation mechanisms.
Such a diagram is not even specific to SwiftUI. You can find the same cycle UIKit apps, or even in web apps, which have nothing to do with SwiftUI or iOS.
Value types or objects are not your first concern when dealing with data
The second popular data flow diagram for SwiftUI is more specific and a bit more helpful. It was originally devised by Chris Eidhof and I have seen it appear in some other places as well.
Unlike Apple’s diagram, this one provides a decision tree to help you decide which property wrapper you should use.
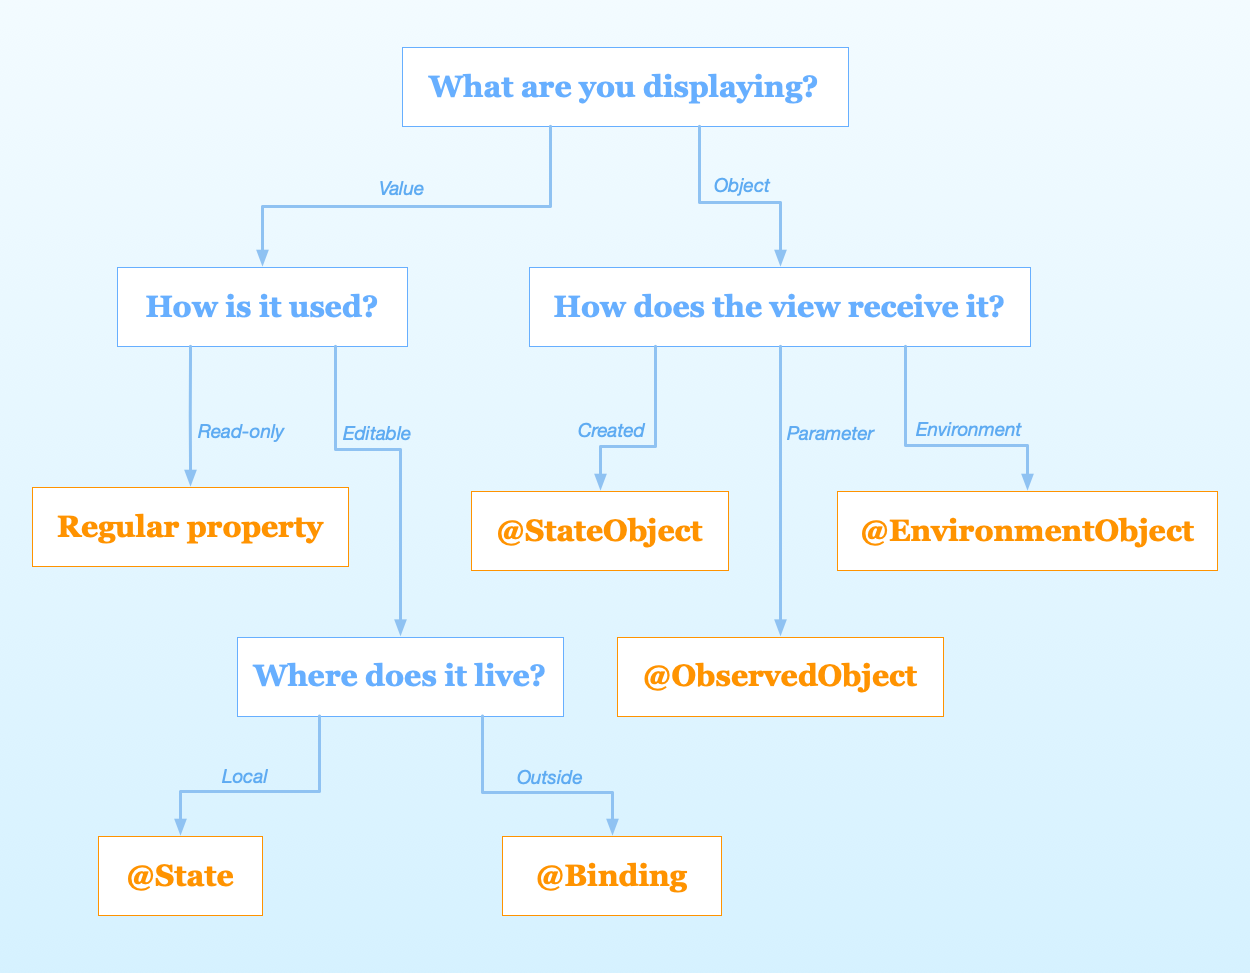
While this is a step forward, I still find it not that useful.
The first question makes you immediately decide if you want to use a value type or an object. Then, it asks more specific questions, leading to one of SwiftUI’s property wrappers. Moreover, on the Value branch, the two questions are equivalent to the one on the Object branch.
I think this chart is popular because people who are already familiar with data flow in SwiftUI see in it a confirmation of what they already know.
That surely has its value. And one of the advantages of this chart is that each question appears only once. That makes it more compact than the one I will show you later.
Nevertheless, those are not the questions I ask myself when I build a complex SwiftUI app.
I don’t start deciding whether some data should go in a value type or an object. In isolation, that question is meaningless.
I first decide if data is local or shared. Then, how it is structured and what is its source. Only then can I determine if it should live in a value type or an object. And, finally, I pick the right SwiftUI property wrapper accordingly.
All the SwiftUI property wrappers and what you should use them for
Admittedly, the plethora of data flow mechanisms offered by SwiftUI, taken in isolation, can be confusing.
As a reference, here is a complete list of all the choices you have with a short explanation of when you should use them. In the rest of the article, we will then see concrete examples.
I find it’s useful to split the list in two categories. The first contains the property wrappers used for generic data flow, which you can use in any view. The second category instead is made of the accessory property wrappers used for some specific tasks like animation, gestures, or Core Data fetch requests.
Here are the generic property wrappers for data flow in SwiftUI:
- The State property wrapper allows a view to store a local mutable state.
- The Binding property wrapper allows a view to change data that resides somewhere else up the view hierarchy.
- The SwiftUI Environment lets you pass data to any view in the view hierarchy, no matter how deep, skipping all intermediate views.
- With the PreferenceKey protocol, a view can read information from any of its descendants, no matter how deep in the view tree.
- The Published property wrapper is applied to the properties of objects conforming to the ObservableObject protocol. These properties trigger changes in the connected SwiftUI views.
- The StateObject property wrapper allows a view to create local objects. These are useful to receive events like asynchronous callbacks or system-wide notifications.
- The ObservedObject property wrapper allows a view to receive an object through dependency injection from one of its ancestors.
- The EnvironmentObject property wrapper allows any view to access global shared objects.
And here are the accessory SwiftUI property wrappers for specific tasks:
- The AppStorage property wrapper is a convenience to access the User Defaults system from any SwiftUI view.
- The SceneStorage property wrapper allows a view to access a persisted per-scene storage. You use it for UI state restoration so that your app can restart where the user left the last time.
- The UIApplicationDelegateAdaptor and NSApplicationDelegateAdaptor property wrappers allow you to provide a UIKit/AppKit app delegate to a SwiftUI app. An app delegate gets notifications for several global events that are not yet available in SwiftUI.
- The FocusedValue and FocusedBinding property wrappers allow you to access the state of the currently focused view. They are commonly used in macOS apps to connect menu items to data in the currently focused window. They are also available on iOS and can be used in iPad apps with multiple windows.
- The FetchRequest property wrapper allows a view to retrieve information from Core Data through a fetch request. It uses the global managed object context stored in the SwiftUI environment.
- The GestureState property wrapper connects a stored property to the state of a gesture. When the gesture becomes inactive, the property resets.
- The ScaledMetric property wrapper scales a numeric value according to the Dynamic Type settings of the device. You use to adapt your UI to different text sizes. For example, you can use scaled metrics to change the dimension of frames or the spacing in stacks.
- The Namespace property wrapper is used to synchronize animations from one view to another. You use it in conjunction with the
.matchedGeometryEffect()modifier.
You can combine the generic data flow property wrappers and the task-specific ones. For example, you can attach a @Binding property to any value wrapper, e.g, @AppStorage or @ScaledMetric. Likewise you can attach an @ObservedObject property to any object wrapper, e.g., @FetchRequest or @UIApplicationDelegateAdaptor.
The Single Source of Truth idea and what many developers get wrong about it
Let’s now go back to the core question: how do you decide which data flow mechanism to use?
The answer lies in the core concept for SwiftUI: the single source of truth.
Every piece of information in your app needs to be stored in a unique place. If you replicate data, you need complex code that keeps all the copies synchronized. That can lead to inconsistencies, which cause bugs, data loss, and data corruption.
To be fair, this is, again, not a new concept unique to SwiftUI. You can apply the idea to any piece of software on any platform. But with SwiftUI, Apple made the idea explicit, while before, it did not have a distinct name.
That’s definitely a step forward, but …
The word “single” makes some developers think that, in any app, there should be only one central place where all data is stored.
That’s wrong.
The idea of a single source of truth applies to each unique piece of data. Thus, your app can, and should, have multiple single sources of truth.
That might sound like a contradiction. But if all you needed were a single, central place that contained all your app’s information, the @State and @StateObject property wrappers would have no reason to exist.
In light of this, I made a new flow chart to decide which data flow mechanism to pick. We will explore these ideas more in-depth throughout this article, so you will probably have to revisit the diagram after reading it.
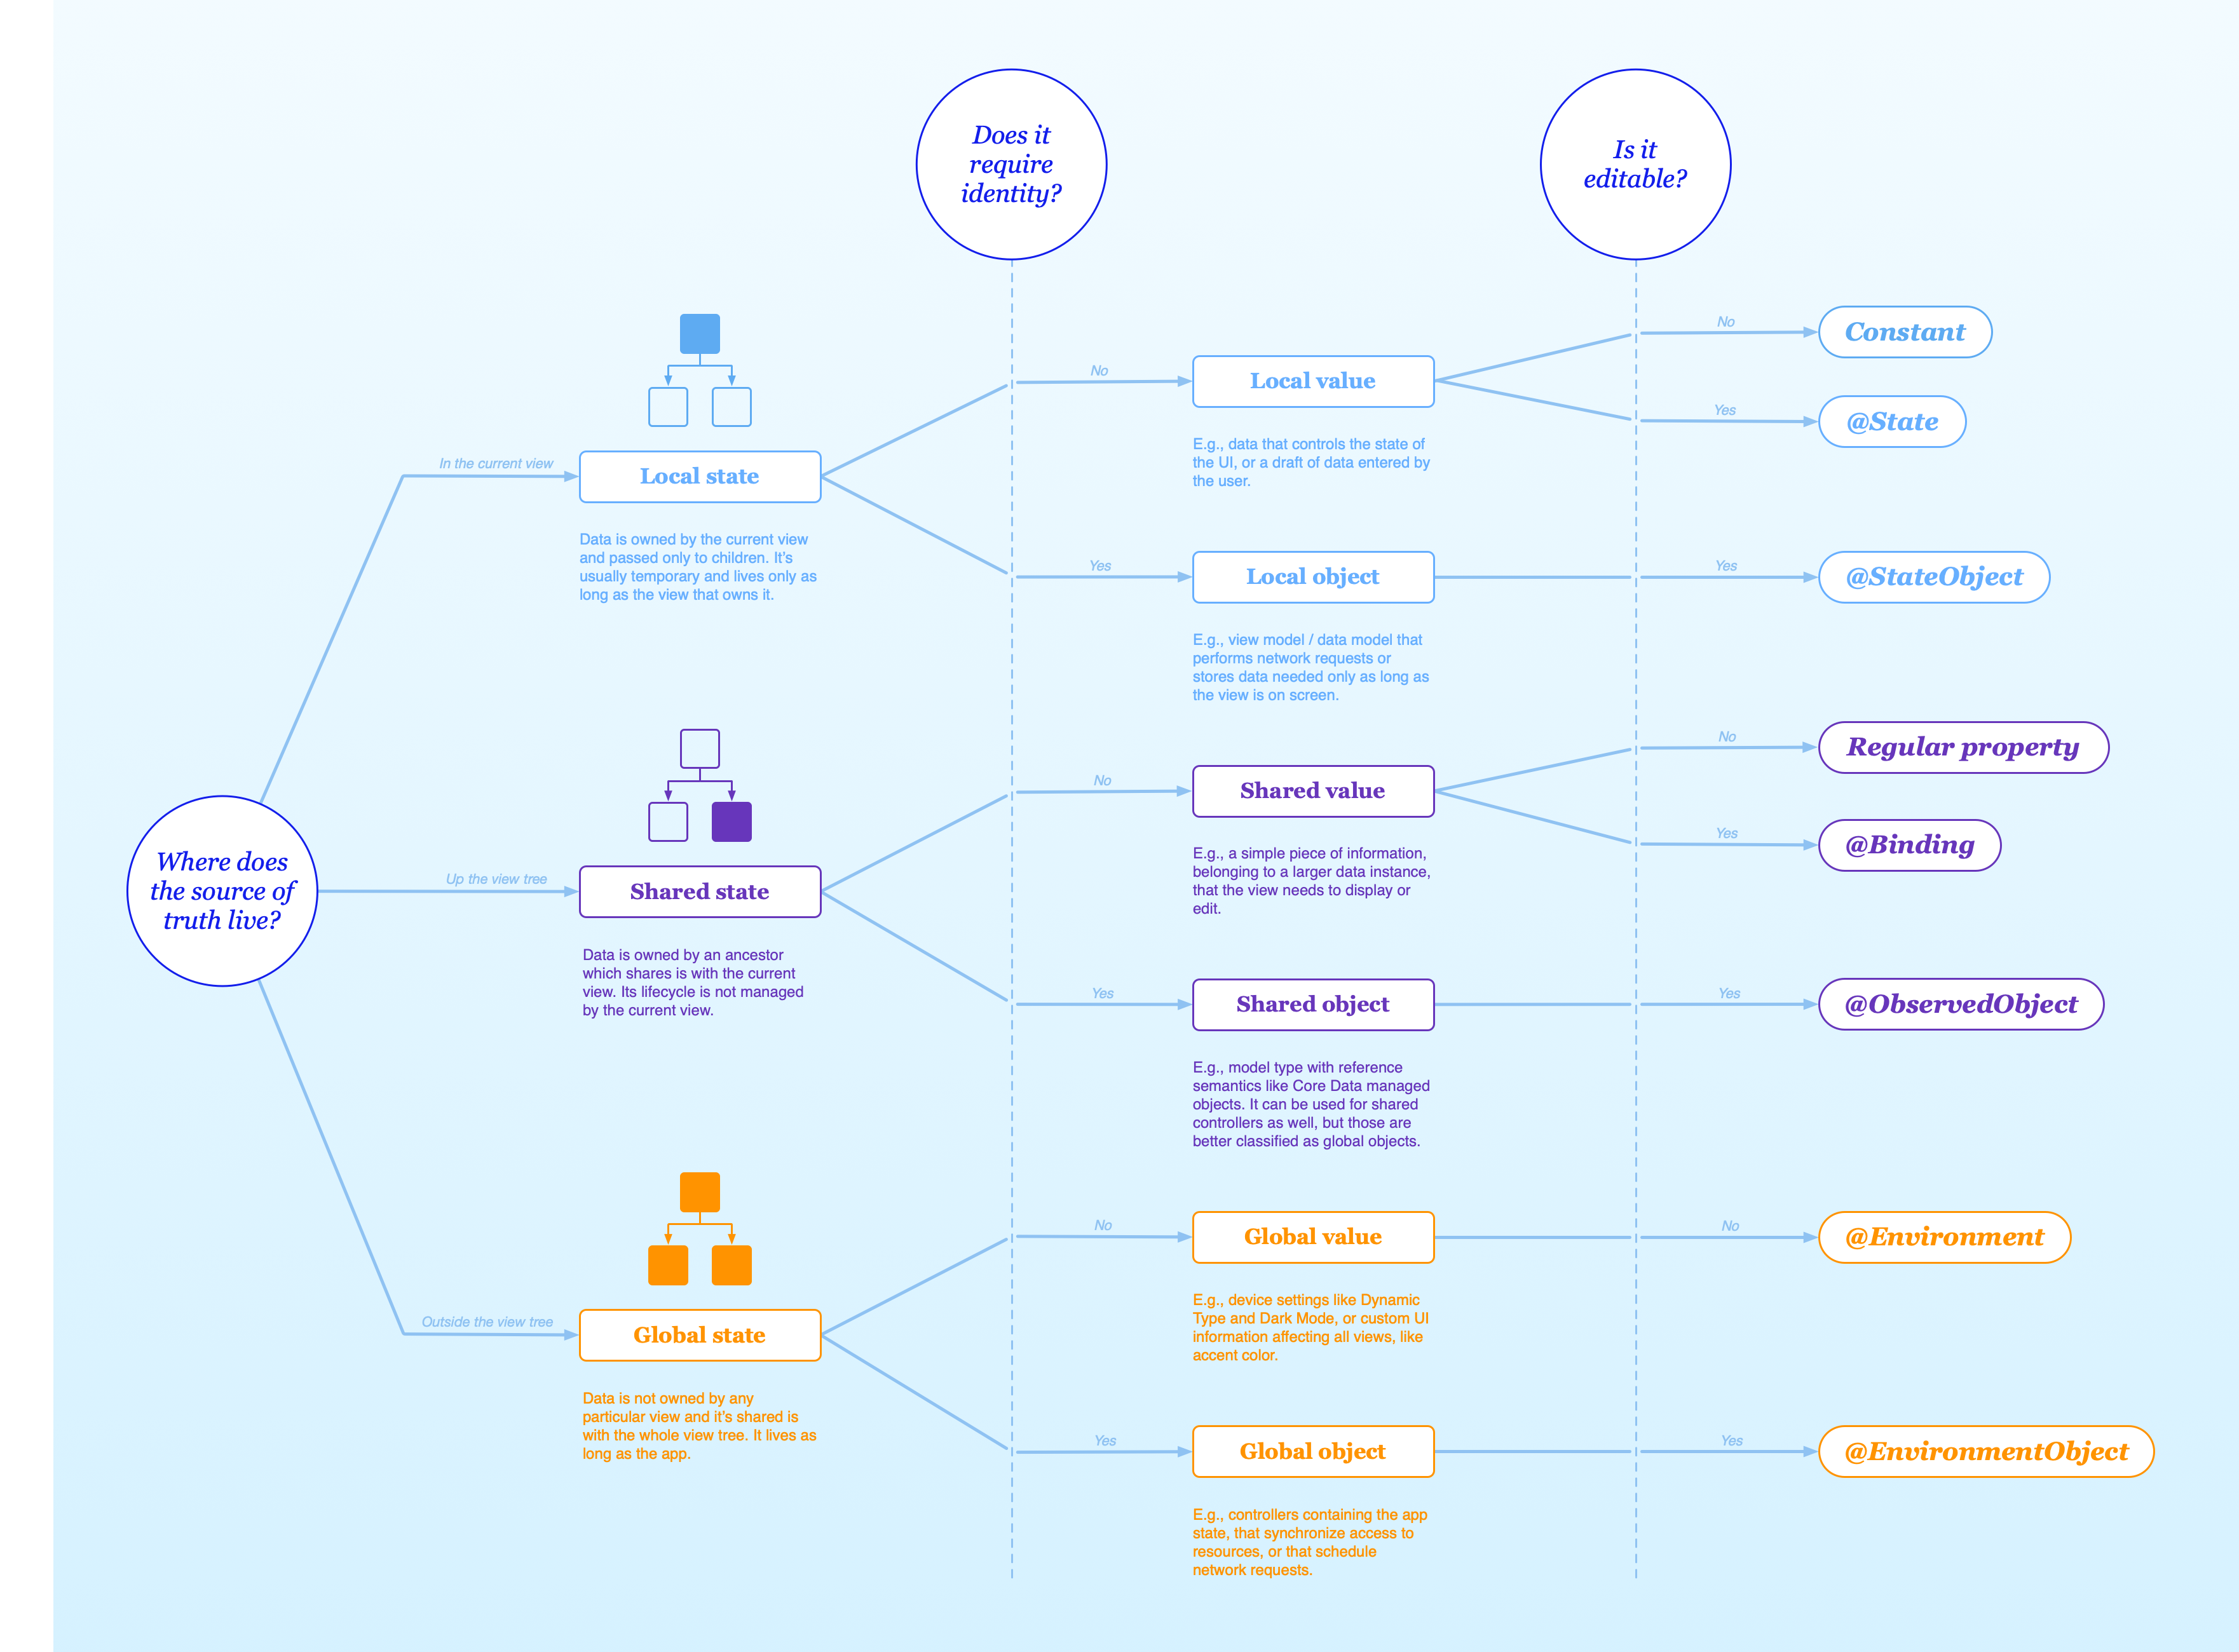
Admittedly, even this chart cannot cover every single case. I can find at least one example in my app that is not covered by the diagram. Still, it does cover the most common use cases. Only the most advanced and uncommon uses are not included.
Chapter 2:
Passing values down a view hierarchy
Value types, and especially structures, are the most common abstractions you use in Swift. Since the release of the Swift language, Apple has emphasized value types over references.
The SwiftUI framework also uses value types for its views and many other mechanisms. So, that’s where we need to start exploring SwiftUI’s data flow.
A sample app to cover all the data flow mechanisms of SwiftUI
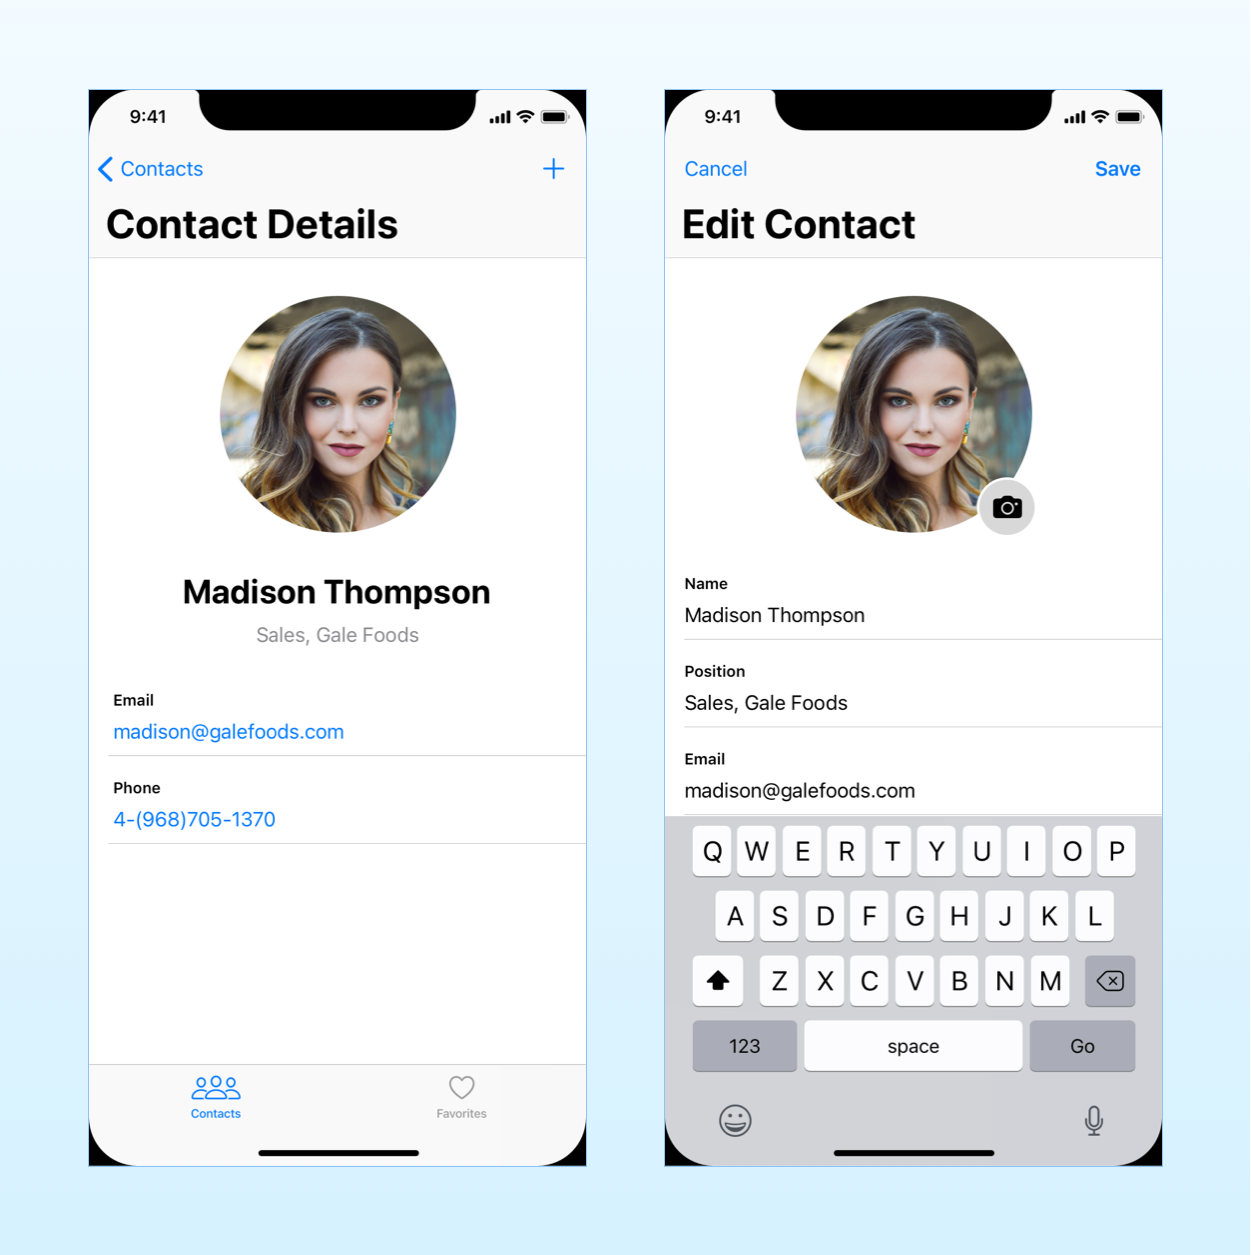
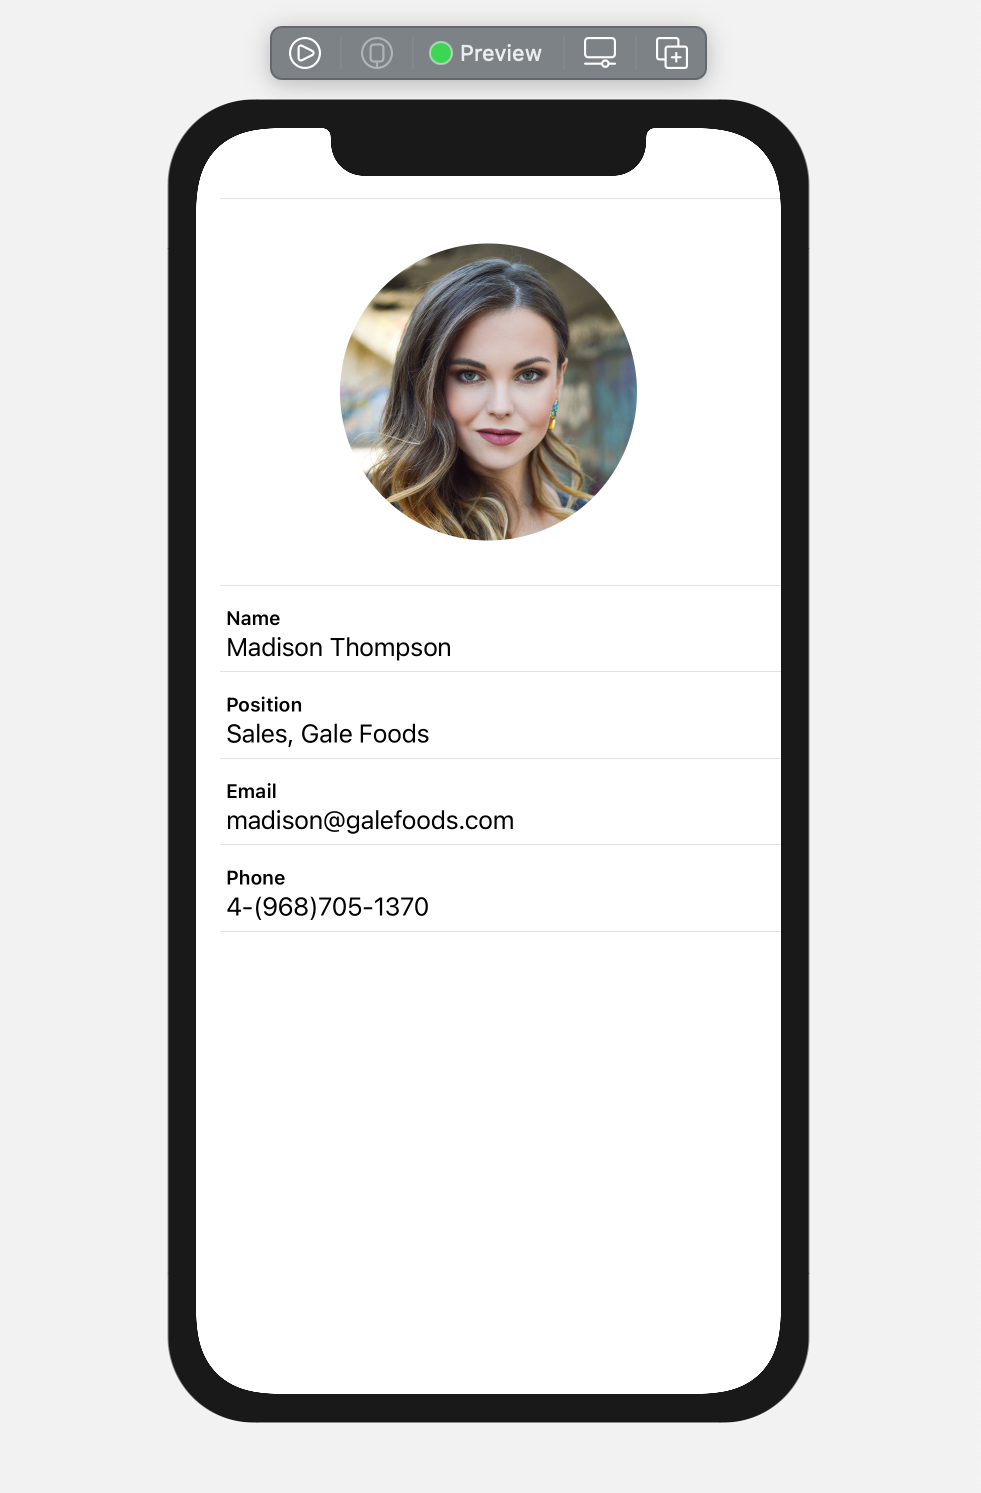
As an example, we will build a small app that displays a single contact, which can be edited by the user. This can be the base of a more extensive app that manages a list of contacts, like the one you find in every iPhone.
You can find the complete Xcode project on GitHub.
For starters, we need a simple model type representing a contact. Model types are a concept you can find in both the MVC and MVVM patterns.
struct Contact {
	var photo: UIImage
	var name: String
	var position: String
	var email: String
	var phone: String
}
And while we are at it, let’s also create some test data we can use for our SwiftUI previews.
struct TestData {
	static let contact = Contact(
		photo:  imageLiteral(resourceName: "Madison"),
		name: "Madison Thompson",
		position: "Sales, Gale Foods",
		email: "[email protected]",
		phone: "4-(968) 705-1370")
}
The photo is located in the Preview Assets catalog of the Xcode project. I got it from Unsplash.com in case you need some free images for your apps.
Using simple stored properties and initializers for read-only values
The easiest and most common way to pass data to a SwiftUI view is through stored properties and initializers.
You use stored properties in views that need read-only values coming from a source of truth up the view tree.
This is already evident in many of the views provided by the SwiftUI framework. Some basic examples are provided by the Text and Image views, which take a single parameter. More complex examples are views like ProgressView and Gauge, which have multiple initializers taking several parameters.
Such a mechanism is obviously available for any of your custom views. Since SwiftUI views are structures, the compiler automatically synthesizes an initializer containing parameters for each stored property.
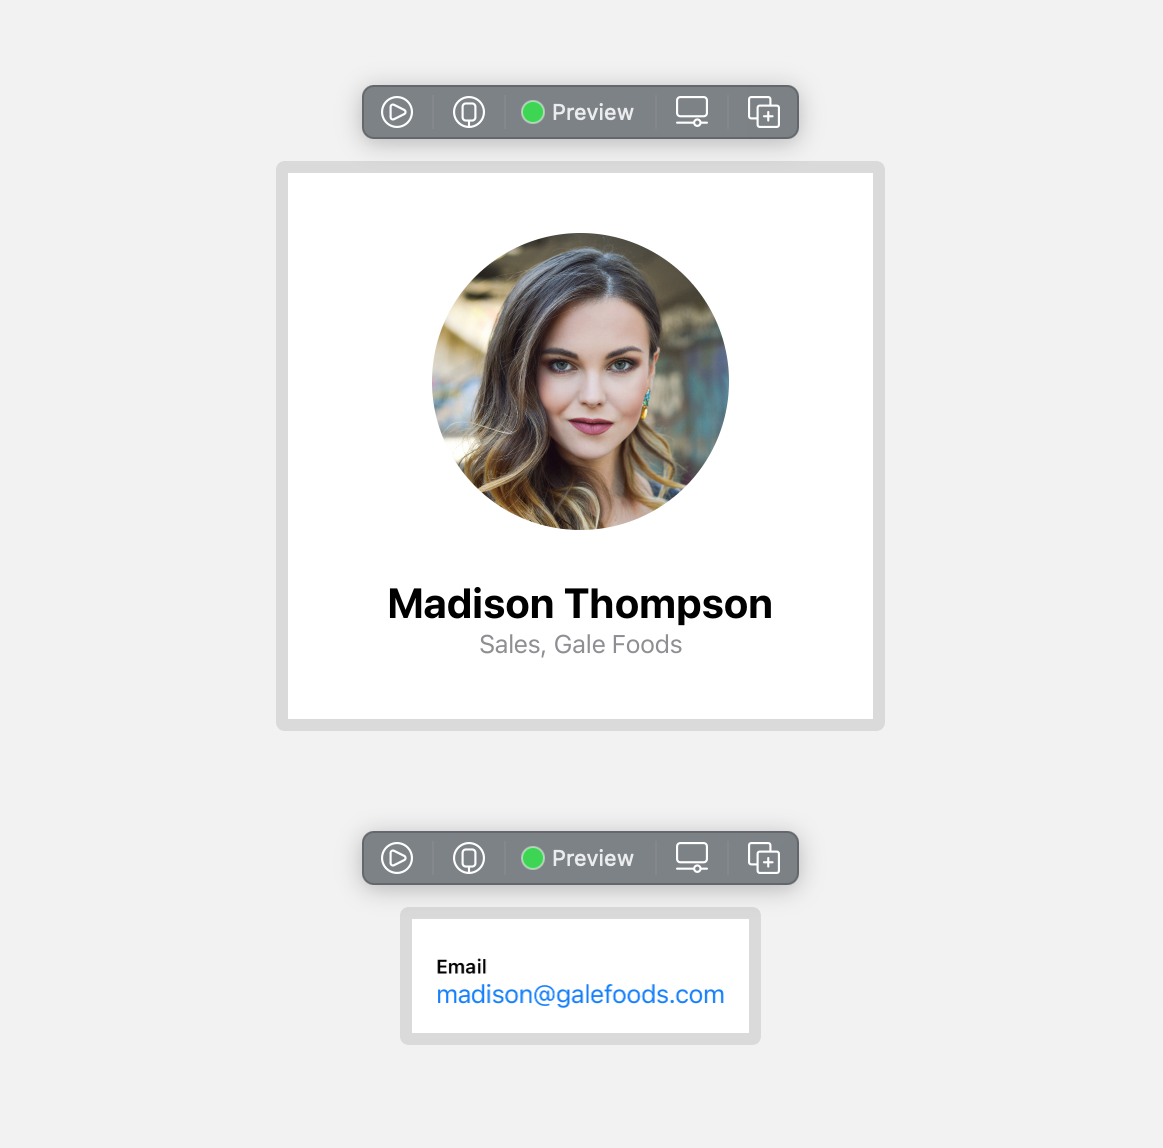
As a first example, we can create a view for the round image we have on our app screens.
struct RoundImage: View {
    let image: UIImage

    var body: some View {
        Image(uiImage: image)
            .resizable()
            .clipShape(Circle())
			.frame(width: 198.0, height: 198.0)
			.frame(maxWidth: .infinity)
			.padding(.vertical, 24.0)
    }
}
We can then use the RoundImage view to put together a couple more pieces we need for our app’s Contact Details screen.
struct Header: View {
	let photo: UIImage
	let name: String
	let position: String

	var body: some View {
		VStack {
			RoundImage(image: photo)
			Text(name)
				.font(.title)
				.bold()
			Text(position)
				.font(.body)
				.foregroundColor(.gray)
		}
		.padding(.bottom, 24.0)
	}
}

struct Row: View {
	let label: String
	let text: String
	let destination: URL

	var body: some View {
		VStack(alignment: .leading) {
			Text(label)
				.font(.footnote)
				.bold()
			Link(text, destination: destination)
				.buttonStyle(BorderlessButtonStyle())
		}
		.padding(.top, 8.0)
	}
}
All these views accept data through simple stored properties.
Keep your views decoupled from your data types as much as possible
Notice that I didn’t use yet use the Contact type anywhere. Instead, all views use properties with simple types, i.e.,String, URL, and UIImage.
The UIImage and URL structures come from the UIKit and Foundation frameworks, respectively. While they are not “simple” Swift types like String or Int, they are in our discussion.
Clearly, this adds a bit more code every time we use any of these views. It’s is undeniable shorter to just pass a single Contact parameter to each. But that would couple our views to model types, making the former less reusable.
struct DetailView_Previews: PreviewProvider {
    static let contact = TestData.contact

    static var previews: some View {
        Group {
			Header(photo: contact.photo, name: contact.name, position: contact.position)
            Row(label: "Email", text: contact.email, destination: URL(string: "example.com")!)
        }
		.padding()
		.previewLayout(.sizeThatFits)
    }
}
This is a lesson that applies to all your views, regardless of the SwiftUI data flow mechanism you use. So keep it in mind as you proceed through the article.
With these views, we can assemble the view for the whole Contact Details screen.
struct DetailView: View {
	let contact = TestData.contact

	var body: some View {
		List {
			Header(photo: contact.photo, name: contact.name, position: contact.position)
				.frame(maxWidth: .infinity)
			Row(label: "Email", text: contact.email, destination: URL(string: "mailto:\(contact.email)")!)
			Row(label: "Phone", text: contact.phone, destination: URL(string: "tel://\(contact.phone)")!)
		}
		.listStyle(PlainListStyle())
	}
}

struct DetailView_Previews: PreviewProvider {
	static let contact = TestData.contact

	static var previews: some View {
		Group {
			DetailView()
			Group {
				Header(photo: contact.photo, name: contact.name, position: contact.position)
				Row(label: "Email", text: contact.email, destination: URL(string: "example.com")!)
			}
			.padding()
			.previewLayout(.sizeThatFits)
		}
	}
}
The DetailView passes the pertinent data to the Header and Row views.
For now, I used a simple constant property in the DetailView to store the contact information. Later, this information will come from a different source of truth.
Chapter 3:
Creating and updating state

SwiftUI views receive, through their stored properties, data that resides in a single source of truth. That means that views need a way to either create such a source of truth or to update state that resides up the view tree.
Storing temporary data in a local source of truth
The simplest type of source of truth is a local mutable value where a single piece of information resides. You create such a source of truth with the @State property wrapper.
Often, a view that creates a local source of truth passes such information to any of its descendants through stored properties, but that’s not necessary.
There are different reasons to create a local source of truth. The first common one is to store temporary data.
We can see a first example in the Edit Contact screen of our little app. There, we don’t immediately save the data edited by the user. We apply those changes only when the user hits the Save button and discard it if he taps on Cancel instead.
That means we need some local state to keep the temporary information typed by the user while editing.
struct EditContactView: View {
	@State private var draft: Contact = TestData.contact

	var body: some View {
		List {
			RoundImage(image: draft.photo)
		}
	}
}
It’s a good practice to declare any @State property as private, to emphasize that this is local data that should not be accessible from other parts of the app.
We will see in a moment how to change such data. For now, what’s important is that the draft property contains temporary local data that does not affect the global state of our app.
Storing the state of the user interface in local sources of truth
Another everyday use for local state is to control the state of the user interface.
In interactive interfaces, the user might tap on various control that change how data is presented on the screen without altering any data.
A typical example of such a local state in SwiftUI is used modal presentation.
In our app, when the user taps on the Edit button, we need to show the Edit Contact screen. Modal presentation is controlled by a local source of truth.
struct DetailView: View {
	let contact = TestData.contact
	@State private var isSheetPresented = false

	var body: some View {
		List {
			Header(photo: contact.photo, name: contact.name, position: contact.position)
				.frame(maxWidth: .infinity)
			Row(label: "Email", text: contact.email, destination: URL(string: "mailto:\(contact.email)")!)
			Row(label: "Phone", text: contact.phone, destination: URL(string: "tel://\(contact.phone)")!)
		}
		.listStyle(PlainListStyle())
		.toolbar {
			Button("Edit", action: { isSheetPresented = true })
		}
		.fullScreenCover(isPresented: $isSheetPresented) {
			NavigationView {
				EditContactView()
			}
		}
	}
}
The isSheetPresented property controls the modal presentation of the EditContactView. This is clearly local information since the state of our user interface is not part, for example, of the contact information and has no place in the model layer of our app.
The DetailView owns this piece of data and changes it to present the EditContactView when the user taps on the Edit button.
Using bindings to update values that reside somewhere up a view hierarchy
Some views need to change values they do not own. Such data usually resides somewhere else up the view hierarchy. For that, we use bindings.
The SwiftUI framework offers many views that use bindings to pass data up the view hierarchy. Some common examples are the TextField, Toggle, or Picker views. These are all standard controls that update data they don’t own.
As usual, our views can use bindings to affect a source of truth up the view hierarchy. For example, in the Edit Contact screen, the editable fields all look the same. We can then create a single reusable view for all of them.
struct EditableRow: View {
	let title: String
	@Binding var text: String

	var body: some View {
		VStack(alignment: .leading, spacing: 0) {
			Text(title)
				.font(.footnote)
				.bold()
			TextField("", text: $text)
		}
		.padding(.top, 8.0)
	}
}

struct EditContactView_Previews: PreviewProvider {
	static let contact = TestData.contact

	static var previews: some View {
		EditableRow(title: "Name", text: .constant(contact.name))
			.previewLayout(.sizeThatFits)
	}
}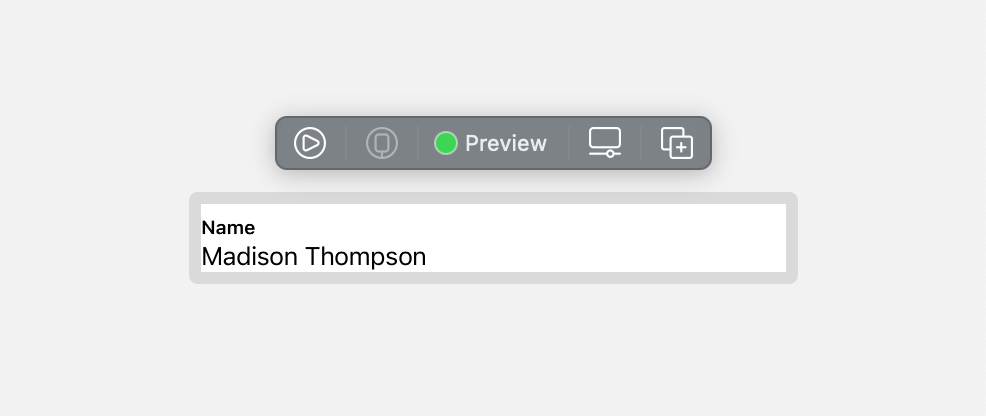
Like the TextField view, our EditableRow type does not own the data in its text property. So, we use a @Binding to connect to some single source of truth up the view hierarchy. That is the draft property in the EditContactView.
struct EditContactView: View {
	@State private var draft: Contact = TestData.contact

	var body: some View {
		List {
			RoundImage(image: draft.photo)
			EditableRow(title: "Name", text: $draft.name)
			EditableRow(title: "Position", text: $draft.position)
			EditableRow(title: "Email", text: $draft.email)
			EditableRow(title: "Phone", text: $draft.phone)
		}
	}
}

struct EditContactView_Previews: PreviewProvider {
	static let contact = TestData.contact

	static var previews: some View {
		Group {
			EditContactView()
			EditableRow(title: "Name", text: .constant(contact.name))
				.previewLayout(.sizeThatFits)
		}
	}
}
Chapter 4:
Working with objects and identity
No iOS app can be made only using value types. Some tasks require an intrinsic concept of identity that value types cannot provide. That’s where objects come in, with the relative SwiftUI data flow mechanisms that support them.
Don’t use simple stored properties with objects
When it comes to objects, we need mechanisms like the ones we just explored for value types. For starters, though, simple stored properties do not work with objects.
The reason comes down to the concept of identity.
Value types don’t have a built-in identity, so when two structures contain the same data, they are equal. Objects, instead, do. Two objects containing the same data are still distinct.
SwiftUI views are structures. They only represent what the screen content should be, but they don’t hold that content. It’s SwiftUI that takes care of the rendering.
The framework detects changes in any source of truth and recreates the view tree affected by the updates. Such updates can be expensive, so the system updates only the views for which data changed.
It’s easy to compare two values to see if they are different. Values are copied, so the system can compare an old value and a new one. With objects, though, that does not work. A reference remains the same even when the content of an instance changes.
Inspecting the content of the object does not work either. All you have is two references pointing to the same object. When the state of an object changes, both references point to that new state. You don’t have access to the old one.
As a result, a SwiftUI view cannot detect the changes in an object if all it has is a reference.
Tracking changes in objects with the ObservableObject protocol and the @Published property wrapper
Some tasks cannot be fulfilled by value types. While you can store the entire state of your app inside composite structures, you need identity when:
- interfacing with objects provided by the SDK;
- interacting with external data sources like disk storage or device sensors;
- receiving callbacks or notifications, for example, the ones coming from network requests.
An everyday use for objects in an iOS app is to create controllers that hold the app’s global state.
In our simple example, that’s a single contact, but in a bigger app, that could be a list of contacts.
class StateController: ObservableObject {
	@Published var contact = TestData.contact
}
Since SwiftUI cannot detect changes in objects, we need some extra plumbing.
- Our object needs to conform to the
ObservableObjectprotocol; and - Any stored property we want to track needs the
@Publishedproperty wrapper.
Behind the scenes, SwiftUI uses the Combine framework to create the necessary plumbing to detect changes in our object’s properties. But you don’t need to know anything about Combine to use SwiftUI.
At this point, you might wonder why we need the StateController at all since it just contains a Contact value.
While that’s true in our example, such a controller would connect to other objects or store data on the disk in more complex apps. You can see a full example of that in my free guide to MVC and MVVM.
Creating local objects with the @StateObject property wrapper
The equivalent of the @State property wrapper for objects is @StateObject, which you use to create a local source of truth that requires identity.
Having created the StateController class, we can use the @StateObject wrapper to create a single source of truth. For global state objects, that happens in your app’s primary type.
@main
struct ContactApp: App {
	@StateObject private var stateController = StateController()

	var body: some Scene {
		WindowGroup {
			DetailView()
		}
	}
}
We will see in a moment how to pass that object to our views.
Some might object that the @StateObject wrapper is not required at this level because the app’s main structure is created only once. And maybe that’s true.
But that’s undocumented behavior, and even Apple uses the @StateObject wrapper at the app’s level. I suspect that an app’s main structure might be recreated when, for example, an app receives an external notification.
As a corollary, this is not the only place where you can use @StateObject. Not all objects are global.
If your app supports multiple windows (on iPadOS or macOS), with their individual states, you can use the @StateObject wrapper in a Scene structure.
Views can also use @StateObject to create local objects. One example is to create a view model that performs network requests.
Passing objects to views through the @ObservedObject property wrapper
The @Binding equivalent for objects is @ObservedObject, which you use to pass an object to a view.
We can use this property wrapper in our app to pass the StateController instance from the ContactApp structure to the DetailView.
struct DetailView: View {
	@ObservedObject var stateController: StateController
	@State private var isSheetPresented = false

	var contact: Contact { stateController.contact }

	var body: some View {
		List {
			Header(photo: contact.photo, name: contact.name, position: contact.position)
				.frame(maxWidth: .infinity)
			Row(label: "Email", text: contact.email, destination: URL(string: "mailto:\(contact.email)")!)
			Row(label: "Phone", text: contact.phone, destination: URL(string: "tel://\(contact.phone)")!)
		}
		.listStyle(PlainListStyle())
		.toolbar {
			Button("Edit", action: { isSheetPresented = true })
		}
		.fullScreenCover(isPresented: $isSheetPresented) {
			NavigationView {
				EditContactView()
			}
		}
	}
}
The contact computed property is not necessary, but it improves the readability of our code.
@main
struct ContactApp: App {
	@StateObject private var stateController = StateController()

	var body: some Scene {
		WindowGroup {
			DetailView(stateController: stateController)
		}
	}
}
Now, the DetailView gets the shared StateController instance created by the ContactApp structure.
Like @StateObject, the @ObservedObject property wrapper requires a class to conform to the ObservableObject protocol and publish properties using the @Published wrapper.
If you follow the MVC pattern or one of its variations, it’s better to use the @EnvironmentObject wrapper for global controllers. We will get to that later.
Controllers, though, are not the only possible object in an app. If, for example, you store your app’s data using Core Data, you have to use objects for your app’s model.
In that case, you pass those objects to your views using @ObservedObject since, as we have seen, you can’t use simple stored properties. The NSManagedObject class conforms to the ObservableObject protocol out of the box.
Chapter 5:
Traversing the view tree
The property wrappers offered by SwiftUI for value and reference types cover all our data flow needs. In large apps, though, they can become inconvenient.
As an iOS app grows, we need a convenient way to transfer data to views far away from each other. SwiftUI covers that need with a couple of solutions that make it easier for data to traverse the entire view tree.
Passing information to every view in a hierarchy through the SwiftUI environment
In our app, only the DetailView and EditContactView types use the Contact structure. All other subviews use simpler types to remain decoupled.
However, there is some information that needs to travel to several, if not all, views.
Passing such information through the initializer of every single view works but is tedious. Too many parameters also make our code unreadable.
To solve these problems, SwiftUI offers the environment, which you use to allow every view in a hierarchy to access a piece of information.
A good example is dark mode, to which every single element in your UI needs to adapt. Even the iOS system colors are sensitive to dark mode.
Luckily, SwiftUI supports Dark Mode out of the box. If you use standard views and colors, you don’t have to do anything to have your app support both light and dark modes.
That shows that all the framework views can detect the mode of the device and change their colors accordingly. And, indeed, that information is stored in the environment and available to every view.
Some apps override the device settings and are always in dark mode, e.g., the Clock, Calculator, or Stocks apps. We can do that in our app too.
You can set any environment value using the .environmentview modifier.
@main
struct ContactApp: App {
	@StateObject private var stateController = StateController()

	var body: some Scene {
		WindowGroup {
			DetailView(stateController: stateController)
				.environment(\.colorScheme, .dark)
		}
	}
}
You can find all the available environment values in the documentation for the EnvironmentValues type.
There is only one caveat. At the time of writing, modal presentation does not carry forward environment values. You have to set them again every time you present a view modally.
struct DetailView: View {
	@ObservedObject var stateController: StateController
	@State private var isSheetPresented = false

	var contact: Contact { stateController.contact }

	var body: some View {
		List {
			Header(photo: contact.photo, name: contact.name, position: contact.position)
				.frame(maxWidth: .infinity)
			Row(label: "Email", text: contact.email, destination: URL(string: "mailto:\(contact.email)")!)
			Row(label: "Phone", text: contact.phone, destination: URL(string: "tel://\(contact.phone)")!)
		}
		.listStyle(PlainListStyle())
		.toolbar {
			Button("Edit", action: { isSheetPresented = true })
		}
		.fullScreenCover(isPresented: $isSheetPresented) {
			NavigationView {
				EditContactView()
			}
			.environment(\.colorScheme, .dark)
		}
	}
}
Reading SwiftUI environment values in custom views
All the views that adapt to the environment values like colorScheme need to read those to adjust their visual representation. That mechanism is also available to our custom views.
To read the content of an environment value, you use the @Environment property wrapper.
Apple recommends avoiding reading the colorScheme value and instead using the standard SwiftUI views included in the framework.
But there is a typical example where it’s useful to access the environment from a custom view: dismissing modal presentation.
The presentation state of a view hierarchy is stored in the presentationMode environment value. To dismiss a modally presented view, we can access that value and call its dismiss() method.
struct EditContactView: View {
	@State private var draft: Contact = TestData.contact
	@Environment(\.presentationMode) private var presentationMode

	var body: some View {
		List {
			RoundImage(image: draft.photo)
			EditableRow(title: "Name", text: $draft.name)
			EditableRow(title: "Position", text: $draft.position)
			EditableRow(title: "Email", text: $draft.email)
			EditableRow(title: "Phone", text: $draft.phone)
		}
		.toolbar {
			ToolbarItem(placement: .navigationBarLeading) {
				Button("Cancel", action: cancel)
			}
			ToolbarItem(placement: .navigationBarTrailing) {
				Button("Save", action: save)
			}
		}
	}
}

extension EditContactView {
	func save() {
		presentationMode.wrappedValue.dismiss()
	}

	func cancel() {
		presentationMode.wrappedValue.dismiss()
	}
}
For now, the save() and cancel() methods are the same. We will implement saving later.
And, finally, you are not limited to the environment values already contained in the EnvironmentValues type. You can set environment values of any kind, even your structures. You can see an example of that in Apple’s documentation.
Adding global objects to the SwiftUI environment
As you might expect, you can not only pass values through the environment but also objects. Here, the environment is commonly used to pass global objects down a view hierarchy.
Global objects contain data that need to be available throughout the entire navigation of your app. I usually call these objects controllers, following the MVC pattern.
Again, we could use the @ObservedObject wrapper, but that would be tedious. Moreover, it would force views to depend on objects they don’t need, only to be able to pass them forward.
The StateController we have in our app is a typical example of a global object we want to propagate to our app’s screens.
Adding objects to the environment is more straightforward than adding custom values.
If you want to add a custom value type to the environment, you first need to create custom keys for the EnvironmentValues type.
For objects, all you need is the .environmentObject view modifier. As usual, the only prerequisite is that your object conforms to the ObservableObject protocol.
@main
struct ContactApp: App {
    @StateObject private var stateController = StateController()

	var body: some Scene {
		WindowGroup {
			NavigationView {
				DetailView()
					.environmentObject(stateController)
			}
			.environment(\.colorScheme, .dark)
		}
	}
}
Notice that, unlike the .environment modifier, .environmentObject does not need a key path. That means you can only set a single instance for each class in the environment.
Accessing global objects stored in the SwiftUI environment
As it happens for environment values, we access environment objects with a specific property wrapper, i.e., @EnvironmentObject.
In our sample app, we have to, first of all, use this new wrapper to replace the @ObservedObject property in the DetailView.
struct DetailView: View {
	@EnvironmentObject private var stateController: StateController
	@State private var isSheetPresented = false

	var contact: Contact { stateController.contact }

	var body: some View {
		List {
			Header(photo: contact.photo, name: contact.name, position: contact.position)
				.frame(maxWidth: .infinity)
			Row(label: "Email", text: contact.email, destination: URL(string: "mailto:\(contact.email)")!)
			Row(label: "Phone", text: contact.phone, destination: URL(string: "tel://\(contact.phone)")!)
		}
		.listStyle(PlainListStyle())
		.toolbar {
			Button("Edit", action: { isSheetPresented = true })
		}
		.fullScreenCover(isPresented: $isSheetPresented) {
			NavigationView {
				EditContactView()
			}
			.environment(\.colorScheme, .dark)
		}
	}
}
We haven’t changed much. The ContactApp still passes the StateController to the DetailView as before. But now, that happens through the environment instead of a parameter in the view’s initializer.
Now that the StateController is in the environment, we can also access it from the EditContactView and finally save the draft changes.
struct EditContactView: View {
	@State private var draft: Contact = TestData.contact
	@Environment(\.presentationMode) private var presentationMode
	@EnvironmentObject private var stateController: StateController

	var body: some View {
		List {
			RoundImage(image: draft.photo)
			EditableRow(title: "Name", text: $draft.name)
			EditableRow(title: "Position", text: $draft.position)
			EditableRow(title: "Email", text: $draft.email)
			EditableRow(title: "Phone", text: $draft.phone)
		}
		.onAppear { draft = stateController.contact }
		.toolbar {
			ToolbarItem(placement: .navigationBarLeading) {
				Button("Cancel", action: cancel)
			}
			ToolbarItem(placement: .navigationBarTrailing) {
				Button("Save", action: save)
			}
		}
	}
}

extension EditContactView {
	func save() {
		stateController.contact = Contact(
			photo: draft.photo,
			name: draft.name,
			position: draft.position,
			email: draft.email,
			phone: draft.phone)
		presentationMode.wrappedValue.dismiss()
	}

	func cancel() {
		presentationMode.wrappedValue.dismiss()
	}
}
Beware that environment objects are not available at initialization time. To initialize our draft with the data coming from the StateController, we need to use the .onAppear modifier.
Again, we could have used an @ObservedObject property and pass the StateController from the DetailView to the EditContactView directly. That would have produced the same result.
In more complex apps, with deeper view hierarchies, this becomes a far better approach. Only the views that need a global object need to declare an @EnvironmentObject property. Others remain untouched. And that’s even better when you have more than one global object in your app.
(Note: In iOS 14, you don’t need to pass forward environment objects in modal presentation as you do for environment values. In iOS 13, though, you must pass both values and objects. That makes me think that environment values suffer from a bug that will be fixed in future releases of iOS).
The drawback of environment objects is that they create problems with Xcode previews. I solve such a problem with a concept I call root views, which you can find in my free guide on MVC and MVVM.
Propagating values up a view hierarchy using SwiftUI’s view preferences
The data stored inside of environment objects is both readable and editable because that’s the nature of reference types.
The same does not apply to environment values. These are read-only, and you can pass only downwards in a view tree. (Unless you use some trick like in the presentationMode example we used above, which hides references inside value types).
But SwiftUI also has a mechanism to propagate values upward in a view hierarchy called view preferences. You can think of preferences as the inverse of the environment, although it’s not an analogy that matches perfectly.
Preferences are quite complex to use and need several moving parts. It’s much easier to pass a value from a single origin down a tree than to combine values coming up from views at different levels in a hierarchy.
Preferences are rarely necessary for standard iOS apps, so they are outside of this article’s scope.
But you can still see them in action in your apps. For example, you set the title of a navigation bar using the .navigationTitle view modifier.
struct DetailView: View {
	@EnvironmentObject private var stateController: StateController
	@State private var isSheetPresented = false

	var contact: Contact { stateController.contact }

	var body: some View {
		List {
			Header(photo: contact.photo, name: contact.name, position: contact.position)
				.frame(maxWidth: .infinity)
			Row(label: "Email", text: contact.email, destination: URL(string: "mailto:\(contact.email)")!)
			Row(label: "Phone", text: contact.phone, destination: URL(string: "tel://\(contact.phone)")!)
		}
		.listStyle(PlainListStyle())
		.navigationTitle("Contact Details")
		.toolbar {
			Button("Edit", action: { isSheetPresented = true })
		}
		.fullScreenCover(isPresented: $isSheetPresented) {
			NavigationView {
				EditContactView()
			}
			.environment(\.colorScheme, .dark)
		}
	}
}

struct EditContactView: View {
	@State private var draft: Contact = TestData.contact
	@Environment(\.presentationMode) private var presentationMode
	@EnvironmentObject private var stateController: StateController

	var body: some View {
		List {
			RoundImage(image: draft.photo)
			EditableRow(title: "Name", text: $draft.name)
			EditableRow(title: "Position", text: $draft.position)
			EditableRow(title: "Email", text: $draft.email)
			EditableRow(title: "Phone", text: $draft.phone)
		}
		.navigationTitle("Edit Contact")
		.onAppear { draft = stateController.contact }
		.toolbar {
			ToolbarItem(placement: .navigationBarLeading) {
				Button("Cancel", action: cancel)
			}
			ToolbarItem(placement: .navigationBarTrailing) {
				Button("Save", action: save)
			}
		}
	}
}
Notice that we are applying this modifier to the List views inside the bodies of our DetailView and EditContactView types. The respective navigation views lie higher in the hierarchy and yet can read those titles.
That’s because the NavigationView type and the .navigationTitle modifier use SwiftUI’s view preferences.
And this is not the only example. The .toolbar modifier we used to add buttons to the navigation bar also uses preferences. And so does the .tabItem modifier that sets the titles and images in a TabView.
Conclusions
As I mentioned at the beginning of this article, deciding which data flow mechanism to use in SwiftUI is not just a matter of determining whether you should use values or references.
Instead, it depends on the purpose of a specific piece of information and where its single source of truth resides in your app’s structure.
Like many other decisions you make when writing apps, that becomes the matter of strategy related to your app’s architecture, instead of being a collection of tactics you use separately.
Still, there are patterns in everything we do in iOS apps. So, in the end, deciding what mechanism to use is even easier than consulting the decision tree I showed at the beginning of the article.
If you follow well-established design patterns like MVC and MVVM, those decisions have, for the most part, already been taken for you. You only need to apply them to your apps. You can find a more in-depth example in my free guide below.
Architecting SwiftUI apps with MVC and MVVM
It's easy to make an app by throwing some code together. But without best practices and robust architecture, you soon end up with unmanageable spaghetti code. In this guide I'll show you how to properly structure SwiftUI apps.
Matteo has been developing apps for iOS since 2008. He has been teaching iOS development best practices to hundreds of students since 2015 and he is the developer of Vulcan, a macOS app to generate SwiftUI code. Before that he was a freelance iOS developer for small and big clients, including TomTom, Squla, Siilo, and Layar. Matteo got a master’s degree in computer science and computational logic at the University of Turin. In his spare time he dances and teaches tango.


Hi Matteo,
Thanks as always for the really helpful guide! One question for you:
How would you handle a situation where multiple @StateObjects rely upon a shared object?
For example, in my app, I have a
StateManagerand aContentManager(for pulling audio content, etc.), both of which rely upon aStorageManager; however, the below code results in the following error, because I’m not able to instantiate that shared object beforehand:Equally, I can’t create the objects within the
bodyblock, because that gets called many times over during the app lifecycle.The only workaround I’ve thought of so far is to use a static singleton version of the
StorageManager, but I know you often advise against that as a design decision.Any suggestions would be welcome.
Thanks!
In that case, you need to explicitly initialize the stored properties in the initializer of your app structure:
Perfect; thanks!
I hadn’t considered the possibility of an explicit initializer in this context. I appreciate the insight.