Many iOS developers make serious architectural mistakes when passing data between view controllers.
There are many ways to do this, but they are not all good. Only a few of them are the best practices.
Quick and easy solutions like singletons often lead to severe problems you will discover only later.
If you want to be a skilled iOS developer, you need to know the architecture behind view controller communication.
In this article, I will show you the best practices to pass data both forward backward. We will also discuss some advanced techniques, and the solutions you should not use.
This article has been updated for iOS 12, Xcode 10 and both Swift 4 and Swift 5.

FREE GUIDE - SwiftUI App Architecture: Design Patterns and Best Practices
MVC, MVVM, and MV in SwiftUI, plus practical lessons on code encapsulation and data flow.
DOWNLOAD THE FREE GUIDEContents

Section 1
The difference between best and weak practices

Section 2
Passing data forward

Section 3
Passing data backward

Section 4
Advanced techniques

Section 5
Wrong techniques
Section 1:
The difference between best and weak practices

Passing data between view controllers might sound like a trivial task.
But when considering that any real iOS app will have many view controllers, communication becomes a crucial part. Getting it wrong can lead to hard to fix bugs.
What happens when you get view controller communication wrong
I worked with many clients and also built my apps. I know first-hand how bad practices can derail a project.
When Apple first published the iOS SDK in 2008, I made a little game for the iPhone. I read some Apple guides and started coding my app from there.
Like any other iOS developer, I soon came to a roadblock: view controller communication.
I was coming from Mac development where there were no view controllers. It was a new concept for me, and I was not well-versed in software architecture and best practices (they don’t teach those in universities).
So I did what I could with my little experience.
Some years later, I wanted to improve my little game and add some new features. At that point, my experience was much more prominent.
When I opened the project, and I looked at the architecture of the app, I wondered:
WTF was I thinking when I wrote this?
You see, sometimes it is easy to look at someone else’s code and think they are bad developers. The truth is that everybody goes through an initial phase of a poor understanding of the platform.
Don’t be a copy and paste developer
What is the difference between the few developers that become highly skilled and all the other copy-and-paste developers?
- Good developers know they lack knowledge and take the time to grow it.
- Bad developers never bother. They go on with the little they know, trying to hack together something and calling it a day.
Do you want to be a proficient iOS developer? Then you need to understand the ideas behind view controller communication.
In the past, I wrote about the MVC pattern in iOS and how iOS apps are structured. While in those articles I treated view controller as separate independent entities, they are not.
In any non-trivial app, view controllers need to communicate and send data back and forth.
There are many ways to enable communication between view controllers. If you look at this question on Stack Overflow, you can find pretty much all of them.
But which ones are bad?
Here are all the ways in which you can pass data between view controllers:
- when a segue is performed
- triggering transitions programmatically in your code
- through the state of the app
- using singletons
- using the app delegate
- assigning a delegate to a view controller
- through unwind segues
- referencing a view controller directly
- using the user defaults
- through notifications
- with Swift closures
But only a few of them are the best practices.
For example, you should not reference view controllers directly, which was the mistake I made in my little game. Nor use notifications, which sank a project, which I had to rescue, for one of my clients.
Recognizing good and bad practices
So, what makes some techniques better than others?
Best practices respect the principles of good software architecture and common design patterns.
Recently, I checked again Apple’s guide on view controllers. I was surprised to find that the correct information was in there all the time.
But as I often mention, Apple’s documentation is a bit cryptic, and sometimes even wrong (yes, even Apple makes mistakes). When I read that guide years ago, I could not absorb all the concepts.
So let’s have a look at how to pass data between view controllers in more detail.
In a complex app, there might be many paths that the user can follow. What matters though is that view controllers come on the screen one after another.
So, there are only two directions in which data can flow.
- forward, to any new view controller that comes on the screen; and
- backwards, to a view controller that was previously on display and to which the user goes back at some point.
The two are not equivalent. Each one has its techniques.
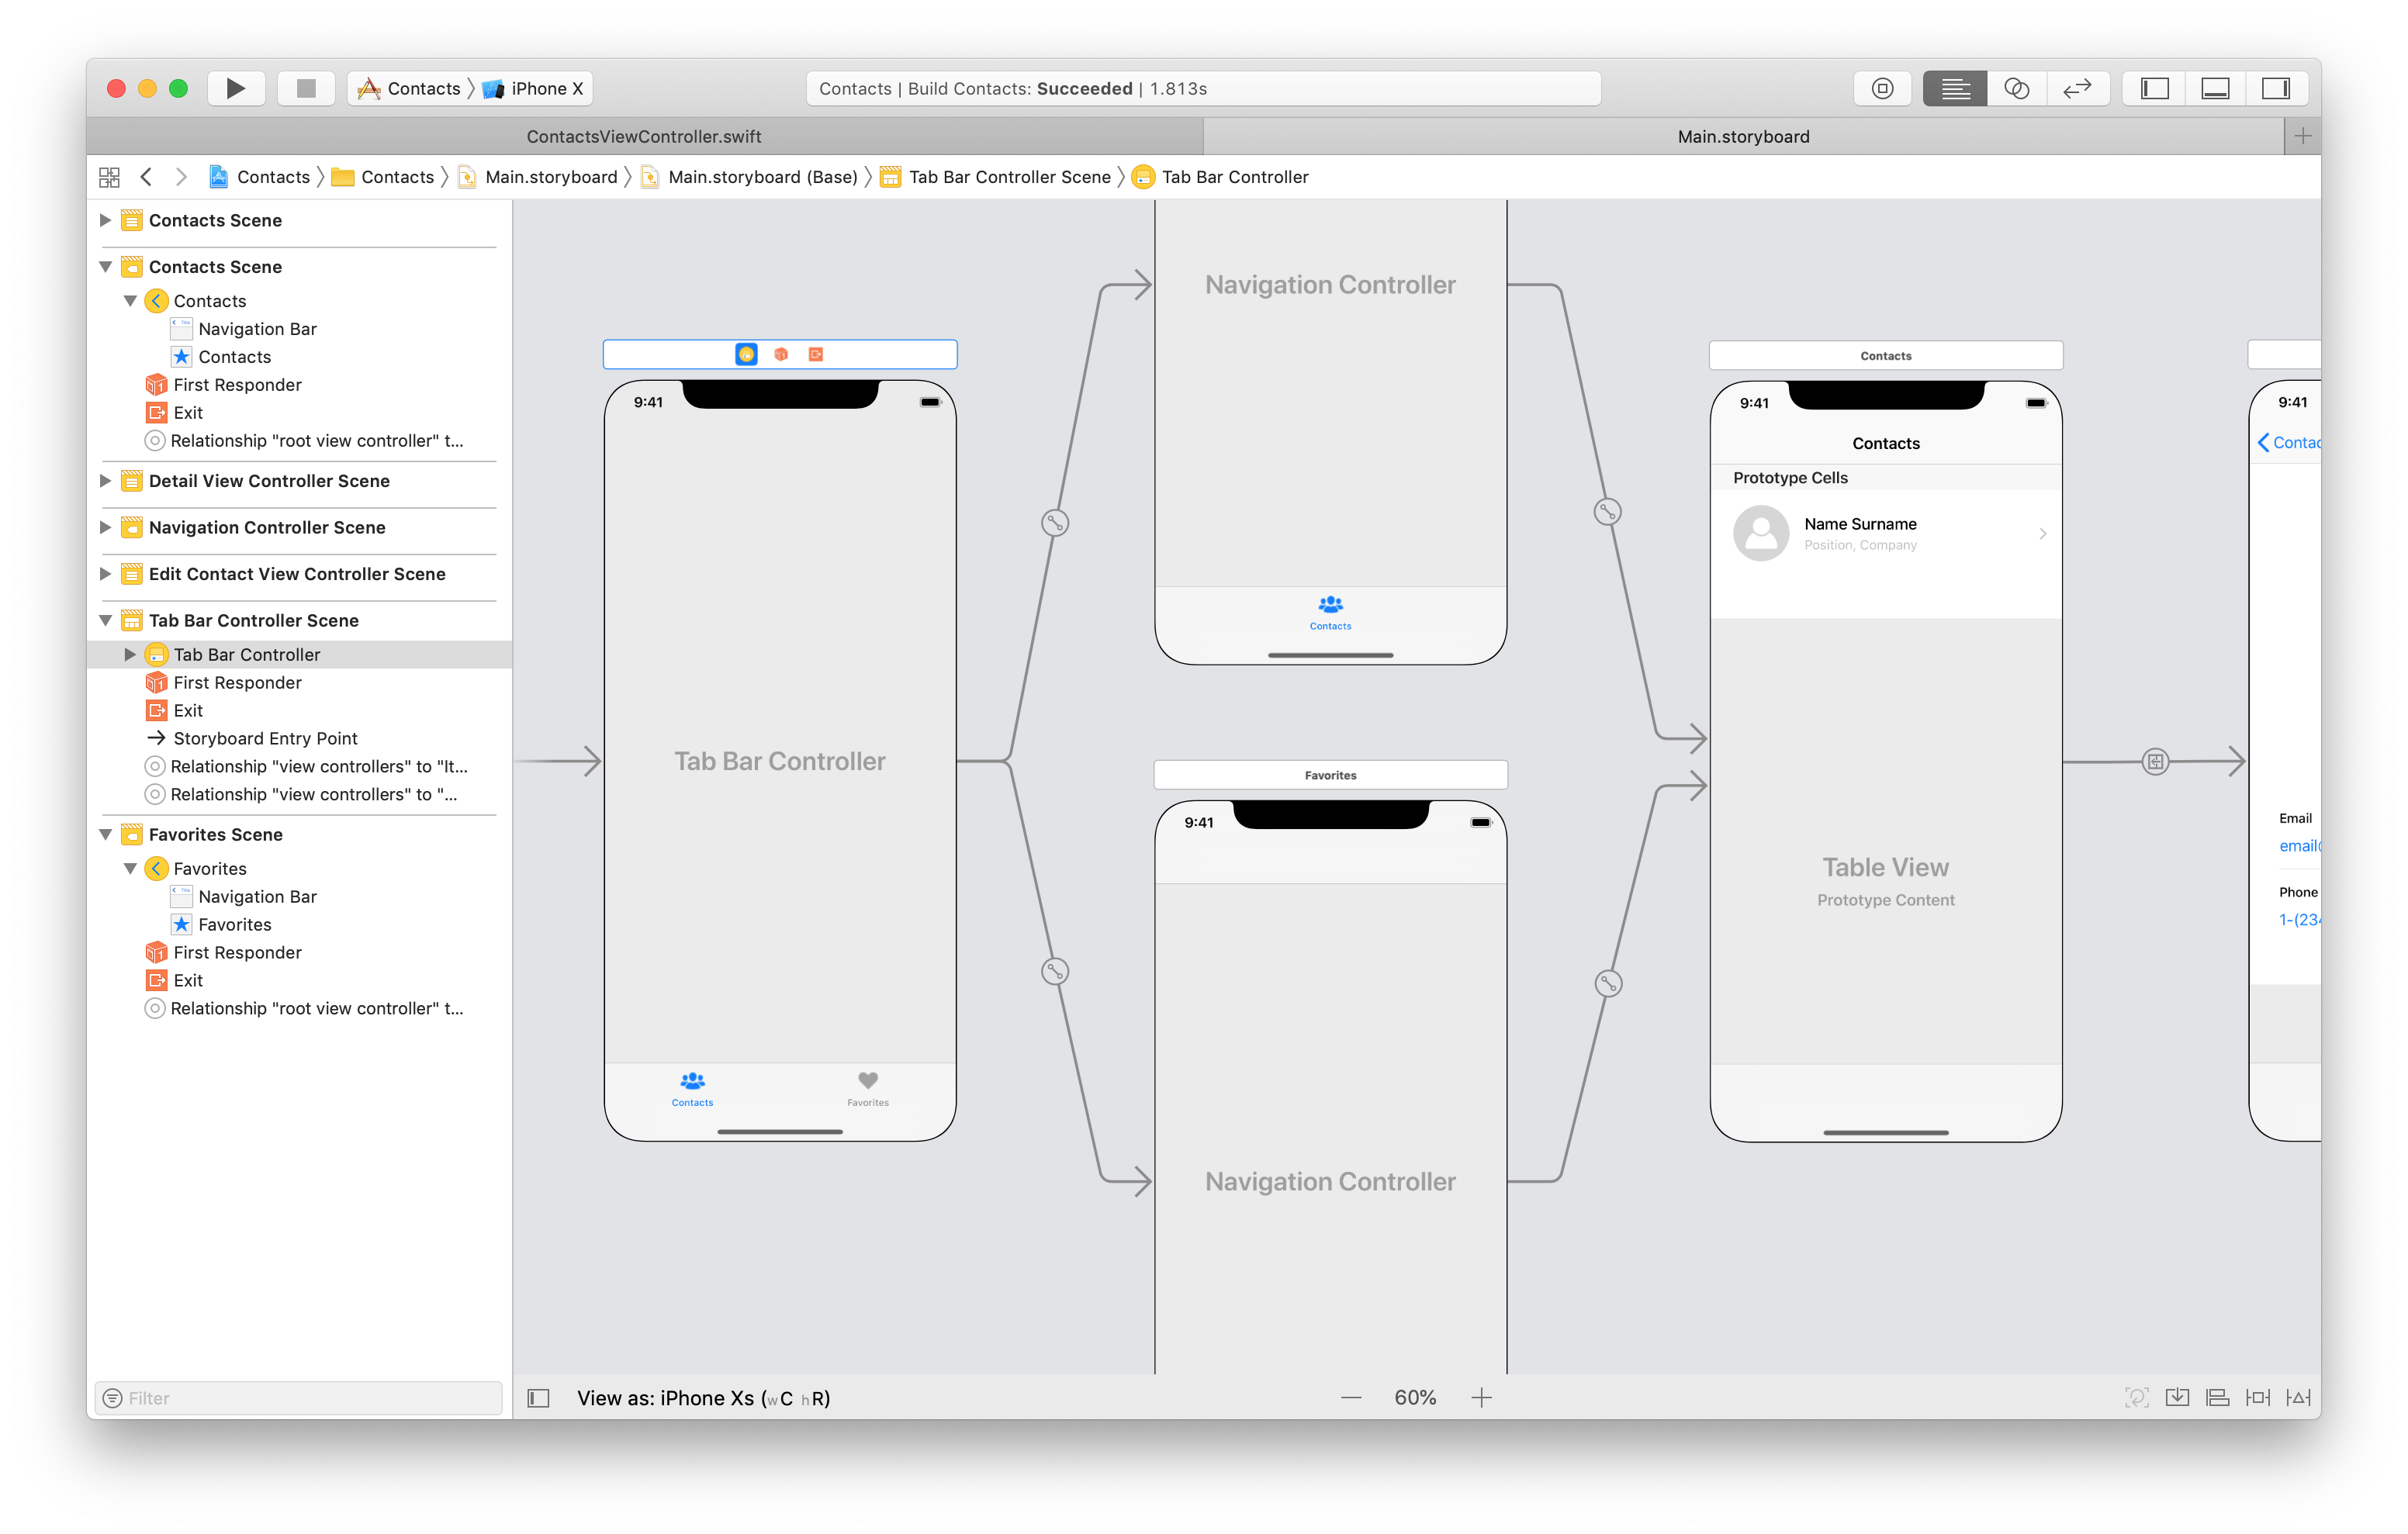
We are going to see all of them, applied to real-world situations in a small sample app to organize contacts. You can find the final version of the code on GitHub.
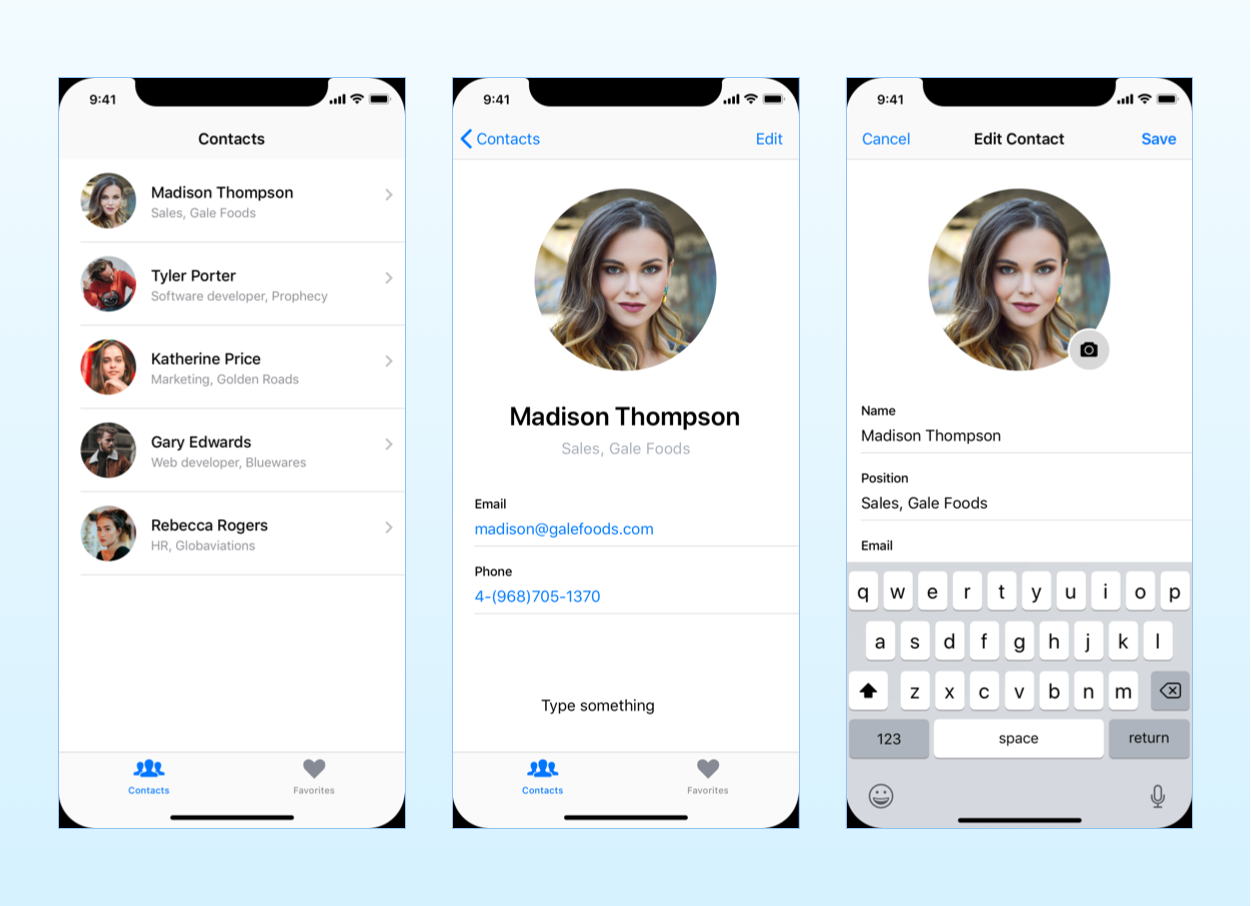
Photo credits: Nathan Dumlao, Philipe Cavalcante, Tamara Bellis, Roberto Delgado Webb, Sorin Sîrbu
Despite their simplicity, these view controllers cover every possible case.
Section 2:
Passing data forward

Passing data forward happens every time a new view controller comes on the screen.
This can happen through a segue or programmatically. Moreover, some view controller containers can make things more complicated.
Passing data forward through a show segue
The most common situation in which you need to pass data forward is when a transition happens through a storyboard segue.
There are two different types of forward segues. The first one we will explore is a show segue in a navigation controller. This produces the typical drill-down navigation of iOS apps.
This is often triggered by selecting a row in a table view.

Before we can pass data between view controllers, we need a Swift structure to represent a contact.
struct Contact {
	let photo: UIImage
	let name: String
	let position: String
	let email: String
	let phone: String
}
The view controllers in a storyboard do not know each other. The only get connected for a short time when a segue happens.
This is precisely the channel through which view controllers communicate.
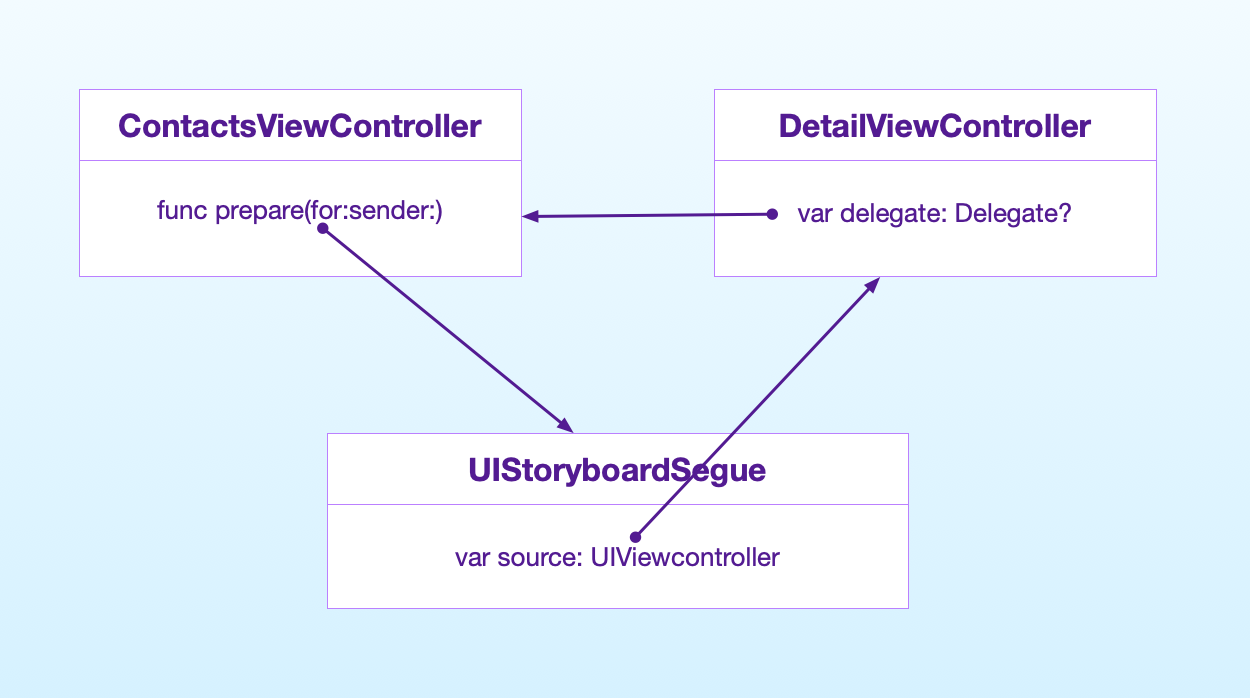
- When a transition is triggered, and a segue is performed, the
prepare(for:sender:)method is called in the source view controller. - The segue, which is an object, is passed as a parameter to that method. Through its
destinationproperty, you can access the destination view controller. - The destination view controller needs to declare a public stored property to receive data.
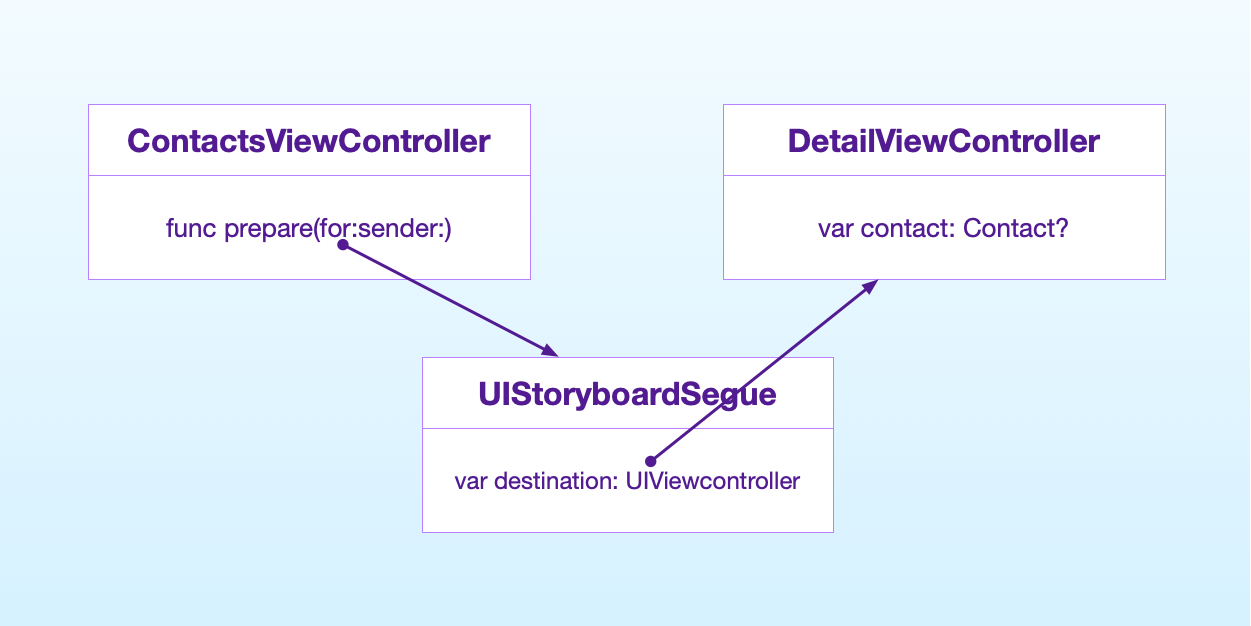
First of all, let’s set up the destination view controller.
class DetailViewController: UITableViewController {
	@IBOutlet var imageView: UIImageView?
	@IBOutlet var nameLabel: UILabel?
	@IBOutlet var positionLabel: UILabel?
	@IBOutlet var emailButton: UIButton?
	@IBOutlet var phoneButton: UIButton?

	var contact: Contact?

	override func viewDidLoad() {
		super.viewDidLoad()
		imageView?.image = contact?.photo
		nameLabel?.text = contact?.name
		positionLabel?.text = contact?.position
		emailButton?.setTitle(contact?.email, for: .normal)
		phoneButton?.setTitle(contact?.phone, for: .normal)
	}
}
We can’t write a custom initializer for a view controller in a storyboard. Since it can only receive data after initialization, the contact property needs to be optional.
We now need a view controller with a list of contacts.
class ContactsViewController: UITableViewController {
	let contacts: [Contact] = [
		Contact(photo:  imageLiteral(resourceName: "Madison"), name: "Madison Thompson", position: "Sales, Gale Foods", email: "[email protected]", phone: "4-(968) 705-1370"),
		Contact(photo:  imageLiteral(resourceName: "Tyler"), name: "Tyler Porter", position: "Software developer, Prophecy", email: "[email protected]", phone: "2-(513) 832-7517"),
		Contact(photo:  imageLiteral(resourceName: "Katherine"), name: "Katherine Price", position: "Marketing, Golden Roads", email: "[email protected]", phone: "1-(722) 844-1495"),
		Contact(photo:  imageLiteral(resourceName: "Gary"), name: "Gary Edwards", position: "Web Developer, Bluewares", email: "[email protected]", phone: "9-(687) 559-3525"),
		Contact(photo:  imageLiteral(resourceName: "Rebecca"), name: "Rebecca Rogers", position: "HR, Globaviations", email: "[email protected]", phone: "3-(710) 249-5471")
	]

	override func tableView(_ tableView: UITableView, numberOfRowsInSection section: Int) -> Int {
		return contacts.count
	}

	override func tableView(_ tableView: UITableView, cellForRowAt indexPath: IndexPath) -> UITableViewCell {
		let contact = contacts[indexPath.row]
		let cell = tableView.dequeueReusableCell(withIdentifier: "ContactCell", for: indexPath) as! ContactCell
		cell.photoImageView?.image = contact.photo
		cell.nameLabel?.text = contact.name
		cell.positionLabel?.text = contact.position
		return cell
	}
}

class ContactCell: UITableViewCell {
	@IBOutlet var photoImageView: UIImageView?
	@IBOutlet var nameLabel: UILabel?
	@IBOutlet var positionLabel: UILabel?
}
For simplicity, the ContactsViewController acts as a data source for its table view, but that’s not the best practice. You can read more about that in my article on UITableView
Finally, we pass the selected contact from to the DetailViewController in the prepare(for:sender:) method of ContactsViewController:
class ContactsViewController: UITableViewController {
	let contacts: [Contact] = [
		Contact(photo:  imageLiteral(resourceName: "Madison"), name: "Madison Thompson", position: "Sales, Gale Foods", email: "[email protected]", phone: "4-(968) 705-1370"),
		Contact(photo:  imageLiteral(resourceName: "Tyler"), name: "Tyler Porter", position: "Software developer, Prophecy", email: "[email protected]", phone: "2-(513) 832-7517"),
		Contact(photo:  imageLiteral(resourceName: "Katherine"), name: "Katherine Price", position: "Marketing, Golden Roads", email: "[email protected]", phone: "1-(722) 844-1495"),
		Contact(photo:  imageLiteral(resourceName: "Gary"), name: "Gary Edwards", position: "Web Developer, Bluewares", email: "[email protected]", phone: "9-(687) 559-3525"),
		Contact(photo:  imageLiteral(resourceName: "Rebecca"), name: "Rebecca Rogers", position: "HR, Globaviations", email: "[email protected]", phone: "3-(710) 249-5471")
	]

	override func tableView(_ tableView: UITableView, numberOfRowsInSection section: Int) -> Int {
		return contacts.count
	}

	override func tableView(_ tableView: UITableView, cellForRowAt indexPath: IndexPath) -> UITableViewCell {
		let contact = contacts[indexPath.row]
		let cell = tableView.dequeueReusableCell(withIdentifier: "ContactCell", for: indexPath) as! ContactCell
		cell.photoImageView?.image = contact.photo
		cell.nameLabel?.text = contact.name
		cell.positionLabel?.text = contact.position
		return cell
	}

	override func prepare(for segue: UIStoryboardSegue, sender: Any?) {
		guard let detailViewController = segue.destination as? DetailViewController,
			let index = tableView.indexPathForSelectedRow?.row
			else {
				return
		}
		detailViewController.contact = contacts[index]
	}
}
You can run the app and see that it works.
Keep in mind that prepare(for:sender:) gets called for all segues going out from a view controller. In this case, we only have one, but in a real app, you can have more.
To know which segue was triggered, you have two options:
- use optional binding like in the example above, to check which view controller comes next; or
- give an identifier to the segue, and then check the
identifierproperty ofUIStoryboardSegue.
Passing data forward through a modal segue
The other forward segue you find in iOS apps is the present modally segue. In iOS, any screen that requires user input is usually presented this way.
This is again a forward segue, so it works as the show segue we saw above.
But often, you find an obstacle on your way.
To get a navigation bar at the top of the screen, you need to place your destination view controller inside a navigation controller.
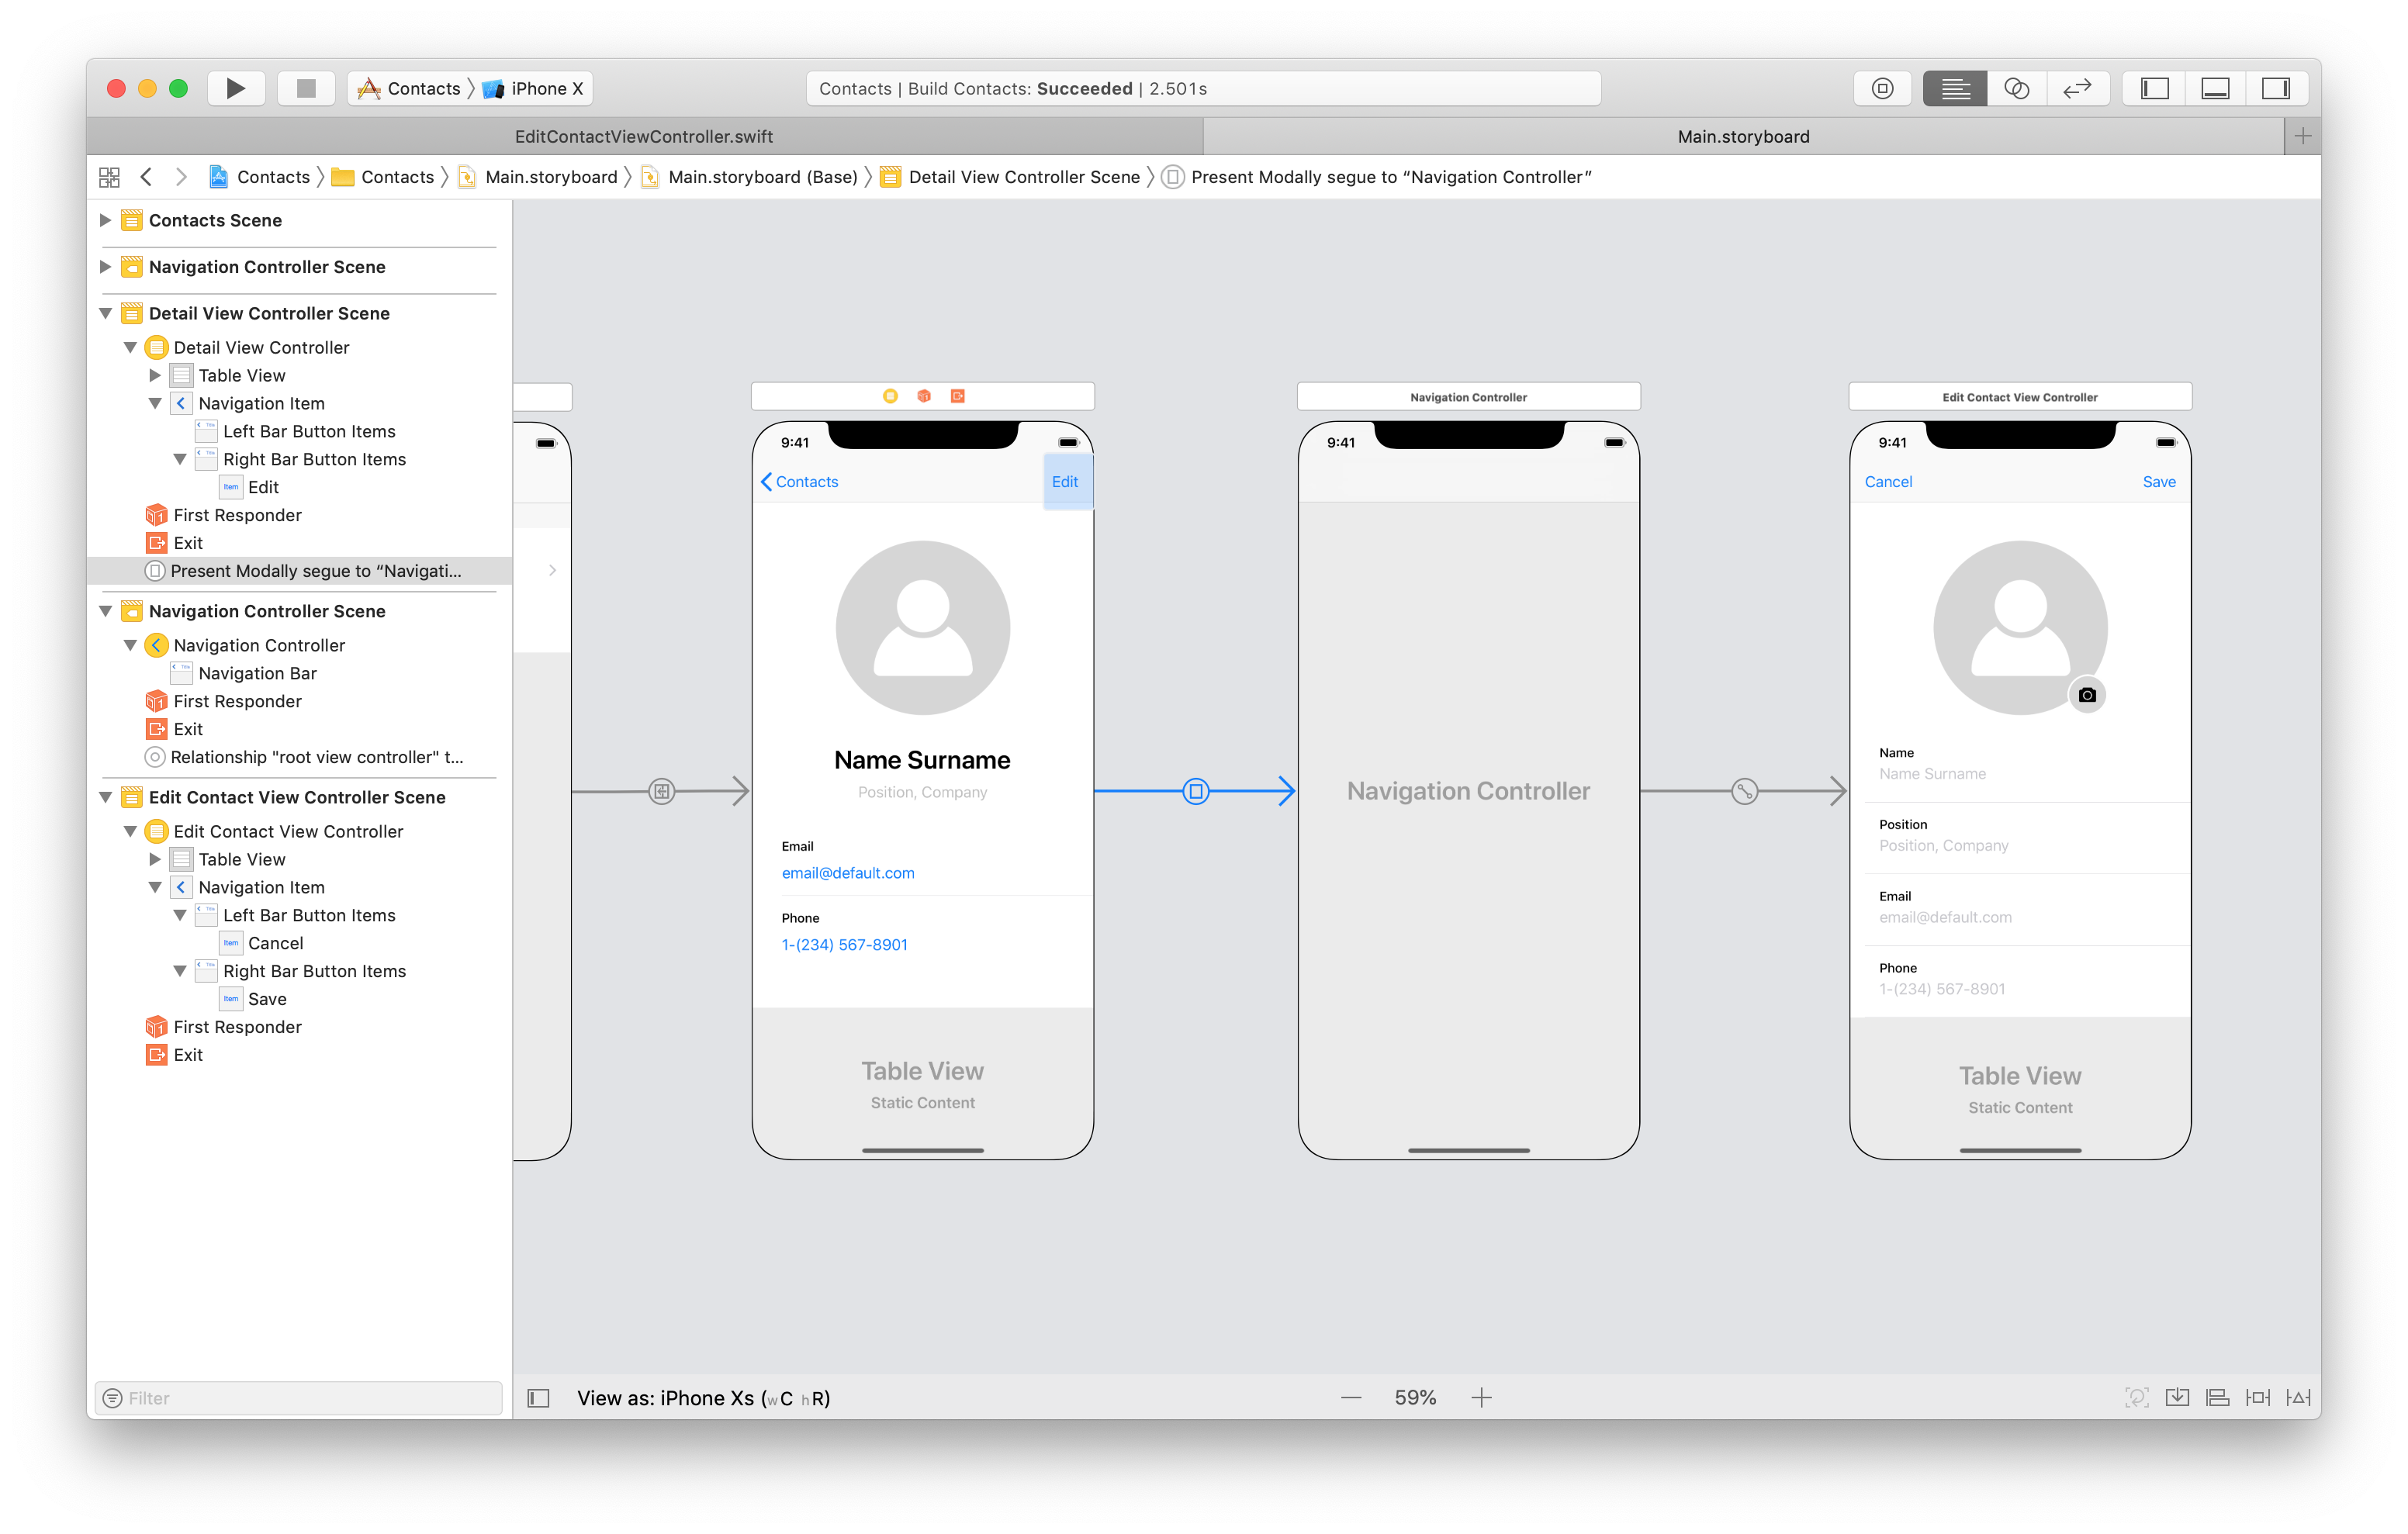
Now, there is a navigation controller between the source and the destination. The mechanism stays the same though.
The destination view controller still receives its data through a stored property.
class EditContactViewController: UITableViewController {
	@IBOutlet weak var imageView: UIImageView!
	@IBOutlet weak var nameTextField: UITextField!
	@IBOutlet weak var positionTextField: UITextField!
	@IBOutlet weak var emailTextField: UITextField!
	@IBOutlet weak var phoneTextField: UITextField!

	var contact: Contact?

	override func viewDidLoad() {
		super.viewDidLoad()
		imageView.image = contact?.photo
		nameTextField.text = contact?.name
		positionTextField.text = contact?.position
		emailTextField.text = contact?.email
		phoneTextField.text = contact?.phone
	}
}
The source view controller instead needs to dig through the navigation controller.
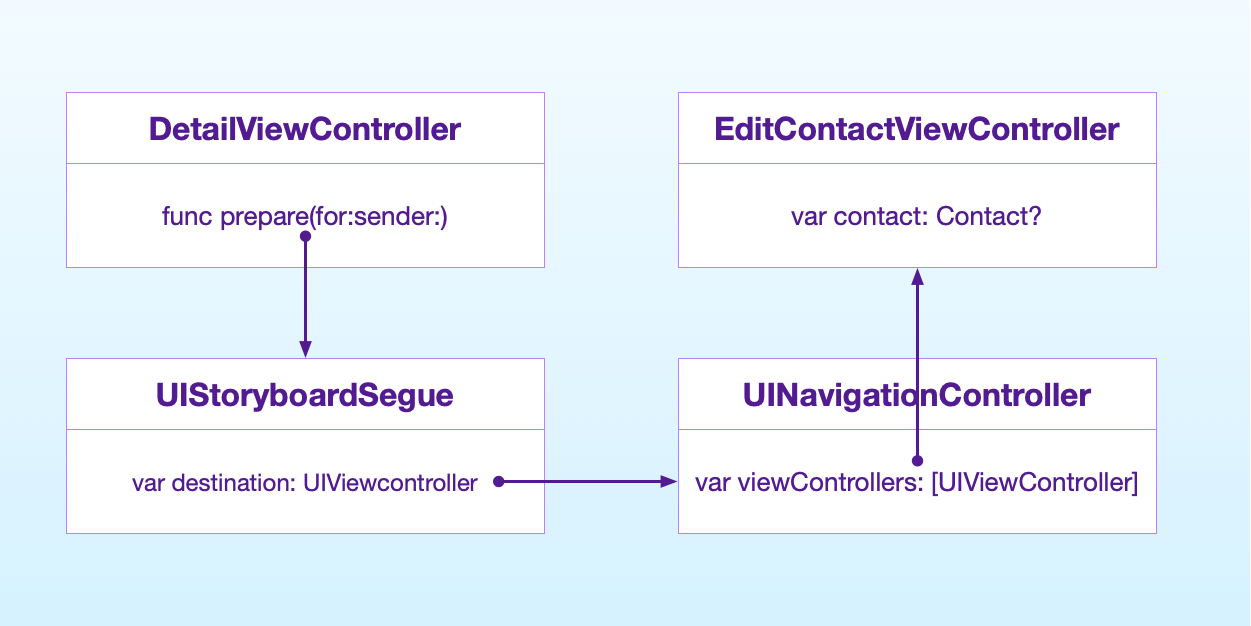
To do that, we:
- cast the
destinationof the segue toUINavigationController; - get its root view controller through the
viewControllersproperty.
class DetailViewController: UITableViewController {
	@IBOutlet var imageView: UIImageView?
	@IBOutlet var nameLabel: UILabel?
	@IBOutlet var positionLabel: UILabel?
	@IBOutlet var emailButton: UIButton?
	@IBOutlet var phoneButton: UIButton?

	var contact: Contact?

	override func viewDidLoad() {
		super.viewDidLoad()
		imageView?.image = contact?.photo
		nameLabel?.text = contact?.name
		positionLabel?.text = contact?.position
		emailButton?.setTitle(contact?.email, for: .normal)
		phoneButton?.setTitle(contact?.phone, for: .normal)
	}

	override func prepare(for segue: UIStoryboardSegue, sender: Any?) {
		if let navigationController = segue.destination as? UINavigationController,
			let editContactViewController = navigationController.viewControllers.first as? EditContactViewController {
			editContactViewController.contact = contact
		}
	}
}
In theory, we could create a UINavigationController subclass that passes data to its children. But that would not be a practical solution for such a small task.
Later, we will see a better, more generic solution in the advanced techniques section.
Passing data forward without a segue
Sometimes, you might connect view controllers programmatically instead of using a segue.
This happens when the destination view controller:
- is in a nib file;
- creates its view hierarchy in code.
In this case, the passage of data is straightforward. Since the source view controller instantiates the destination view controller, it has a direct reference to the latter.
I usually recommend using storyboards in any iOS app, since they have many advantages. But not using storyboards has one advantage.
View controllers that don’t come from a storyboard can have custom initializers.
class EditContactViewController: UITableViewController {
	@IBOutlet weak var imageView: UIImageView!
	@IBOutlet weak var nameTextField: UITextField!
	@IBOutlet weak var positionTextField: UITextField!
	@IBOutlet weak var emailTextField: UITextField!
	@IBOutlet weak var phoneTextField: UITextField!

	let contact: Contact

	init(contact: Contact) {
		self.contact = contact
		super.init(nibName: nil, bundle: nil)
	}

	required init?(coder aDecoder: NSCoder) {
		fatalError("init(coder:) has not been implemented")
	}

	override func viewDidLoad() {
		super.viewDidLoad()
		imageView.image = contact.photo
		nameTextField.text = contact.name
		positionTextField.text = contact.position
		emailTextField.text = contact.email
		phoneTextField.text = contact.phone
	}
}
This removes optionals from the view controller properties, which means less unwrapping code.
Since there is no segue, the source controller instantiates the destination directly. The prepare(for:sender:) method is also not called.
Instead, we handle user interaction in
- an action method for buttons, or
- the
tableView(_:didSelectRowAt:)method ofUITableViewDelegatewhen using table views.
class DetailViewController: UITableViewController {
	@IBOutlet var imageView: UIImageView?
	@IBOutlet var nameLabel: UILabel?
	@IBOutlet var positionLabel: UILabel?
	@IBOutlet var emailButton: UIButton?
	@IBOutlet var phoneButton: UIButton?

	var contact: Contact?

	override func viewDidLoad() {
		super.viewDidLoad()
		imageView?.image = contact?.photo
		nameLabel?.text = contact?.name
		positionLabel?.text = contact?.position
		emailButton?.setTitle(contact?.email, for: .normal)
		phoneButton?.setTitle(contact?.phone, for: .normal)
	}

	@IBAction func edit(_ sender: Any) {
		guard let contact = contact else {
			return
		}
		let editViewController = EditContactViewController(contact: contact)
		let navigationViewController = UINavigationController(rootViewController: editViewController)
		show(navigationViewController, sender: nil)
	}
}
Passing data between view controllers inside a tab bar controller
Another common container in iOS apps is the tab bar controller. This allows the user to switch between different tabs using a tab bar at the bottom of the screen.
Sometimes, you need to update one tab as a consequence of a user action in another tab. But view controllers in different tabs do not have a direct channel of communication.
Switching between view controllers in different tabs does not trigger any segue or any event inside view controllers.
You can still detect tab switching adding a delegate to the tab bar controller, but that’s not a good solution for view controller communication.
In our example app, we can add a feature to mark a contact as favorite directly in the first tab. Of course, when the user switches to the second tab, the list of favorite contacts needs to be up to date.
In this case, view controllers communicate indirectly through the state of the app.
- The state of the app is usually contained inside a model controller.
- The first view controller updates the state of the app as a consequence of user interaction.
- When the second view controller comes on screen, it fetches the updated data from the model controller and updates its interface.
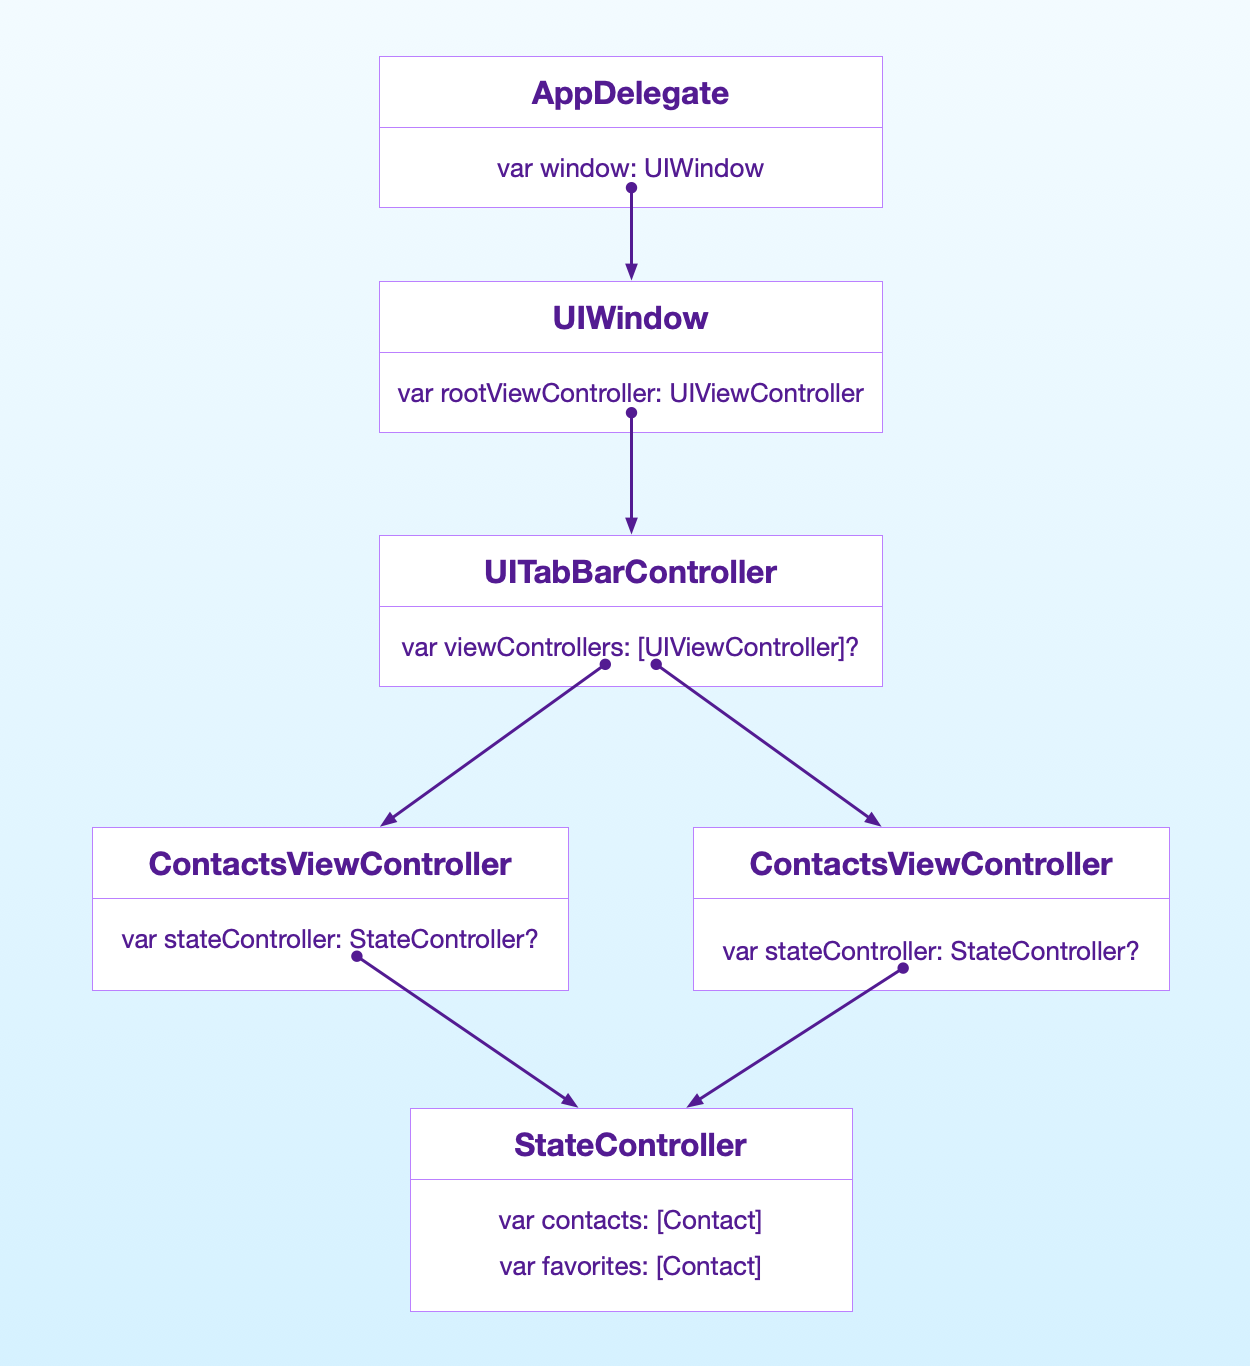
In iOS apps, a tab bar controller is usually the initial view controller, which is reachable from the app delegate.
Let’s start by creating a model controller that contains the state of the app.
class StateController {
	let contacts: [Contact] = [
		Contact(photo:  imageLiteral(resourceName: "Madison"), name: "Madison Thompson", position: "Sales, Gale Foods", email: "[email protected]", phone: "4-(968) 705-1370"),
		Contact(photo:  imageLiteral(resourceName: "Tyler"), name: "Tyler Porter", position: "Software developer, Prophecy", email: "[email protected]", phone: "2-(513) 832-7517"),
		Contact(photo:  imageLiteral(resourceName: "Katherine"), name: "Katherine Price", position: "Marketing, Golden Roads", email: "[email protected]", phone: "1-(722) 844-1495"),
		Contact(photo:  imageLiteral(resourceName: "Gary"), name: "Gary Edwards", position: "Web Developer, Bluewares", email: "[email protected]", phone: "9-(687) 559-3525"),
		Contact(photo:  imageLiteral(resourceName: "Rebecca"), name: "Rebecca Rogers", position: "HR, Globaviations", email: "[email protected]", phone: "3-(710) 249-5471")
	]

	var favorites: [Contact] = []
}
A real state controller would probably have a more complex interface to add and remove favorites, and would probably store its data on the disk. But let’s keep things simple.
Both tabs show a list of contacts, so we can put a ContactsViewController in each one. We just need to change it a bit, so it gets its data from the StateController.
class ContactsViewController: UITableViewController {
	var stateController: StateController?
	var favoritesOnly = false

	var contacts: [Contact] {
		if favoritesOnly {
			return stateController?.favorites ?? []
		}
		return stateController?.contacts ?? []
	}

	override func tableView(_ tableView: UITableView, numberOfRowsInSection section: Int) -> Int {
		return contacts.count
	}

	override func tableView(_ tableView: UITableView, cellForRowAt indexPath: IndexPath) -> UITableViewCell {
		let contact = contacts[indexPath.row]
		let cell = tableView.dequeueReusableCell(withIdentifier: "ContactCell", for: indexPath) as! ContactCell
		cell.photoImageView?.image = contact.photo
		cell.nameLabel?.text = contact.name
		cell.positionLabel?.text = contact.position
		return cell
	}

	override func prepare(for segue: UIStoryboardSegue, sender: Any?) {
		guard let detailViewController = segue.destination as? DetailViewController,
			let index = tableView.indexPathForSelectedRow?.row
			else {
				return
		}
		detailViewController.contact = contacts[index]
	}
}
If you feel there is too much going on with optionals here, be sure to grab my guide to Swift optionals.
To favorite a contact, we can use table view row actions.
	override func tableView(_ tableView: UITableView, editActionsForRowAt indexPath: IndexPath) -> [UITableViewRowAction]? {
		let favoriteAction = UITableViewRowAction(style: .default, title: "Favorite") { [weak self](_, indexPath) in
			guard let favorite = self?.stateController?.contacts[indexPath.row] else {
				return
			}
			self?.stateController?.favorites.append(favorite)
		}
		return [favoriteAction]
	}
Finally, we need to update the UI of the view controller every time it comes on the screen. In this way, the favorites are always going to be up to date.
ContactsViewController: UITableViewController {
	var stateController: StateController?
	var favoritesOnly = false

	var contacts: [Contact] {
		if favoritesOnly {
			return stateController?.favorites ?? []
		}
		return stateController?.contacts ?? []
	}

	override func viewWillAppear(_ animated: Bool) {
		super.viewWillAppear(animated)
		tableView.reloadData()
	}

	override func tableView(_ tableView: UITableView, numberOfRowsInSection section: Int) -> Int {
		return contacts.count
	}

	override func tableView(_ tableView: UITableView, cellForRowAt indexPath: IndexPath) -> UITableViewCell {
		let contact = contacts[indexPath.row]
		let cell = tableView.dequeueReusableCell(withIdentifier: "ContactCell", for: indexPath) as! ContactCell
		cell.photoImageView?.image = contact.photo
		cell.nameLabel?.text = contact.name
		cell.positionLabel?.text = contact.position
		return cell
	}

	override func prepare(for segue: UIStoryboardSegue, sender: Any?) {
		guard let detailViewController = segue.destination as? DetailViewController,
			let index = tableView.indexPathForSelectedRow?.row
			else {
				return
		}
		detailViewController.contact = contacts[index]
	}
}
The only thing left is giving to both instances of ContactsViewController a shared StateController instance. We do so in the AppDelegate.
class AppDelegate: UIResponder, UIApplicationDelegate {
	var window: UIWindow?
	let stateController = StateController()

	func application(_ application: UIApplication, didFinishLaunchingWithOptions launchOptions: [UIApplication.LaunchOptionsKey: Any]?) -> Bool {
		guard let tabBarController = window?.rootViewController as? UITabBarController,
			let viewControllers = tabBarController.viewControllers else {
				return true
		}
		for (index, viewController) in viewControllers.enumerated() {
			if let navigationController = viewController as? UINavigationController,
				let contactsViewController = navigationController.viewControllers.first as? ContactsViewController {
				contactsViewController.stateController = stateController
				contactsViewController.favoritesOnly = index == 1
			}
		}
		return true
	}
}
Again, each tab in the tab bar controller contains a navigation controller, so we have to dig through those to get to the two ContactsViewController instances.
Section 3:
Passing data backward
Passing data backward in an iOS app is as important as moving it forward. Users often go back to a previous screen they visited.
As the user interacts with your app, you have to keep those previous screens updated. That does not happen automatically, so there are different techniques you can use.
Passing data back through an unwind segue
If you use storyboards in your app and navigate forward using segues, to keep things consistent, you use unwind segues to go back.
Unwind segues are commonly used to reverse modal presentation. In navigation controllers, there is no need for unwind segues since the container takes care of everything.
But you can also use an unwind segue in a navigation controller if you want to jump back more than one screen.
Unwind segues have many moving parts, so they can be a bit confusing.
First of all, you cannot directly connect a control, e.g., a button, to an unwind segue. You first need to create an unwind action inside the view controller you want to go back to.
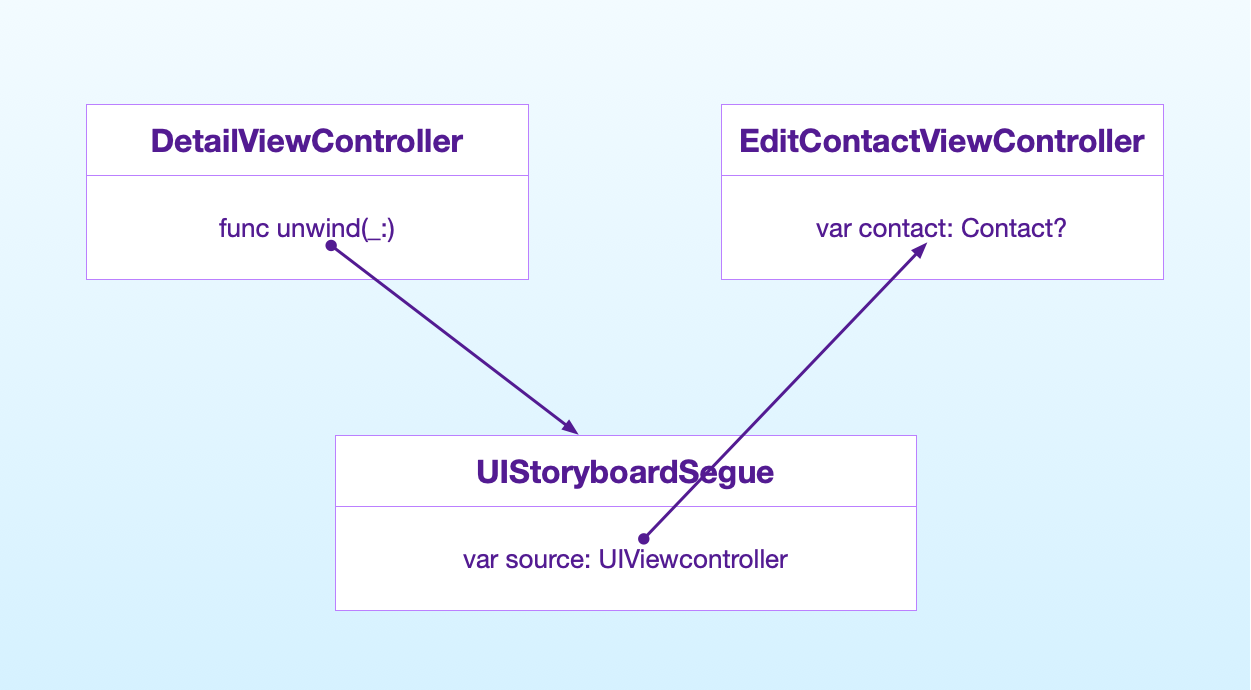
In an unwind segue, the source is the view controller currently on screen, and the destination is the previous view controller.
At first sight, this does not look like a big problem. When an unwind segue is triggered, the prepare(for:sender:) is called in the source view controller as you would expect.
But since we are going back, it’s not a good practice to reference the previous view controller.
It’s common for a view controller to know which view controllers come after. But a view controller should not know the ones which come before.
So, here the steps are different:
- In its
prepare(for:sender:)method, the source view controller stores the data it wants to pass back in a public property. - After that, the unwind action is called in the destination view controller. This method also gets the
UIStoryboardSegueinstance as a parameter. Through the segue, the destination reads the data stored in the property of the source.
In our sample app, we first store the edited data for a contact in the contact property when prepare(for:sender:) gets called.
class EditContactViewController: UITableViewController {
	@IBOutlet weak var imageView: UIImageView!
	@IBOutlet weak var nameTextField: UITextField!
	@IBOutlet weak var positionTextField: UITextField!
	@IBOutlet weak var emailTextField: UITextField!
	@IBOutlet weak var phoneTextField: UITextField!

	var contact: Contact?

	override func viewDidLoad() {
		super.viewDidLoad()
		imageView.image = contact?.photo
		nameTextField.text = contact?.name
		positionTextField.text = contact?.position
		emailTextField.text = contact?.email
		phoneTextField.text = contact?.phone
	}

	override func prepare(for segue: UIStoryboardSegue, sender: Any?) {
		if let photo = imageView.image,
			let name = nameTextField.text,
			let position = positionTextField.text,
			let email = emailTextField.text,
			let phone = phoneTextField.text {
			contact = Contact.init(photo: photo, name: name, position: position, email: email, phone: phone)
		}
	}
}
Then, in the unwind action in the destination view controller, we read the contact data.
class DetailViewController: UITableViewController {
	@IBOutlet var imageView: UIImageView?
	@IBOutlet var nameLabel: UILabel?
	@IBOutlet var positionLabel: UILabel?
	@IBOutlet var emailButton: UIButton?
	@IBOutlet var phoneButton: UIButton?

	var contact: Contact?

	override func viewWillAppear(_ animated: Bool) {
		super.viewWillAppear(animated)
		imageView?.image = contact?.photo
		nameLabel?.text = contact?.name
		positionLabel?.text = contact?.position
		emailButton?.setTitle(contact?.email, for: .normal)
		phoneButton?.setTitle(contact?.phone, for: .normal)
	}

	override func prepare(for segue: UIStoryboardSegue, sender: Any?) {
		if let navigationController = segue.destination as? UINavigationController,
			let editContactViewController = navigationController.viewControllers.first as? EditContactViewController {
			editContactViewController.contact = contact
		}
	}

	@IBAction func cancel(_ unwindSegue: UIStoryboardSegue) {}

	@IBAction func save(_ unwindSegue: UIStoryboardSegue) {
		if let editViewController = unwindSegue.source as? EditContactViewController {
			contact = editViewController.contact
		}
	}
}
Finally, the UI of the view controller gets updated by the viewWillAppear(_:) method we already implemented.
Passing data back through the shared state of the app
As we have seen above, model controllers can keep track of the current state of the app.
The state of the app is a clear channel through which view controllers can communicate with each other in any direction.
We have already seen an example above, so I won’t repeat it here.
- All you need to do is pass a shared model controller instance to the destination view controller when moving forward.
- That view controller can then make all the updates it needs to the state of the app.
- When the user goes back to the previous view controller, this can read the new state in its
viewWillAppear(_:)method, as we saw in the example above.
Passing data back using a delegate
Sometimes the techniques we have seen are still not enough.
- The data you want to pass back might be temporary and not belong to the shared state of the app.
- When the user goes back in a navigation controller, no segue is triggered.
- You might want communication to happen at any moment and not only when a transition occurs.
In these cases, we need a direct connection between the current view controller and the previous one. As I explained above though view controllers should not know anything about previous ones.
The solution is delegation.
Delegation allows us to create a link to a previous view controller without knowing its type. We do so with a protocol that defines the interface with which we need to interact.
This is how delegation works:
- We define a delegate protocol to define an interface with which the source view controller will interact.
- We use this protocol as the type of a stored property. This creates a link to the destination view controller without having to specify its type.
- The destination view controller adopts the delegate protocol and implements its interface. Them, it passes a reference to itself during a forward segue.
- The source view controller can then interact with the destination through the interface defined by the protocol.
In our app, when the user saves the changes to a contact, the EditContactViewController passes data back to the DetailViewController through the segue.
But this data does not yet get passed back to the ContactViewController.
To create a link back from the DetailViewController we define a delegate protocol with a method to update a contact.
protocol DetailViewControllerDelegate: AnyObject {
	func update(_ contact: Contact)
}

class DetailViewController: UITableViewController {
	@IBOutlet var imageView: UIImageView?
	@IBOutlet var nameLabel: UILabel?
	@IBOutlet var positionLabel: UILabel?
	@IBOutlet var emailButton: UIButton?
	@IBOutlet var phoneButton: UIButton?

	var contact: Contact?
	weak var delegate: DetailViewControllerDelegate?

	override func viewWillAppear(_ animated: Bool) {
		super.viewWillAppear(animated)
		imageView?.image = contact?.photo
		nameLabel?.text = contact?.name
		positionLabel?.text = contact?.position
		emailButton?.setTitle(contact?.email, for: .normal)
		phoneButton?.setTitle(contact?.phone, for: .normal)
	}

	override func prepare(for segue: UIStoryboardSegue, sender: Any?) {
		if let navigationController = segue.destination as? UINavigationController,
			let editContactViewController = navigationController.viewControllers.first as? EditContactViewController {
			editContactViewController.contact = contact
		}
	}

	@IBAction func cancel(_ unwindSegue: UIStoryboardSegue) {}

	@IBAction func save(_ unwindSegue: UIStoryboardSegue) {
		if let editViewController = unwindSegue.source as? EditContactViewController {
			contact = editViewController.contact
			if let contact = contact {
				delegate?.update(contact)
			}
		}
	}
}
Any delegate property needs to be weak to avoid strong reference cycles. See this article for more details on weak and strong references.
In the code above, I pass the data back in the unwind action, but you can do that at any moment. The advantage of delegation is that the link is always available.
The ContactsViewController then adopts the DetailViewControllerDelegate and establishes the link when moving forward.
class ContactsViewController: UITableViewController {
	var stateController: StateController?
	var favoritesOnly = false

	var contacts: [Contact] {
		if favoritesOnly {
			return stateController?.favorites ?? []
		}
		return stateController?.contacts ?? []
	}

	override func viewWillAppear(_ animated: Bool) {
		super.viewWillAppear(animated)
		tableView.reloadData()
	}

	override func tableView(_ tableView: UITableView, numberOfRowsInSection section: Int) -> Int {
		return contacts.count
	}

	override func tableView(_ tableView: UITableView, cellForRowAt indexPath: IndexPath) -> UITableViewCell {
		let contact = contacts[indexPath.row]
		let cell = tableView.dequeueReusableCell(withIdentifier: "ContactCell", for: indexPath) as! ContactCell
		cell.photoImageView?.image = contact.photo
		cell.nameLabel?.text = contact.name
		cell.positionLabel?.text = contact.position
		return cell
	}

	override func prepare(for segue: UIStoryboardSegue, sender: Any?) {
		guard let detailViewController = segue.destination as? DetailViewController,
			let index = tableView.indexPathForSelectedRow?.row
			else {
				return
		}
		detailViewController.contact = contacts[index]
		detailViewController.delegate = self
	}

	override func tableView(_ tableView: UITableView, editActionsForRowAt indexPath: IndexPath) -> [UITableViewRowAction]? {
		let favoriteAction = UITableViewRowAction(style: .default, title: "Favorite") { [weak self](_, indexPath) in
			guard let favorite = self?.stateController?.contacts[indexPath.row] else {
				return
			}
			self?.stateController?.favorites.append(favorite)
		}
		return [favoriteAction]
	}
}

extension ContactsViewController: DetailViewControllerDelegate {
	func update(_ contact: Contact) {
		stateController?.update(contact)
	}
}
In the update(_:) delegate method, the ContactsViewController updates the contact in the StateController. We still don’t have that method, so here is a simple implementation.
class StateController {
	private(set) var contacts: [Contact] = [
		Contact(photo:  imageLiteral(resourceName: "Madison"), name: "Madison Thompson", position: "Sales, Gale Foods", email: "[email protected]", phone: "4-(968) 705-1370"),
		Contact(photo:  imageLiteral(resourceName: "Tyler"), name: "Tyler Porter", position: "Software developer, Prophecy", email: "[email protected]", phone: "2-(513) 832-7517"),
		Contact(photo:  imageLiteral(resourceName: "Katherine"), name: "Katherine Price", position: "Marketing, Golden Roads", email: "[email protected]", phone: "1-(722) 844-1495"),
		Contact(photo:  imageLiteral(resourceName: "Gary"), name: "Gary Edwards", position: "Web Developer, Bluewares", email: "[email protected]", phone: "9-(687) 559-3525"),
		Contact(photo:  imageLiteral(resourceName: "Rebecca"), name: "Rebecca Rogers", position: "HR, Globaviations", email: "[email protected]", phone: "3-(710) 249-5471")
	]

	var favorites: [Contact] = []

	func update(_ contact: Contact) {
		for (index, old) in contacts.enumerated() {
			if old.name == contact.name {
				contacts[index] = contact
				break
			}
		}
	}
}
Yes, I know that this method does not work if the user changes the name of a contact, but it’s good enough for our example.
Section 4:
Advanced techniques

The techniques we saw in the previous sections are the standard best practices for view controller communication in iOS.
There are also a couple of alternative techniques you can use. These are more advanced, so you don’t need to adopt them straight away.
But when you are ready, they can be useful.
Replacing delegation with Swift closures
Some developers use Swift closures to pass data backward between view controllers.
This technique is similar to delegation but more flexible. That’s also the reason why I usually recommend not to use it.
- When using delegation, you specify the interface of the destination view controller in a protocol. Using closures, you can define that interface through stored properties containing closures.
- The source view controller executed these closures to interact with a previous view controller. This is the same as calling methods on a delegate.
- The destination view controller also establishes a link when a forward transition happens. But in this case, instead of passing forward a reference to itself, it passes a closure.
As an example, we can replace delegation in the DetailViewController with a closure.
class DetailViewController: UITableViewController {
	@IBOutlet var imageView: UIImageView?
	@IBOutlet var nameLabel: UILabel?
	@IBOutlet var positionLabel: UILabel?
	@IBOutlet var emailButton: UIButton?
	@IBOutlet var phoneButton: UIButton?

	var contact: Contact?
	var updateContactClosure: ((Contact) -> Void)?

	override func viewWillAppear(_ animated: Bool) {
		super.viewWillAppear(animated)
		imageView?.image = contact?.photo
		nameLabel?.text = contact?.name
		positionLabel?.text = contact?.position
		emailButton?.setTitle(contact?.email, for: .normal)
		phoneButton?.setTitle(contact?.phone, for: .normal)
	}

	override func prepare(for segue: UIStoryboardSegue, sender: Any?) {
		if let navigationController = segue.destination as? UINavigationController,
			let editContactViewController = navigationController.viewControllers.first as? EditContactViewController {
			editContactViewController.contact = contact
		}
	}

	@IBAction func cancel(_ unwindSegue: UIStoryboardSegue) {}

	@IBAction func save(_ unwindSegue: UIStoryboardSegue) {
		if let editViewController = unwindSegue.source as? EditContactViewController {
			contact = editViewController.contact
			if let contact = contact {
				updateContactClosure?(contact)
			}
		}
	}
}
As you can see, the code looks pretty much the same as before. The only difference is that we lost the protocol and the stored property has now a function type.
When the forward segue is triggered, the ContactsViewController injects a closure into that stored property.
class ContactsViewController: UITableViewController {
	var stateController: StateController?
	var favoritesOnly = false

	var contacts: [Contact] {
		if favoritesOnly {
			return stateController?.favorites ?? []
		}
		return stateController?.contacts ?? []
	}

	override func viewWillAppear(_ animated: Bool) {
		super.viewWillAppear(animated)
		tableView.reloadData()
	}

	override func tableView(_ tableView: UITableView, numberOfRowsInSection section: Int) -> Int {
		return contacts.count
	}

	override func tableView(_ tableView: UITableView, cellForRowAt indexPath: IndexPath) -> UITableViewCell {
		let contact = contacts[indexPath.row]
		let cell = tableView.dequeueReusableCell(withIdentifier: "ContactCell", for: indexPath) as! ContactCell
		cell.photoImageView?.image = contact.photo
		cell.nameLabel?.text = contact.name
		cell.positionLabel?.text = contact.position
		return cell
	}

	override func prepare(for segue: UIStoryboardSegue, sender: Any?) {
		guard let detailViewController = segue.destination as? DetailViewController,
			let index = tableView.indexPathForSelectedRow?.row
			else {
				return
		}
		detailViewController.contact = contacts[index]
		detailViewController.updateContactClosure = { [weak self] contact in
			self?.stateController?.update(contact)
		}
	}

	override func tableView(_ tableView: UITableView, editActionsForRowAt indexPath: IndexPath) -> [UITableViewRowAction]? {
		let favoriteAction = UITableViewRowAction(style: .default, title: "Favorite") { [weak self](_, indexPath) in
			guard let favorite = self?.stateController?.contacts[indexPath.row] else {
				return
			}
			self?.stateController?.favorites.append(favorite)
		}
		return [favoriteAction]
	}
}
The code in the closure is the one that was in the delegate method.
Notice also that the closure contains a reference to self. So, like delegation, using closures still creates a link between the two view controllers.
This approach is a bit more concise than delegation. But using closures also presents several features/disadvantages that delegation does not have.
- Giving a good name to stored properties that contain closures is not as easy as giving proper names to methods.
- If you need more than one closure to communicate with the previous view controller, you need a stored property for each one of them. With delegation, the whole interface is segregated inside a protocol, and you need only one delegate property.
- Delegation forces a single channel of communication. Multiple closure properties are more flexible and can point to different view controllers. You can’t be sure where they go through. You pay for the flexibility with code that is harder to understand.
In my opinion, closures work better as callbacks for asynchronous tasks, like network requests or animations. Delegation is a better solution for view controller communication.
Removing repeated code by using an injecting segue
You might have noticed that in the various prepare(for:segue:) methods, we had to cast view controller instances to the appropriate class before we could pass any data to them.
That code becomes more tedious when we add containers like navigation controllers.
It would be better if we could get rid of such code, because:
- It needs to be repeated in every view controller. Since an app may have many navigation paths that lead to a single view controller, every preceding view controller needs the same code.
- While it’s acceptable for a view controller to reference the next ones, this makes our storyboard less flexible. When you rearrange the scenes in a storyboard, you also have to change the code to pass data forward.
Some time ago I discovered a technique to remove all that code from view controllers and move it in a single location.
I have been teaching this in my courses for a while. I might not be the first one to use it, but I haven’t seen anyone use it yet.
The trick relies on the fact that a segue is an object. That means we can extend the UIStoryboardSegue class and put there all the code that casts view controller instances.
extension UIStoryboardSegue {
	func forward(_ contact: Contact?, to destination: UIViewController) {
		if let navigationController = destination as? UINavigationController {
			let root = navigationController.viewControllers[0]
			forward(contact, to: root)
		}
		if let detailViewController = destination as? DetailViewController {
			detailViewController.contact = contact
		}
		if let editContactViewController = destination as? EditContactViewController {
			editContactViewController.contact = contact
		}
	}
}
Notice that this method also descends recursively into containers.
The code above is a bit longer than the one we wrote in view controllers, but you need to write it only once. Any view controller that passes a contact forward can do so in a single line of code.
class DetailViewController: UITableViewController {
	@IBOutlet var imageView: UIImageView?
	@IBOutlet var nameLabel: UILabel?
	@IBOutlet var positionLabel: UILabel?
	@IBOutlet var emailButton: UIButton?
	@IBOutlet var phoneButton: UIButton?

	var contact: Contact?

	override func viewWillAppear(_ animated: Bool) {
		super.viewWillAppear(animated)
		imageView?.image = contact?.photo
		nameLabel?.text = contact?.name
		positionLabel?.text = contact?.position
		emailButton?.setTitle(contact?.email, for: .normal)
		phoneButton?.setTitle(contact?.phone, for: .normal)
	}

	override func prepare(for segue: UIStoryboardSegue, sender: Any?) {
		segue.forward(contact, to: segue.destination)
	}

	@IBAction func cancel(_ unwindSegue: UIStoryboardSegue) {}

	@IBAction func save(_ unwindSegue: UIStoryboardSegue) {
		if let editViewController = unwindSegue.source as? EditContactViewController {
			contact = editViewController.contact
			if let contact = contact {
				delegate?.update(contact)
			}
		}
	}
}
Any reference to the next view controller is gone, making this view controller wholly decoupled.
Section 5:
Wrong techniques

We have seen the best practices for view controller communication. Unfortunately, I many projects, I saw many of the wrong ones too.
In this section, we will look at which one they are, and why you should not use them.
Do not reference the previous view controller directly
In theory, delegation could be substituted by a direct reference to a previous view controller. After all, that’s what delegation is anyway.
So, why bother with a delegate protocol?
class DetailViewController: UITableViewController {
	@IBOutlet var imageView: UIImageView?
	@IBOutlet var nameLabel: UILabel?
	@IBOutlet var positionLabel: UILabel?
	@IBOutlet var emailButton: UIButton?
	@IBOutlet var phoneButton: UIButton?

	var contact: Contact?
	weak var contactsViewController: ContactsViewController?

	override func viewWillAppear(_ animated: Bool) {
		super.viewWillAppear(animated)
		imageView?.image = contact?.photo
		nameLabel?.text = contact?.name
		positionLabel?.text = contact?.position
		emailButton?.setTitle(contact?.email, for: .normal)
		phoneButton?.setTitle(contact?.phone, for: .normal)
	}

	override func prepare(for segue: UIStoryboardSegue, sender: Any?) {
		segue.forward(contact, to: segue.destination)
	}

	@IBAction func cancel(_ unwindSegue: UIStoryboardSegue) {}

	@IBAction func save(_ unwindSegue: UIStoryboardSegue) {
		if let editViewController = unwindSegue.source as? EditContactViewController {
			contact = editViewController.contact
			if let contact = contact {
				contactsViewController?.update(contact)
			}
		}
	}
}
The ContactsViewController then needs to provide the required interface.
class ContactsViewController: UITableViewController {
	var stateController: StateController?
	var favoritesOnly = false

	var contacts: [Contact] {
		if favoritesOnly {
			return stateController?.favorites ?? []
		}
		return stateController?.contacts ?? []
	}

	func update(_ contact: Contact) {
		stateController?.update(contact)
	}

	override func viewWillAppear(_ animated: Bool) {
		super.viewWillAppear(animated)
		tableView.reloadData()
	}

	override func tableView(_ tableView: UITableView, numberOfRowsInSection section: Int) -> Int {
		return contacts.count
	}

	override func tableView(_ tableView: UITableView, cellForRowAt indexPath: IndexPath) -> UITableViewCell {
		let contact = contacts[indexPath.row]
		let cell = tableView.dequeueReusableCell(withIdentifier: "ContactCell", for: indexPath) as! ContactCell
		cell.photoImageView?.image = contact.photo
		cell.nameLabel?.text = contact.name
		cell.positionLabel?.text = contact.position
		return cell
	}

	override func prepare(for segue: UIStoryboardSegue, sender: Any?) {
		guard let detailViewController = segue.destination as? DetailViewController,
			let index = tableView.indexPathForSelectedRow?.row
			else {
				return
		}
		detailViewController.contact = contacts[index]
		detailViewController.delegate = self
	}

	override func tableView(_ tableView: UITableView, editActionsForRowAt indexPath: IndexPath) -> [UITableViewRowAction]? {
		let favoriteAction = UITableViewRowAction(style: .default, title: "Favorite") { [weak self](_, indexPath) in
			guard let favorite = self?.stateController?.contacts[indexPath.row] else {
				return
			}
			self?.stateController?.favorites.append(favorite)
		}
		return [favoriteAction]
	}
}
This is the same code we wrote for delegation, minus the protocol. But it has many more problems.
- Referencing the previous view controller class creates more coupling than necessary between the view controllers. Changes in the interface of the destination produce changes also in the source.
- In an iOS app, a view controller is usually reached through more than one path. This means that we need a specific property for every view controller that might come before the current one.
- Changes to the navigation flow in the storyboard would break our code.
As Apple says in its view controllers guide:
Always use a delegate to communicate information back to other controllers. Your content view controller should never need to know the class of the source view controller or any controllers it doesn’t create.
Do not use a singleton to share the app state
Singletons are an abused programming pattern. Especially in iOS, singletons get used for anything and everything.
The reason is that singletons are very easy to create and use. And even Apple endorses them in their documentation.
It looks like a perfect solution, but it’s not.
On the surface, a singleton looks like using the state of the app.
But a singleton can be accessed from anywhere in the app, not only from the view controllers that have an explicit dependency. Singletons introduce a lot of coupling and make objects harder to test and reuse.
This isn’t just my opinion, by the way. You can search on Google for “singleton antipattern” for more information about why singletons are bad. For example, look at this Stack Overflow question
Do not use the app delegate
Using the app delegate to pass data or store the app’s state is the same as using a singleton.
Although the app delegate is not technically a singleton, it can be considered one.
This is because you can access it through the shared UIApplication instance, which is a singleton.
In short, this code should never appear anywhere in your project:
let appDelegate = UIApplication.shared.delegate
// Do something with the app delegate
Do not use the iOS user defaults
In iOS, the UserDefaults store user preferences that need to survive between app launches.
Anything stored in the user defaults stays there until you remove it explicitly, so it is not a mechanism to pass data between objects.
Also, you can only store simple data types in the user defaults, in the form of property lists. This means that you need to convert any custom type before you can put it there.
Finally, this is again like using a singleton. While you can create separate UserDefaults instances, what usually happens is that developers use the shared instance, which is a singleton.
In general, your app should access the user defaults through a single point, which is usually a custom shared model controller as I showed above in this article.
Do not use notifications
Notifications in iOS give you a channel through which some code can send a message to other objects to which it does not have a direct reference.
I have seen many developers use notifications to pass data between view controllers. That’s not what notifications are for.
Notifications create indirection and make your code harder to follow. When you post a notification you cannot be sure which objects will receive it, nor in which order. This often leads to unexpected behavior.
I have seen projects crippled by bugs caused by notifications going to the wrong objects.
Notifications can be useful sometimes. But you should use them sparingly, and only when necessary.
We have seen many direct communication channels between view controllers. There is no point in using an indirect one.
Should view controllers know about each other at all?
You might have noticed that many of the best practices lead view controllers to know about other ones, at least going forward.
But should view controllers know about each other?
The point of storyboards is to be able to change the flow of an app at any moment without changing its code.
Moreover, many paths can lead to a single view controller. We often end with a lot of coupling between view controller classes and repeated code.
The single responsibility of a view controller is to manage a single screen.
If we take this literally, a view controller should not:
- know about other view controllers, and
- contain code that manages the navigation flow.
In the previous section, I showed an advanced technique to get rid of coupling.
In more advanced design patterns, view controller communication is instead handled by coordinators.
Coordinators have direct access to any view controller, and they can also take care of dependency injection. This relieves view controllers from passing dependencies to each other.
One of such design patterns is VIPER. I also use coordinators in my Lotus MVC Pattern.
But those are advanced design patterns. The techniques I listed in this article are reliable and widely used among iOS developers.
I used them for many projects. You can rely on them until you are ready to adopt more advanced practices. Often, a good enough solution that works now is better than a perfect one that takes time to learn.
And in the end, there are no perfect solutions.
Conclusions
There are many ways to pass data between view controllers.
Only some of them are best practices though. Others might look convenient at first, but create problems later.
Pick the correct ones, and move on. There are other things to focus on when making apps.
SwiftUI App Architecture: Design Patterns and Best Practices
It's easy to make an app by throwing some code together. But without best practices and robust architecture, you soon end up with unmanageable spaghetti code. In this guide I'll show you how to properly structure SwiftUI apps.
Matteo has been developing apps for iOS since 2008. He has been teaching iOS development best practices to hundreds of students since 2015 and he is the developer of Vulcan, a macOS app to generate SwiftUI code. Before that he was a freelance iOS developer for small and big clients, including TomTom, Squla, Siilo, and Layar. Matteo got a master’s degree in computer science and computational logic at the University of Turin. In his spare time he dances and teaches tango.
Great blog post. These concepts always seem simple when you know them, but so easy to get wrong though. Good to have them clearly explained.
How do you handle async though? For example, logging in to a web service and then needing to get some sort of authentication token back which is subsequently used by multiple objects that are waiting on this token before they can do anything productive? This is where previously I’ve tended to use notifications, as they cope with the 1:many aspect and kicking off multiple different actions nicely.
(Now that you’ve made me think about it, would it be better for the callback to update a data field in the model and using observers to pass the info on? Or is this effectively just another form of notification?)
I didn’t talk specifically about notifications here because this article was about how view controllers communicate with each other and not how they communicate with the rest of your code.
In case of asynch callbacks notifications would definitely be an option and I will talk about those in the future. But I tend to use them sparingly and only when necessary, due to them being hard to follow mentally. Every time you post a notification you don’t know which objects will intercept it and in which order. I have seen many code bases plagued by bugs caused by this.
In some cases you need notifications, but I discovered that you do much less than you might think of.
For example, in network communication, most of the times the view controller that initiates a request is the only one that needs a callback. In that case my preferred method is to use a closure for the callback. Sometimes a delegate protocol might make more sense, assuming your network controller instance is not shared among different controllers.
In cases where you need to update the global state of the data, I would still go for a single callback at the origin of the network request. The callback then takes care of updating the global state and every view controller updates its UI as soon as it comes on the screen (through viewWillAppear(_:)).
The only scenarios that come on top of my mind at the moment for the use of notifications are these:
– The callback for the asynch call (or a timer that fires) comes at a time where the user has navigated away from the screen where that was initiated, but you still want to present a result to the user (through an alert, for example). In that case a notification might be used to trigger the presentation of this alert, regardless of what view controller is on the screen at that moment and what the user is doing.
– An event is generated without a user action that generates it. For example, this might happen in a multiplayer online game, where the server sends periodical updates without your app requesting them. Or another example is the app changing state (going to the background, etc.) which might happen at any moment.
Yeah, that all makes sense.
Thinking through my example of an authentication token again, it’s probably slightly false as I should be holding the data in a single ‘user’ object rather than holding it in multiple view controller. Which then leads to the interesting question whether it is right for the initial view controller to instantiate the user object or whether to do it from the AppDelegate, and how to then pass its reference to other parallel VCs,?
Thanks for taking the time to go off at a slight tangent. It’s always good to think through these things theoretically, so hopefully I then adopt the good practice when it comes to actual coding. Thanks again.
I spoke a bit about this in other articles and I go more in details in my course, but the overall idea is to keep state in a separate object that then gets passed around view controllers. As for where to instantiate it, I definitely do it from the app delegate and then pass it to the initial view controller. Each view controller then passes this object to the next one.
What are your thoughts on passing data back using unwind segues?
https://developer.apple.com/library/ios/technotes/tn2298/_index.html
That is a good question.
I forgot to mention it in this article, since it’s not one of the most popular ways. It’s not even included in a guide, but just in a separate technical note, although the introductory tutorial from Apple uses it (in the “Implement navigation” section): https://developer.apple.com/library/ios/referencelibrary/GettingStarted/DevelopiOSAppsSwift/index.html#//apple_ref/doc/uid/TP40015214-CH2-SW1
In my opinion it is indeed a valid method.
At his basic use it is a way to pass data back without affecting the model of the app or creating a delegation infrastructure. Beware though not to fall into the trap of referencing the previous view controller in prepareForSegue(_:sender:), since that would be equivalent to what I explained in the section of what not to do.
The correct approach is the same you can see in Apple’s tutorial: set a local property with the data you want to pass backwards, then read such property from the unwind action. If you unwind to a different view controller than the one you came from, this is the only way to do it apart from changing the model. In this case delegation would not work.
At the moment I am not sure I like it much, since the flow is a bit clearer in the other two cases. But I don’t dislike it either. I will think a bit more about it an maybe update the article.
Nice catch, thanks for asking.
I have a fundamental question about view controllers. I don’t use Interface Builder, so I implement all UI views programatically including auto layout constraint settings. No storyboard or nib files. And I actually found out that I don’t use view controllers at all (except the initial/built-in view controller) because I don’t really get the concept what they are for.
For example, if I want to add a table view, I just create a UITableView() programatically and add it to a parent view. Why do I need to have a UITableViewController? I don’t even know how to incorporate it into my code. And what’s the benefit to use one?
On the first topic: using or not using Interface Builder. It is indeed possible to do everything in code. I would ask myself why though. IB is there to make your life easier in a lot of tasks and strip away a lot of code from your app. There are some reasons why people don’t use IB, like large teams where it gets hard to work together on a storyboard, but that does not seem to be the case for you. Why are you doing it? Just because somebody told you to do so? Or because you don’t want to learn IB? Feel free to then continue doing things in code if you prefer so, but in my opinion you need a valid reason to give up all the help IB gives you.
Second topic: view controllers. These are the fundamental building blocks of an iOS app. Roughly speaking, a view controller represents one screen of the app and manages its resources.
What you are doing is adding everything to the first screen. This means that all the resources get allocated there and you keep all of them in memory all the time. Also, you have to code yourself all the animations that iOS gives you for free.
View controllers are a large topic, but a fundamental one you must understand for iOS development. What you do is possible, but goes against the platform design and will create you all sorts of problems down the road.
For a starter, you can read the other articles I have written on the topic:
http://matteomanferdini.com/the-concepts-at-the-foundation-of-any-ios-app/
http://matteomanferdini.com/how-to-structure-the-code-of-ios-apps/
http://matteomanferdini.com/the-common-lifecycle-of-a-view-controller/
http://matteomanferdini.com/understanding-the-core-architectural-principles-of-ios-development-with-a-practical-example/
Thanks for your detailed reply. Really appreciate it.
About IB, I understand your points. I also researched earlier if I should use it or not. The conclusion was the same as yours. One should take advantage of what IB offers and Apple encourages people to do so. I did try to learn IB, however maybe I am an old school type. I have been coding in C/C++ for many years but I was mainly coding on system level instead of UI level, therefore when I come to UI, using a tool like IB is very painful for me. For example, now I am coding a table view with custom cells. When the device rotates, I want to change the layout of the views arranged in a cell (without reloading the table). I can do this freely in code. However, when I think of using IB to do the same, I just can’t get it. Things become complicated to me.
About view controllers. I also understand your points for a view controller representing one screen and I am actually adding everything onto it. But the thing that really confuses me is not UIViewController representing a screen. But as in my original question, when adding a table view to a screen, why do I need to have a view controller (UITableViewController) for this table view? To me, it’s a subview for the first screen. I still can make a separate class to handle the table view and everything goes fine without a UITableViewController. From my understanding, if I go through the typical route by adding a table view to a UI view screen via IB, I will be using UITableViewController. This is something I don’t get and maybe I miss or misunderstand something.
IB might take some time to get and indeed it does not allow you to do everything you can do in code. For those cases I just use a mixed approach.
Regarding view controllers and table views, there are many points in your question.
Yes, you can and indeed you should add the table view to the view of the first view controller, if that table view is on the first screen. A table view is a view and like any other is part of the view hierarchy. Each view controller has its own view to display the interface for the screen.
If it is on another screen, though it belongs to another view controller. Views are only visual element. A view controller is responsible for handling the flow of data to and from the views.
UITableViewController actually does not do much and is not required. You can have a table view with a simple UIViewController. UITableViewController is just a subclass that packs a couple of common tasks you do with table views, but you can do without.
This is a complex topic, so I can’t cover it all in a comment. You can check Apple’s guides:
https://developer.apple.com/library/ios/featuredarticles/ViewControllerPGforiPhoneOS/index.html
https://developer.apple.com/library/ios/documentation/WindowsViews/Conceptual/ViewPG_iPhoneOS/Introduction/Introduction.html
Sure, thanks for the general direction. I will go through more documents and your articles to pick up more.
Thank you very much.
I have read through your guide on passing data between view controllers. I am using a delegate and am able to pass data to and from two view controllers. However, what if i wanted to pass live data, such as a timer? For instance, say i have a view controller that starts a timer that counts every second. Now on view controller one, i have a label that reflects that up counting timer. Suppose i wanted to send that continuous counting clock to another view controller? Right now, i only get the value when the segue is called because the connection between the viewcontrollers only exist for that instant that prepareforsegue is called. How could i display the up counting clock from viewcontroller 1 on viewcontroller 2? Thanks!
In the comments someone posted something similar with async communications. What am i actually designing is an IOS app to communicate with Modbus TCP to a microcontroller. Since one view controller will be constantly polling the microcontroller, i want a separate viewcontroller to display a graphical representation of the microcontroller and the LEDs that will be hooked up to it off of the output pins. I need to pass the data that returns from the microcontroller and pass it from the viewcontroller that is polling the unit to the view controller that is representing it graphically.
This is a different problem than view controller communication. Remember that responsibility of view controllers is to manage a single screen, not more.
Since this timer affects the app globally and more than one screen, it does not belong inside a view controller in the first place. It is better placed inside of another object. After you do this, there are two solutions to get the information to the appropriate view controllers that need to display it. Notifications and Key-Value Observing (which I still didn’t have the time to talk about on this blog)
1) Every time the timer fires, the object that contains it posts a notification. The view controllers that need this value, listen to that notification and update their own interface when it’s posted.
2) Every time the timer fires, the object that contains it updates a public property. This object can be passed around to different view controllers, which observe this property through KVO
Personally I would go for the second solution, since architecturally it is better. It requires a bit more code than the first one, though.
Your a legend! Passing objects backward through the protocol is super easy and convenient. When I updated to iOS 9 all of my unwind segues no longer worked properly. Since I only needed to unwind one view controller I was able to use self.navigationController.popViewControllerAnimate(true) and pass the objects through your method and is worked perfectly :)
Matteo, I’m having some difficulty passing data through the model between view controllers. Any suggestions on a good tutorial or description?
Not that I can think of, sorry. What is exactly your problem?
I’m building an app that will be used to calculate the volumes of cement and chemical, and the procedure required for a given hole. To make this work there will be 5 or 6 views with UI required to be completed by the user which would then be used for the calculations in the model and populate a summary view which could then be printed or sent as a PDF. The issue I’m having is that each view needs to instantiate it’s own instance of the model for which certain properties need to be shared with other views. Any help point me in the right direction would be great.
So, by 5 or 6 views I suppose your app would have 5 or 6 screens, which in iOS means an equal number of view controllers.
To keep shared state, you should create a class, let’s call it StateController. This will contain all the state view controllers need to share with each other.
You then create one instance of this class in the initial view controller of your app and then pass this single instance forward to other view controllers with the techniques I described above.
Is there any problem with creating a struct with static vars and static funcs as a means of maintaining state for the app’s various view controllers versus instantiating a StateController and passing that object around to any of the app’s view controllers in need of state information?
What I’m proposing has the “feel” of a singleton – so maybe I should be instantiating a struct but I’m having difficulty understanding why it is necessary to instantiate versus using a structs static vars and funcs.
The problem is not in the way you implement the singleton itself, the problem is in having global shared state in a place that can be accessed from everywhere. Wether you do this through a class that returns the same instance or other means, it does not matter.
The problem in this is that all the code that accesses that singleton becomes coupled to it. This makes it very hard to test such code. Moreover, unexpected changes to shared state are one of the main causes of bugs.
You can read more about it here, for example: http://stackoverflow.com/questions/12755539/why-is-singleton-considered-an-anti-pattern
Thank you for the comments and link Matteo. Helped me understand that what I wanted was to create properties with a global get capability and a fully constrained set capability.
I was able to do so with struct computed static vars with tuple set param that limits the set operation to one class and as well populates a global get only staric var each time the constained computed var is updated or set.
Have yet to try it but I should also be able to constrain set operation to one object instance if that’s a design requirement.
As far as I can tell, this setup is easily tested and the recievers of the get var see it as a consistent black box data source while the constainted set computed var has a fair amout of flexibility for modifying and constraining how the get output is generated.
So constainted and flexible set data and global and consistent get data.
Given my limited design pattern experience I could be creating hard to maintain code but it doesn’t feel that way. I think it’ll be easily understood and easily modified if that was required six months down the road.
Excellent, thank you very much for the help. You’re articles are excellent and well written. Learning iOS development has been rather frustrating and it’s good to have a resource that is clear to follow.
Hi Matteo, I’m trying to build an app news that when I clicked in and article opens a detail view that have title, image, date and also a webview with another related articles, when I click on each related article I have to present this data in the same view controller (update the article data) how can I do this, like making a transition to the top, not a new controller, the same controller? I’m making the request data throug a model news and with a delegate notify in the same view that I have the new article updated info but I can’t present it in the same viewcontroller. Appreciate your help!
For Xcode 8 and Swift 3, in OriginViewController class, when you pass data through delegation, change:
override func prepareForSegue(segue: UIStoryboardSegue, sender: AnyObject?)
to
override func prepare(for segue: UIStoryboardSegue, sender: Any?)
Indeed. In Swift 3 many methods in the SDK have been renamed to follow the new naming guidelines.
Interesting tutorial.
I’m having problems putting it to use though, concerning passing data back through delegation. When and how to fire passDataBackWards().
I’ve tried firing it in the override of viewWillDisappear() (in the destination Controller), but it doesn’t work.
That should work. What is the problem you have?
I would check with the debugger. Putting a breakpoint on that line should help you finding the reasons.
Thanks for the quick answer.
Ok, sorry, my comment was not very precise. i’ve put a break point in my equivalent of :
func passDataBackWards() {
let data = Data()
delegate?.doSomethingWithData(data)
}
but it doesn’t go through there (I have 2 segues, one to go to the destinationView, the other one to go back to the originalView)
That’s why I’ve tried to encapsulate the call to the delegate into viewWillDisappear:
override func viewWillDisappear(_ animated: Bool) {
super.viewWillDisappear(animated)
if self.isBeingDismissed {
let data = Data()
delegate?.doSomethingWithData(data)
}
}
but the data is still nil in my originalView… besides, I’ve put a breakpoint inside viewWillDisappear, but it’s not called when I go back to originalView…
I’m quite at a loss to understand in what you show here how passDataBackWards is called…
The strange part here is viewWillDisappear(_:) not being called. That should be called when both going forward and backwards.
What are you using to transition? A navigation controller? Or it’s a modal presentation (it should not make any difference anyway)
Pay attention to self.isBeingDismissed. The documentation does not say anything but I assume it will be true only when using modal presentation and not inside a container like a navigation controller.
I see what you mean. Indeed, it’s strange that viewWillDisappear is not being called. Maybe because I segue from 2nd view to 1rst view ?
What I do is use a stateController that I declare in each view
var stateController : StateController?
and I use you tuto to try to pass this controller from one view to another, to keep the state of my App (and to keep the calculation done by the App alive, whichever view is called).
Here, when I go back to 1rst view, stateController is nil, even if I have in 1rst View Controller:
func doSomethingWithData(stateController: StateController) {
self.stateController = stateController
}
It works when I use the segue method you give at the beginning of the tuto (segue from 2nd View to 1rst View) but i don’t manage to implement the code you give to do it though delegation… i’d love to, though, because it lessens the dependency between the views
Passing the StateController forward is correct. What I still don’t get is why the viewWillDisappear(_:) is not called.
What kind of segues do you have between the view controllers?
Show ones.
What I don’t understand in your tuto is how the passDataBackWards func is called in your exemple.
Ok, I understand the problem now… I use several checks on properties of the stateControlleur in 1rst view Controller viewDidLoad(). Apparently, the viewDidLoad of this view fires before viewWillDisappear of the 2nd view controller. So I had the error before viewWillDisappear was called…
Ah, yes. Good find. There is no guarantee on the order in which different lifecycle methods are called across different view controllers. Different containers have different behaviors and load view controllers at different moments. You can only assume the order of the methods in a single view controller.
Very tricky indeed, so much that I didn’t manage to apply this exchange through delegate AND make the view display the data exchanged (I tested and it’s very strange: the first view controller gets the data but the view doesn’t display it)…
But I realized that my need is broader than exchanging data between views. I need an object that can exist all through the app, and stock some data and multithread (through GCD) calculations, independently of the views…
Well what worked for me is close to the model example you give:
create a stateController following the Singleton design advised by Apple:
class StateController {
static let sharedInstance = StateController()
….
}
It create one instance of StateController that is thread safe (Apple: “n Swift, you can simply use a static type property, which is guaranteed to be lazily initialized only once, even when accessed across multiple threads simultaneously”, https://developer.apple.com/library/content/documentation/Swift/Conceptual/BuildingCocoaApps/AdoptingCocoaDesignPatterns.html#singleton)
I then get it whereever I want throughout the app:
class ViewController: UIViewController {
var stateController = StateController.sharedInstance
…
}
And it works just fine.
Thank you fro the time you took to answer me and for your tuto, it really allowed me to progress and lead me to ask myself the right questions
cheers
I know that in you tuto you specify to not use singletons, but I don’t really understand why you consider it not to be a good practice.
Specially when you write “Singletons introduce coupling in your code and make your objects hard to test.”
I have much less coupling with a singleton stateController than with the segue technique or even the delegation one (both are view dependant), and I can easily test my stateController at any moment… I must have missed something in your arguments.
Matteo great article…
But tell me prepare for Segue doesn’t get called with ViewControllers in a Tab Bar.
What would the code look like then?
Indeed, prepare(for:sender:) does not get called in case of relationship segues (for example tab bar controllers or the root view controller of a navigation controller).
In this case there are different solutions, depending on which view controllers you want to communicate.
I assume you want the view controllers in different tabs to communicate with each other. For this you can set a delegate for the UITabBarControllerDelegate and enable communication when the tab gets changed, or subclass UITabBarController.
But this would be atypical. Normally view controllers among tabs don’t really communicate directly. What they usually do is share the state of the app and update that one, so communication is indirect.
If you really need to have different tabs communicate directly I would say your app might have a strange user interaction which should be rethought. It is not a normal UX paradigm in iOS.
I injected dependencies from my login controller to my firstTabViewController and that works fine – created a custom function which gets called.
But I now want to pass that object to the secondTabController.
So I realise prepare for isn’t the right way. So how would I implement this?
There are two ways.
The view controllers in a tab bar controller all get instantiated immediately. So you can do it at the same time you pass dependencies to your firstTabViewController. I assume you are accessing the viewControllers property of UITabBarViewController. Just loop through each view controller in the array.
The second way is to set a delegate for the tab bar controller (you can subclass it and set itself as its own delegate). Then pass the dependencies in the tabBarController(_:shouldSelect:) method.
wow… thanks Matteo… you just saved me a lot of time. Actually the penny dropped when you mentioned that all view controllers in a tab bar get instantiated immediately. Your explanation was excellent
Great read!. Its funny cos I did all of the things you listed on the DONTs :D I will never do it again. I promise hahaha thanks.
Tip:
When passing a Core Data ManagedObject to the next ViewController it is better to pass the ObjectID instead of the real ManagedObject. Let the next ViewController get it from the context itself by that ObjectID. Better for Testing also!
Hello Matteo, I am from China. Thank you very much for these great articles. I have one question. In the section above —Passing data backwards through the shared state of the app, you mentioned ‘ shared state of the app’. I try to understant what is ‘ shared state of the app’? Could you give more introduction about it? Is there any related artices I can read?
By shared state I mean whatever data the is shared across the app and is in memory. For example, if you have a to-do list app, the shared state could be the list of the to-do items.
The shared state is kept in memory and usually different parts of the app access it. To continue with the to-do list app, let’s say that the items can also have a date. An app could have one screen that shows the items in a list, and another screen that shows them in a calendar. But the data is always the same, only its representation to the user is different.
This data is usually kept in a place that different parts of the app can access. This is what I mean by “state”.
Thank you Matteo for your reply. It is really helpful for me to understand this concept. In addition, I also found another article wrote by you about this topic. This is the link:
https://code.tutsplus.com/tutorials/the-right-way-to-share-state-between-swift-view-controllers–cms-28474
In this article, you give very helpful code examples. Now I totally can use this concept in my own APP. Thank you very much.
it is more than a “model” rather that a state.. u mean by keeping a class in memory with data in it. is it like a singleton?
There is some confusion, becasue in patterns like the classic MVC with three layers, the model and the state of the app are the same thing, since model types are objects referenced by the whole app.
If you implement model types using Swift structures though, you have to keep the current state somewhere else, since structures are value types and not reference types.
A singleton can definietly be an example, although I recommend not using singletons.
Thanks for your work. I have a question. What if I need to pass the object from AppDelegate to TableViewController, and TableViewController is embedded in NavigationController which is embedded in SplitViewController which is embedded in TabBarController? Do I need to subclass every container viewcontroller and pass the object trough this hierarchy?
That is one option.
Another one is to do all this in the AppDelegate. You would end with a bunch of if statements though, and that code would be very brittle and break at any change in the navigation of the app.
The best solution, albeit more complex, is to use VIPER / coordinator objects. I put links to those in the article.
Link missing:
“You can see how that works here (link) “
Fixed. Thanks!
Hi Matteo , great article! I have a question : I’m working on a App where in the main view an object collects different data from the network. I want update a second view (a TableViewController) with the data received. Do you think I can use the delegate to send the new data to the dataTable? Can you explain how I can do? Thanks
This depends more on the structure of your app than on the task. Things that affect the decision are, which view controller comes first, where you keep the state, etc.
Have a look here for networking: http://matteomanferdini.com/network-requests-rest-apis-ios-swift/
And here for an architecture example: http://matteomanferdini.com/understanding-the-core-architectural-principles-of-ios-development-with-a-practical-example/
Hi thanks for you reply… In my case the network interface is already implemented… what I need is to understand the best way to send an update continuosly data (for example an array) from the first view controller (where is running the network interface that collects the data) to the second view (where I need to show the updated data). Do you have any idea? I don’t like so much the use of Notification… is possible to use some sort of delegate?
Yes, notifications are not the right way. I assume from what you write that your view controllers are in a tab bar controller. Delegation is not correct either. There is a section for that in this article.
Ciao, no, non sto usando un tabBarController, su questa mia vecchia App ho un ViewController in cui istanzio l’oggetto che si occupa di leggere dati via rete e li memorizza su degli array aggiornati in tempo reale (sono array di interi). Da questo ViewController vorrei aprire altri ViewController per mostrare in tempo reale solo alcuni dei dati che continuo a leggere. Dovrei quindi inviare a questi ViewController degli eventi (in qualche modo) contenenti le liste dei nuovi dati. Tipo una pagine dei dettagli ma con aggiornamento in tempo reale. Mai fatto nulla di simile?
Allora il caso è più semplice, perché il passaggio avviene in avanti.
Dipende se usi uno storyboard o meno.
Nel primo caso, devi passare i dati quando avviene il segue. Vedi “Passing data between view controllers connected by a segue” nell’articolo.
Nel secondo caso, non ci sono segue, per cui il passaggio è diretto. Vedi “Passing data between view controllers without a segue” nell’articolo.
Hello , Matteo.
Thank you very much for the lesson. A lot of very useful information in your lessons to be an excellent professional in IOS.
Thank you a lot.
Best regards,
Valeriy
Hi Matteo! Very knowledgable article. Thank you for sharing.
I do in a slightly different way:
I use closures to perform back operations and use variables in the destination controller to pass data between views, like so:
class SourceViewController: UIViewController {
@IBAction func showDestinationView(_ sender: UIButton) {
performSegue(withIdentifier: “toDestinationViewSegue”, sender: sender)
}
override func prepare(for segue: UIStoryBoardSegue, sender: Any?) {
if segue.identifier == “toDestinationViewSegue” {
let destination = segue.destination as! DestinationViewController
destination.data = // Assign the data you want here…
destination.onReturn = { result in
// Process the returned data in this closure…
}
}
}
}
class DestinationViewController: UIViewController {
var data: Any?
var onReturn: ((_ result: Any?) -> Void)?
@IBAction func doSomething(_ sender: UIButton) {
// Do something you would like to do…
onReturn?(result) // Dont forget to call the onReturn closure…
}
}
Closures work too, but I don’t like them for every task.
When you have a delegate protocol, you know that all the calls go to the same delegate object.
Each separate closure instead could be provided by any object, so you never know for sure where your call goes.
It’s a matter of style more than right or wrong approach. I like to keep my code as unambiguous as possible.
This is a great tutorial. I love the part where you talk about your progress as an iOS Developer, can totally relate to that part.
Interms of using embedded VC inside a container. The cleanest solution of passing data back to Parent VC is to use a Delegate method?
Yes. Otherwise you are left with referencing the parent directly, which has the same problems as referencing a previous view controller directly in a navigation controller, for example.
What is the best way to pass the api data from one view controller to another?
Great! So how to pass data from detail view controller (navigation controller’s child view) to another view controller with button?
This needs to be updated for XCode 11 and Swift 5, window variable no longer exist in app delegate, got moved to scene delegate
This is hands down one of the best tutorials I have ever seen, thank you very much as this helped me finally understand segues properly.