Asynchronous sequences are a core feature of Swift concurrency. They allow you to process asynchronous events easily using simple for loops.
However, conforming to the AsyncSequence protocol to create an asynchronous sequence is not straightforward.
That’s where AsyncStream comes to the rescue, allowing you to easily create asynchronous sequences and quickly adapt old APIs to Swift concurrency.
FREE GUIDE - SwiftUI App Architecture: Design Patterns and Best Practices
MVC, MVVM, and MV in SwiftUI, plus practical lessons on code encapsulation and data flow.
DOWNLOAD THE FREE GUIDETable of contents
- What is AsyncStream, and how it simplifies creating asynchronous sequences
- Creating an asynchronous stream and consuming its values in a for-await-in loop
- Producing the values of an asynchronous stream using a continuation
- Using the WebSocket protocol and an asynchronous stream to implement chat functionality
- Yielding asynchronous values for a stream through its continuation
- Consuming an AsyncStream in SwiftUI views
What is AsyncStream, and how it simplifies creating asynchronous sequences
AsyncStream is a Foundation type that allows you to easily create asynchronous sequences that can be used with Swift Concurrency.
Moreover, according to Apple documentation:
In particular, an asynchronous stream is well-suited to adapt callback- or delegation-based APIs to participate with async-await.
We first need to examine asynchronous sequences to understand how to use AsyncStream and why it is convenient.
One of the first things you learn about Swift programming is how to iterate through sequences of elements using a for in loop.
for value in sequence {
	print(value)
}
The for in loop works with any type conforming to the Sequence protocol. The Array type is the most common sequence you use in everyday Swift, but there are many others, e.g., String, Dictionary, and ClosedRange.
Similarly, an asynchronous sequence conforms to the AsyncSequence protocol to deliver its values asynchronously over a potentially long period. You can loop over its values using a for await in loop.
for await value in asyncSequence {
	print(value)
}
However, the AsyncSequence protocol requires conforming types to provide an asynchronous iterator that conforms to AsyncIteratorProtocol, which might not be easy to implement.
AsyncStream lets you easily create sequences without worrying about asynchronous iterators.
Creating an asynchronous stream and consuming its values in a for-await-in loop
The easiest way to create an AsyncStream is to use its init(unfolding:onCancel:) initializer, which takes an asynchronous function.
The stream calls the passed function sequentially, delivering its results as an asynchronous sequence that can be consumed in a for await in loop.
let stream = AsyncStream {
	try? await Task.sleep(nanoseconds: 1_000_000_000)
	return Int.random(in: 1...10)
}

for await random in stream {
	print(random)
}
The above example takes an asynchronous closure that waits for one second and produces a random number. Running it in a Swift playground shows that it produces a random number every second until you stop it.
AsyncStream returns values indefinitely until the task that runs it is canceled or the passed closure returns a nil value.
If your closure throws errors, you must use the corresponding AsyncThrowingStream type instead and consume its values using a for try await in loop. Thrown errors will also stop the stream.
let stream = AsyncThrowingStream<Int, Error> {
	try await Task.sleep(nanoseconds: 1_000_000_000)
	return Int.random(in: 1...10)
}

for try await random in stream {
	print(random)
}
Producing the values of an asynchronous stream using a continuation
Before the introduction of Swift concurrency, asynchronous events were handled using callback closures or delegation.
Several APIs in the iOS SDK deliver asynchronous events using closures and delegation. You can adapt these APIs to modern Swift concurrency using a continuation-based stream.
The AsyncStream.Continuation type provides a mechanism to interface synchronous code to an asynchronous stream. You obtain a continuation when creating a stream and call one of its yield methods to deliver values through the connected stream.
My URLSession article provides an example of adapting delegation to Swift concurrency using AsyncStream to track a file’s download progress. Another typical example is the CLLocationManager class, which also delivers location updates asynchronously using a delegate.
AsyncStream can also be used to report the download progress of a file, as you can read in my article on Downloading files from URLs in Swift.
Chat apps must also continuously listen for updates delivered by a server to provide real-time communication. We will implement a simple chat app that delivers messages as an asynchronous stream as an example. You can download the Xcode project on GitHub.
The AsyncStream structure is a generic type with an Element generic, so the first step to creating an AsyncStream is implementing a type for the values it will deliver.
struct Message: Identifiable, Hashable {
	let type: MessageType
	let content: String
	let timestamp: Date = Date()

	var id: Int { hashValue }

	enum MessageType {
		case sent, received, status, error
	}
}
For simplicity, we will use the Message structure to deliver messages, status updates, and errors through a single stream of type AsyncStream.
If you want to create separate streams and combine them later, you can use the swift-async-algorithms package.
Using the WebSocket protocol and an asynchronous stream to implement chat functionality
Modern chat apps use the WebSocket protocol to keep an open TCP connection with a chat server and exchange messages in real time.
We will use Postman’s WebSocket Echo Service, a WebSocket server that returns any message sent to the wss://ws.postman-echo.com/raw URL.
The iOS URL loading system offers the URLSessionWebSocketTask class to interact with WebSocket servers.
Its send(_:completionHandler:) and receive(completionHandler:) methods use callback closures, while lifecycle events are delivered through the URLSessionWebSocketDelegate protocol, making it perfect for our example.
Because it uses such mixed mechanisms, we will encapsulate our networking code inside a dedicated class, isolating it from the rest of the app, which will only use Swift concurrency.
@Observable class Postman: NSObject {
	let messages: AsyncStream
	private(set) var isConnected = false

	private let continuation: AsyncStream.Continuation
	private let webSocketTask: URLSessionWebSocketTask = URLSession.shared.webSocketTask(
		with: URL(string: "wss://ws.postman-echo.com/raw")!
	)

	override init() {
		(self.messages, self.continuation) = AsyncStream.makeStream(of: Message.self)
	}

	func connect() {
		webSocketTask.resume()
		isConnected = true
	}

	func disconnect() {
		webSocketTask.cancel(with: .normalClosure, reason: nil)
		isConnected = false
	}
}
The Postman class exposes the messages asynchronous stream, which other code can access using a for await in loop.
Apple’s documentation shows how to initialize an AsyncStream with a closure that takes a continuation. However, that’s useful only when you can use the continuation immediately.
If, instead, you need to use the continuation somewhere else or in multiple places, e.g., in a callback closure or with delegation, you have to save it in a stored property.
In such cases, the makeStream(of:bufferingPolicy:) type method is convenient for simultaneously initializing the stream and its continuation.
And since URLSessionWebSocketTask is a subclass of URLSessionTask, we need to call its resume() method to establish the TCP connection with the server.
Yielding asynchronous values for a stream through its continuation
To produce values through an AsyncStream you call the yield(_:) method on its continuation.
We can start by producing status messages when opening and closing the connection. These events are delivered through the URLSessionWebSocketDelegate protocol, so we yield the messages there.
@Observable class Postman: NSObject {
	let messages: AsyncStream
	private(set) var isConnected = false

	private let continuation: AsyncStream.Continuation
	private let webSocketTask: URLSessionWebSocketTask = URLSession.shared.webSocketTask(
		with: URL(string: "wss://ws.postman-echo.com/raw")!
	)

	// ...

	func connect() {
		webSocketTask.delegate = self
		webSocketTask.resume()
		isConnected = true
	}

	// ...
}

extension Postman: URLSessionWebSocketDelegate {
	func urlSession(
		_ session: URLSession,
		webSocketTask: URLSessionWebSocketTask,
		didOpenWithProtocol protocol: String?
	) {
		continuation.yield(Message(type: .status, content: "Connection open"))
	}

	func urlSession(
		_ session: URLSession,
		webSocketTask: URLSessionWebSocketTask,
		didCloseWith closeCode: URLSessionWebSocketTask.CloseCode,
		reason: Data?
	) {
		isConnected = false
		continuation.yield(Message(type: .status, content: "Connection closed"))
	}
}
Sending a WebSocket message to the server is also straightforward using the send(_:completionHandler:) method of URLSessionWebSocketTask.
@Observable class Postman: NSObject {
	let messages: AsyncStream
	private(set) var isConnected = false

	private let continuation: AsyncStream.Continuation
	private let webSocketTask: URLSessionWebSocketTask = URLSession.shared.webSocketTask(
		with: URL(string: "wss://ws.postman-echo.com/raw")!
	)

	override init() {
		// ...
	}

	func connect() {
		// ...
	}

	func disconnect() {
		// ...
	}

	func send(message: Message) {
		var message = message
		webSocketTask.send(.string(message.content)) { error in
			if let error {
				message = Message(type: .error, content: error.localizedDescription)
			}
			self.continuation.yield(message)
		}
	}
}
In the completionHandler closure, I called the yield(_:) method on the continuation to deliver sent messages and eventual errors through the stream. This will simplify the caller code, which will not have to mix messages from different sources.
Receiving WebSocket messages is trickier. The receive(completionHandler:) method uses a completion handler that takes a Result enumeration value containing a URLSessionWebSocketTask.Message enumeration value in case of success.
We need to use nested switch statements to handle all cases.
private extension Postman {
	func handle(_ result: Result<URLSessionWebSocketTask.Message, any Error>) {
		let message = switch result {
		case .success(let success):
			switch success {
				case .string(let string):
					Message(type: .received, content: string)
				case .data(let data):
					Message(type: .error, content: "Received binay data")
				@unknown default: fatalError()
			}
		case .failure(let failure):
			Message(type: .error, content: failure.localizedDescription)
		}
		continuation.yield(message)
	}
}
Regardless of the result, we always call the yield(_:) method on the continuation to produce a value through the asynchronous stream.
The URLSessionWebSocketTask class keeps an open connection to receive messages from the server but does not notify us when that happens.
So we need to pol it regularly to fetch any incoming message.
@Observable class Postman: NSObject {
	let messages: AsyncStream
	private(set) var isConnected = false

	private let continuation: AsyncStream.Continuation
	private var pollingTimer: Timer?
	private let webSocketTask: URLSessionWebSocketTask = URLSession.shared.webSocketTask(
		with: URL(string: "wss://ws.postman-echo.com/raw")!
	)

	override init() {
		// ...
	}

	func connect() {
		// ...
	}

	func disconnect() {
		// ...
	}

	func send(message: Message) {
		// ...
	}

	func startPolling() {
		pollingTimer = Timer(timeInterval: 0.5, repeats: true) { [weak self] _ in
			self?.webSocketTask.receive { [weak self] result in
				guard let self else { return }
				guard isConnected else { return }
				handle(result)
			}
		}
		RunLoop.main.add(pollingTimer!, forMode: .common)
	}
}
Consuming an AsyncStream in SwiftUI views
Now that all the networking code is hidden behind an asynchronous sequence, we can use it directly in SwiftUI thanks to Swift concurrency.
We start by creating a few modular views to compose our user interface. First, we need to allow the user to type and send messages.
struct MessageComposer: View {
	var sendAction: (String) -> Void
	@State private var message: String = ""

	var body: some View {
		HStack {
			TextField("", text: $message)
				.padding(.horizontal)
				.padding(.vertical, 6)
				.overlay {
					Capsule()
						.stroke(Color.secondary)
				}
			Button(action: {
				sendAction(message)
				message = ""
			}, label: {
				Image(systemName: "arrow.up")
			})
			.buttonStyle(.borderedProminent)
			.buttonBorderShape(.circle)
			.disabled(message.isEmpty)
		}
		.padding()
		.padding(.trailing, -8)
		.background(Color.white)
	}
}

#Preview {
	Color.clear
		.safeAreaInset(edge: .bottom) {
			MessageComposer { _ in }
		}
}
We also need to display the messages in the chat.
struct MessageRow: View {
	let message: Message

	var body: some View {
		Text(message.content)
			.foregroundStyle(textColor)
			.padding()
			.background {
				backgroundColor
					.clipShape(RoundedRectangle(cornerRadius: 20))
			}
			.frame(maxWidth: .infinity, alignment: alignment)
			.listRowSeparator(.hidden)
	}

	var backgroundColor: Color {
		switch message.type {
			case .sent: .blue
			case .received: .gray.opacity(0.2)
			case .status: .cyan.opacity(0.2)
			case .error: .red
		}
	}

	var textColor: Color {
		switch message.type {
			case .sent, .error: .white
			case .status, .received: .black
		}
	}

	var alignment: Alignment {
		switch message.type {
			case .sent: .trailing
			case .received: .leading
			case .status, .error: .center
		}
	}
}

#Preview {
	List {
		MessageRow(
			message: Message(type: .status, content: "Lorem ipsum dolor sit amet")
		)
		MessageRow(
			message: Message(type: .sent, content: "Consectetur adipiscing elit.")
		)
		MessageRow(
			message: Message(type: .received,content: "Ut enim ad minim veniam.")
		)
		MessageRow(
			message: Message(type: .error,content: "Nisi ut aliquip ex ea commodo")
		)
	}
	.listStyle(.plain)
}
Then, we integrate these views using a List to display all the messages received through the Postman class.
struct ContentView: View {
	@State private var postman = Postman()
	@State var messages: [Message] = []

    var body: some View {
		ScrollViewReader { proxy in
			List(messages) { message in
				MessageRow(message: message)
					.id(message.id)
			}
			.onChange(of: messages) {
				withAnimation { proxy.scrollTo(messages.last?.id) }
			}
			.listStyle(.plain)
		}
		.task { await connect() }
		.animation(.easeIn, value: messages)
		.navigationTitle("Echo Chat")
		.safeAreaInset(edge: .bottom) {
			MessageComposer(sendAction: send(_:))
		}
		.toolbar {
			Button("Disconnect", action: postman.disconnect)
				.disabled(!postman.isConnected)
		}
    }
}

private extension ContentView {
	func connect() async {
		guard !postman.isConnected else { return }
		postman.connect()
		postman.startPolling()
		for await message in postman.messages {
			messages.append(message)
		}
	}

	func send(_ message: String) {
		postman.send(message: Message(type: .sent, content: message))
	}
}

#Preview {
	NavigationStack {
		ContentView()
	}
}
The crucial piece of code is in the connect() async method, which:
- Connects the
Postmanobject to the server and starts its message polling. - Monitors its
messagesasynchronous stream using afor await inloop and updates themessagesstate property every time a new message comes.
The connect() method is called by the task(priority:_:) view modifier when the view appears. The rest of the code is mainly structural, with a couple of animations to make the chat smoother.
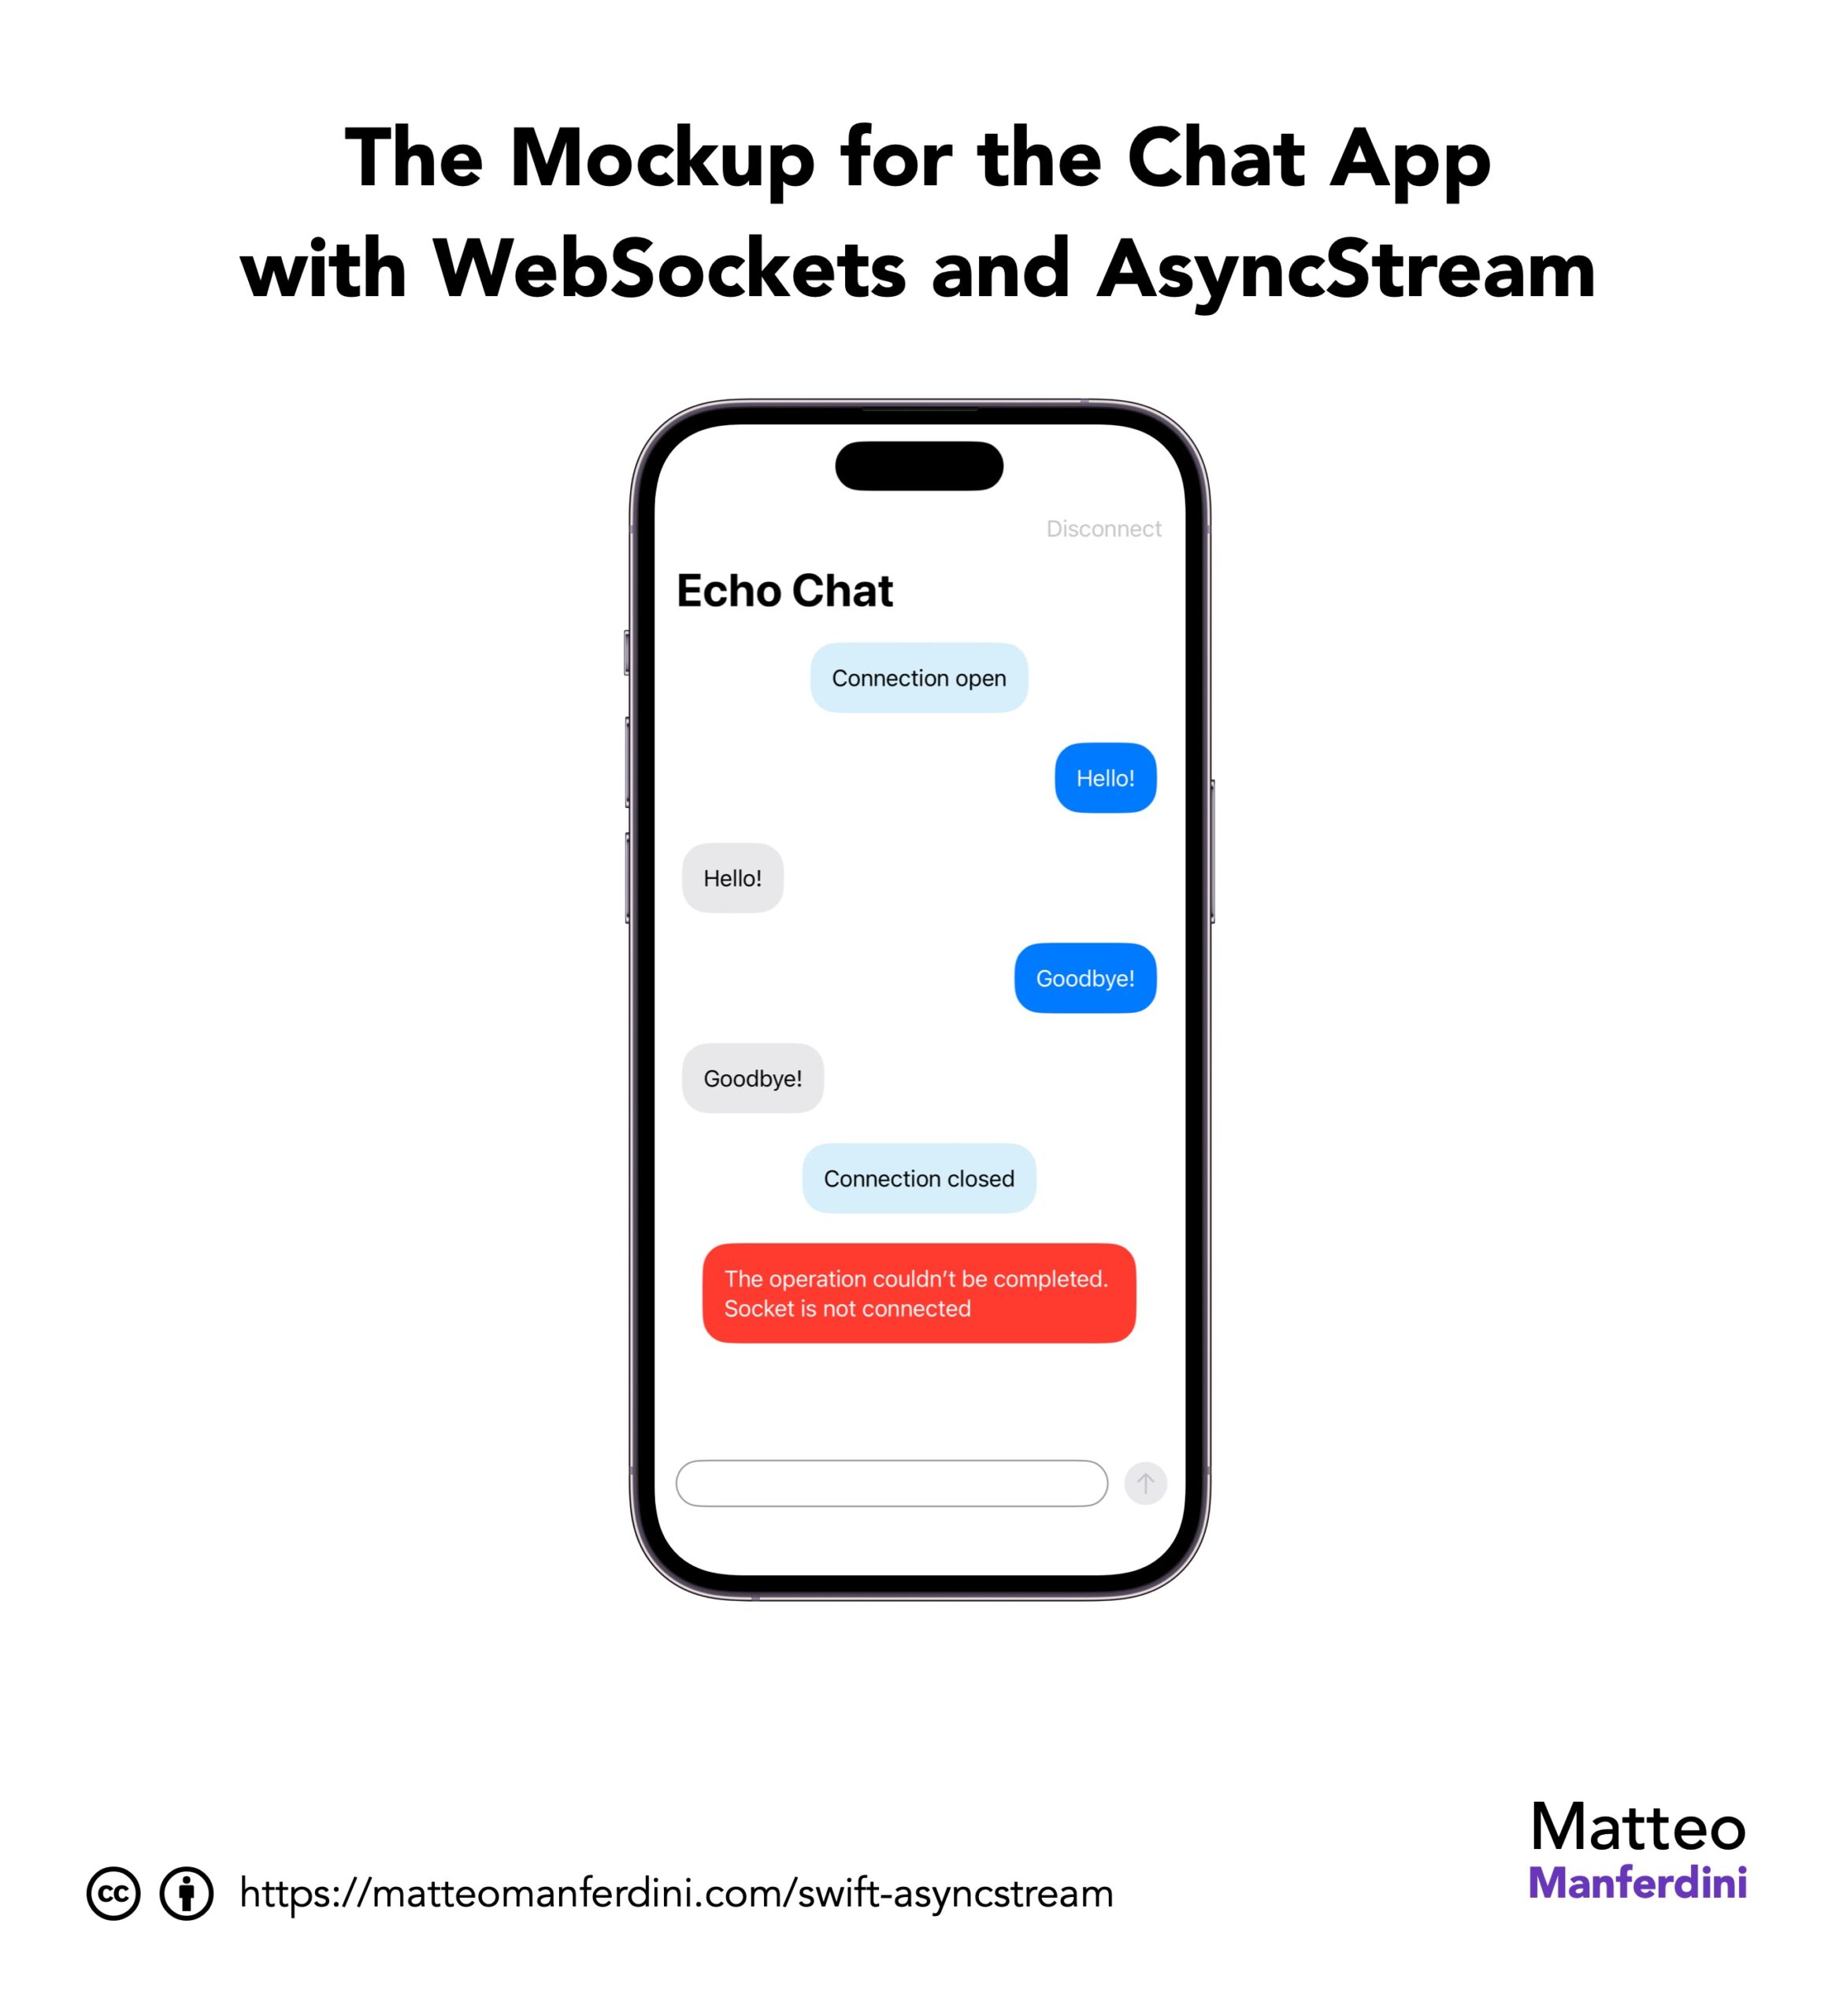
You can try the chat directly inside Xcode previews.
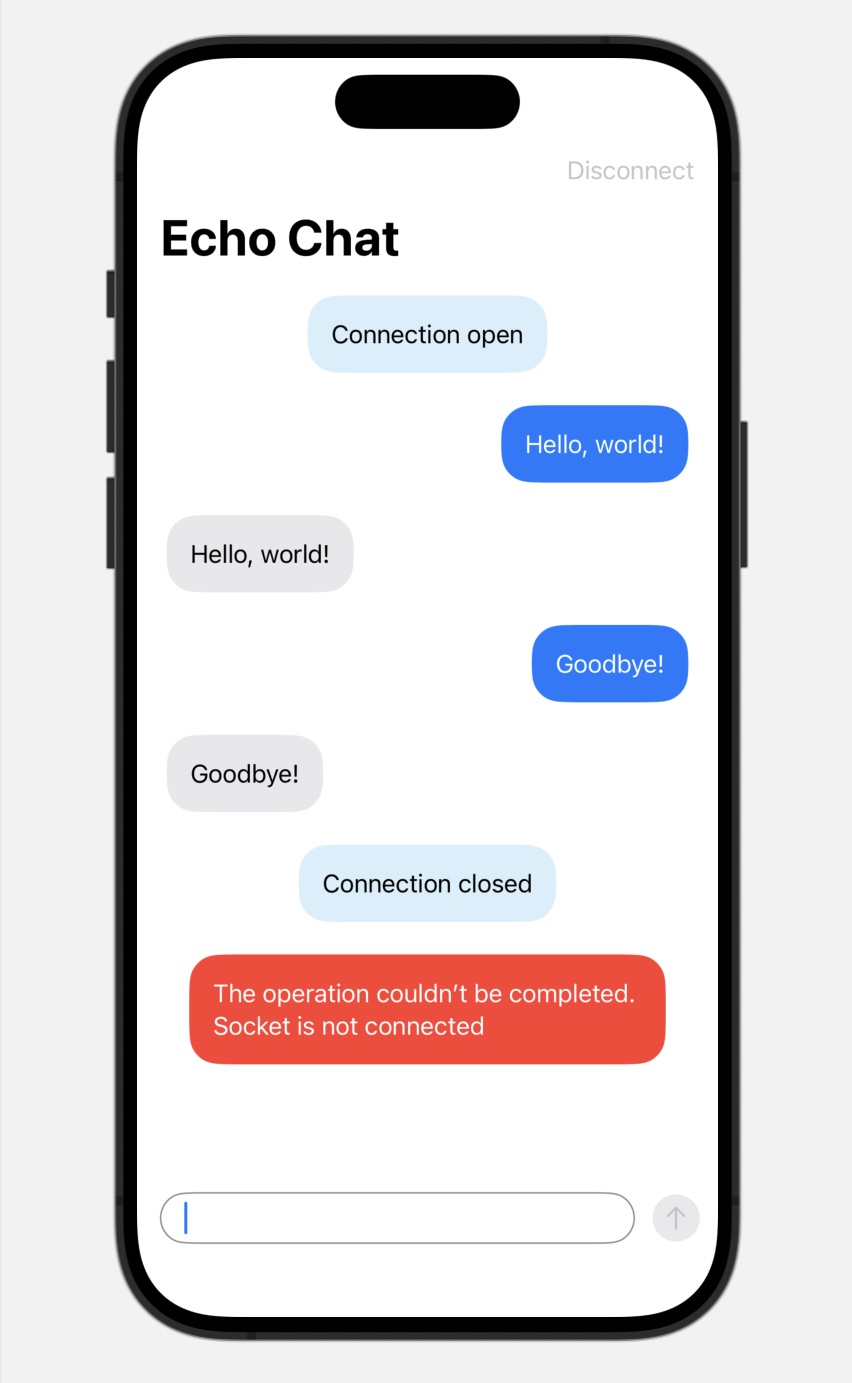
The Connection open message at the top is received through the asynchronous stream immediately after establishing the connection.
When you send messages through the chat, the server will echo them.
Finally, an error will be displayed if you try sending a message after tapping the disconnect.
SwiftUI App Architecture: Design Patterns and Best Practices
It's easy to make an app by throwing some code together. But without best practices and robust architecture, you soon end up with unmanageable spaghetti code. In this guide I'll show you how to properly structure SwiftUI apps.
Matteo has been developing apps for iOS since 2008. He has been teaching iOS development best practices to hundreds of students since 2015 and he is the developer of Vulcan, a macOS app to generate SwiftUI code. Before that he was a freelance iOS developer for small and big clients, including TomTom, Squla, Siilo, and Layar. Matteo got a master’s degree in computer science and computational logic at the University of Turin. In his spare time he dances and teaches tango.