Unwind segues in iOS can be quite confusing.
Unlike their forward counterpart, they are based on a more complicated mechanism and different rules. That usually complicates their setup.
Moreover, many wonder why you should use an unwind segue when you can dismiss a view controller with a single line of code.
I will answer all these questions in this article.
Architecting SwiftUI apps with MVC and MVVM
GET THE FREE BOOK NOWContents
- The difference between unwind segues and other segues in an Xcode storyboard
- Why should you use unwind segues instead of dismissing or popping view controllers?
- The typical scenario for unwind segues: modal presentation
- Dismissing a modal view controller with an unwind segue
- Jumping back more than one view controller in a navigation stack
- Passing data to a previous view controller in an unwind segue
- Performing an unwind segue programmatically
- The flexibility of unwind segues
The difference between unwind segues and other segues in an Xcode storyboard
First of all, what is an unwind segue?
In an iOS storyboard, you can have four types of segues:
- Relationship segues add view controllers to containers, e.g., navigation or tab bar controllers.
- Embed segues embed a view controller inside a custom view controller, making the latter a custom container with no need of code extra code.
- Action segues trigger a forward transition to navigate from one view controller to the next.
- Unwind segues roll back action segues, going back to a view controller that was previously on the screen.
While the definition for unwind segues is simple, they are more complicated than they appear.
- Unwind segues are not limited to the last transition. They can be used to jump back any number of view controllers.
- While an action segue is directly connected to the destination view controller, selecting the destination of an unwind segue is a more complicated process.
- Connecting an unwind segue in a storyboard is not as straightforward as connecting other segues. While connecting any other type of segue is as simple as control-dragging from the source to the destination, connecting unwind segues is more complicated (more details below).
Why should you use unwind segues instead of dismissing or popping view controllers?
Since unwind segues can be a bit complicated, why should you bother?
(If you don’t care and you want to know how to set up an unwind segue, jump directly to the next section).
After all:
- To dismiss a view controller presented modally, you can call
dismiss(animated:completion:). - To go back in a navigation controller, you can call
popViewController(animated:)
Both are one-liners. Why should you spend time setting up an unwind segue?
The short answer is: because there is more to an unwind segue than just going back.
There are many valid reasons to use unwind segues:
- When you use storyboards, it’s good to be consistent and use the same mechanism to go forward and backward. Unwind segues are the counterpart of action segues.
The point of storyboards and segues in iOS apps is to remove navigation code from view controllers. So, if you use segues to go forward, you should also use segues to move backward.
- Unwind segues are more generic than code. There is more than meets the eye in the two one-line methods I listed above.
For example, when you have several modal view controllers on screen at a specific time, you have to call the dismiss(animated:completion:) on the correct view controller to go back where you want.
That’s more than one line of code, and not as easy.
Another problem is that to use popViewController(animated:) you have to climb the view controller hierarchy, which is not a good practice, to call the method on the navigation controller.
- When a view controller is reachable in more than one way, you need to decide which method to use to go back. Unwind segues remove navigation code from view controllers.
Often, you can reach a view controller in your storyboard through different navigation paths. Some might use modal presentation, while others might use navigation controllers.
In those cases, to go back, you need to call the correct method. That implies writing more code in the current view controller to make the decision.
Moreover, this gives a view controller the responsibility of knowing all the possible paths that reach it. This is not a responsibility view controllers should have.
- Sometimes, you need to jump back more than one view controller. In apps with more complex navigation structures, you might want to jump back a few screens after a user action. Unwind segues remove boilerplate code.
While that is also possible in code, it adds again more responsibilities to a view controller.
Moreover, sometimes you want different view controllers to take part in the process. Since view controllers are not connected, you need more bpilerplate code.
Unwind segues offer a sophisticated infrastructure that allows other view controllers and containers to take part in the decision. Most of the process is automatic, and you often don’t need to write any extra code.
But when you need more flexibility, you already have all the plumbing in place.
The typical scenario for unwind segues: modal presentation
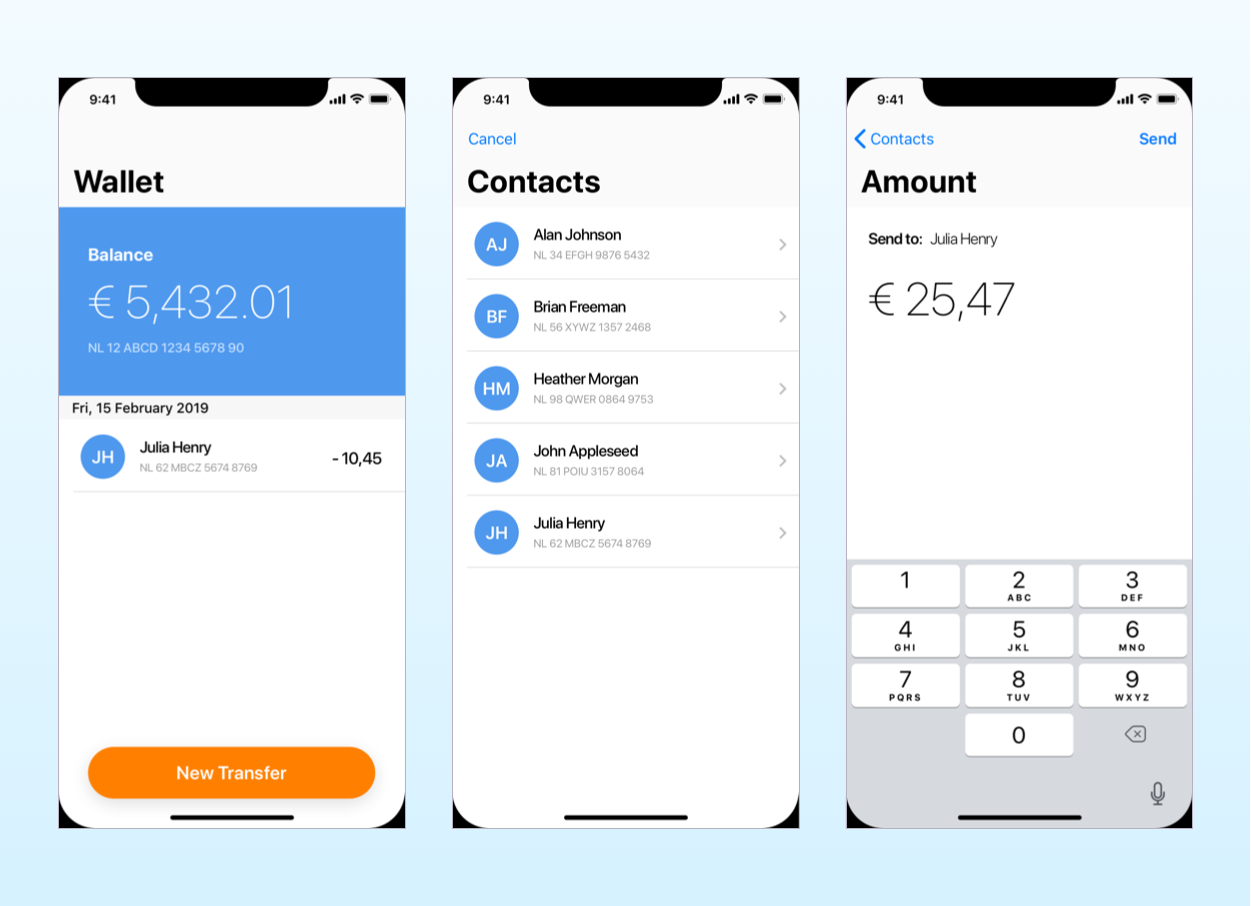
As an example, we will create a small wallet app that allows you to send money to friends. The app has
- a screen with balance and transactions,
- a screen with contacts, and
- a screen to send money.
You can get the full Xcode project on GitHub.
As a start, let’s create a scene in the storyboard for the initial screen of the app.
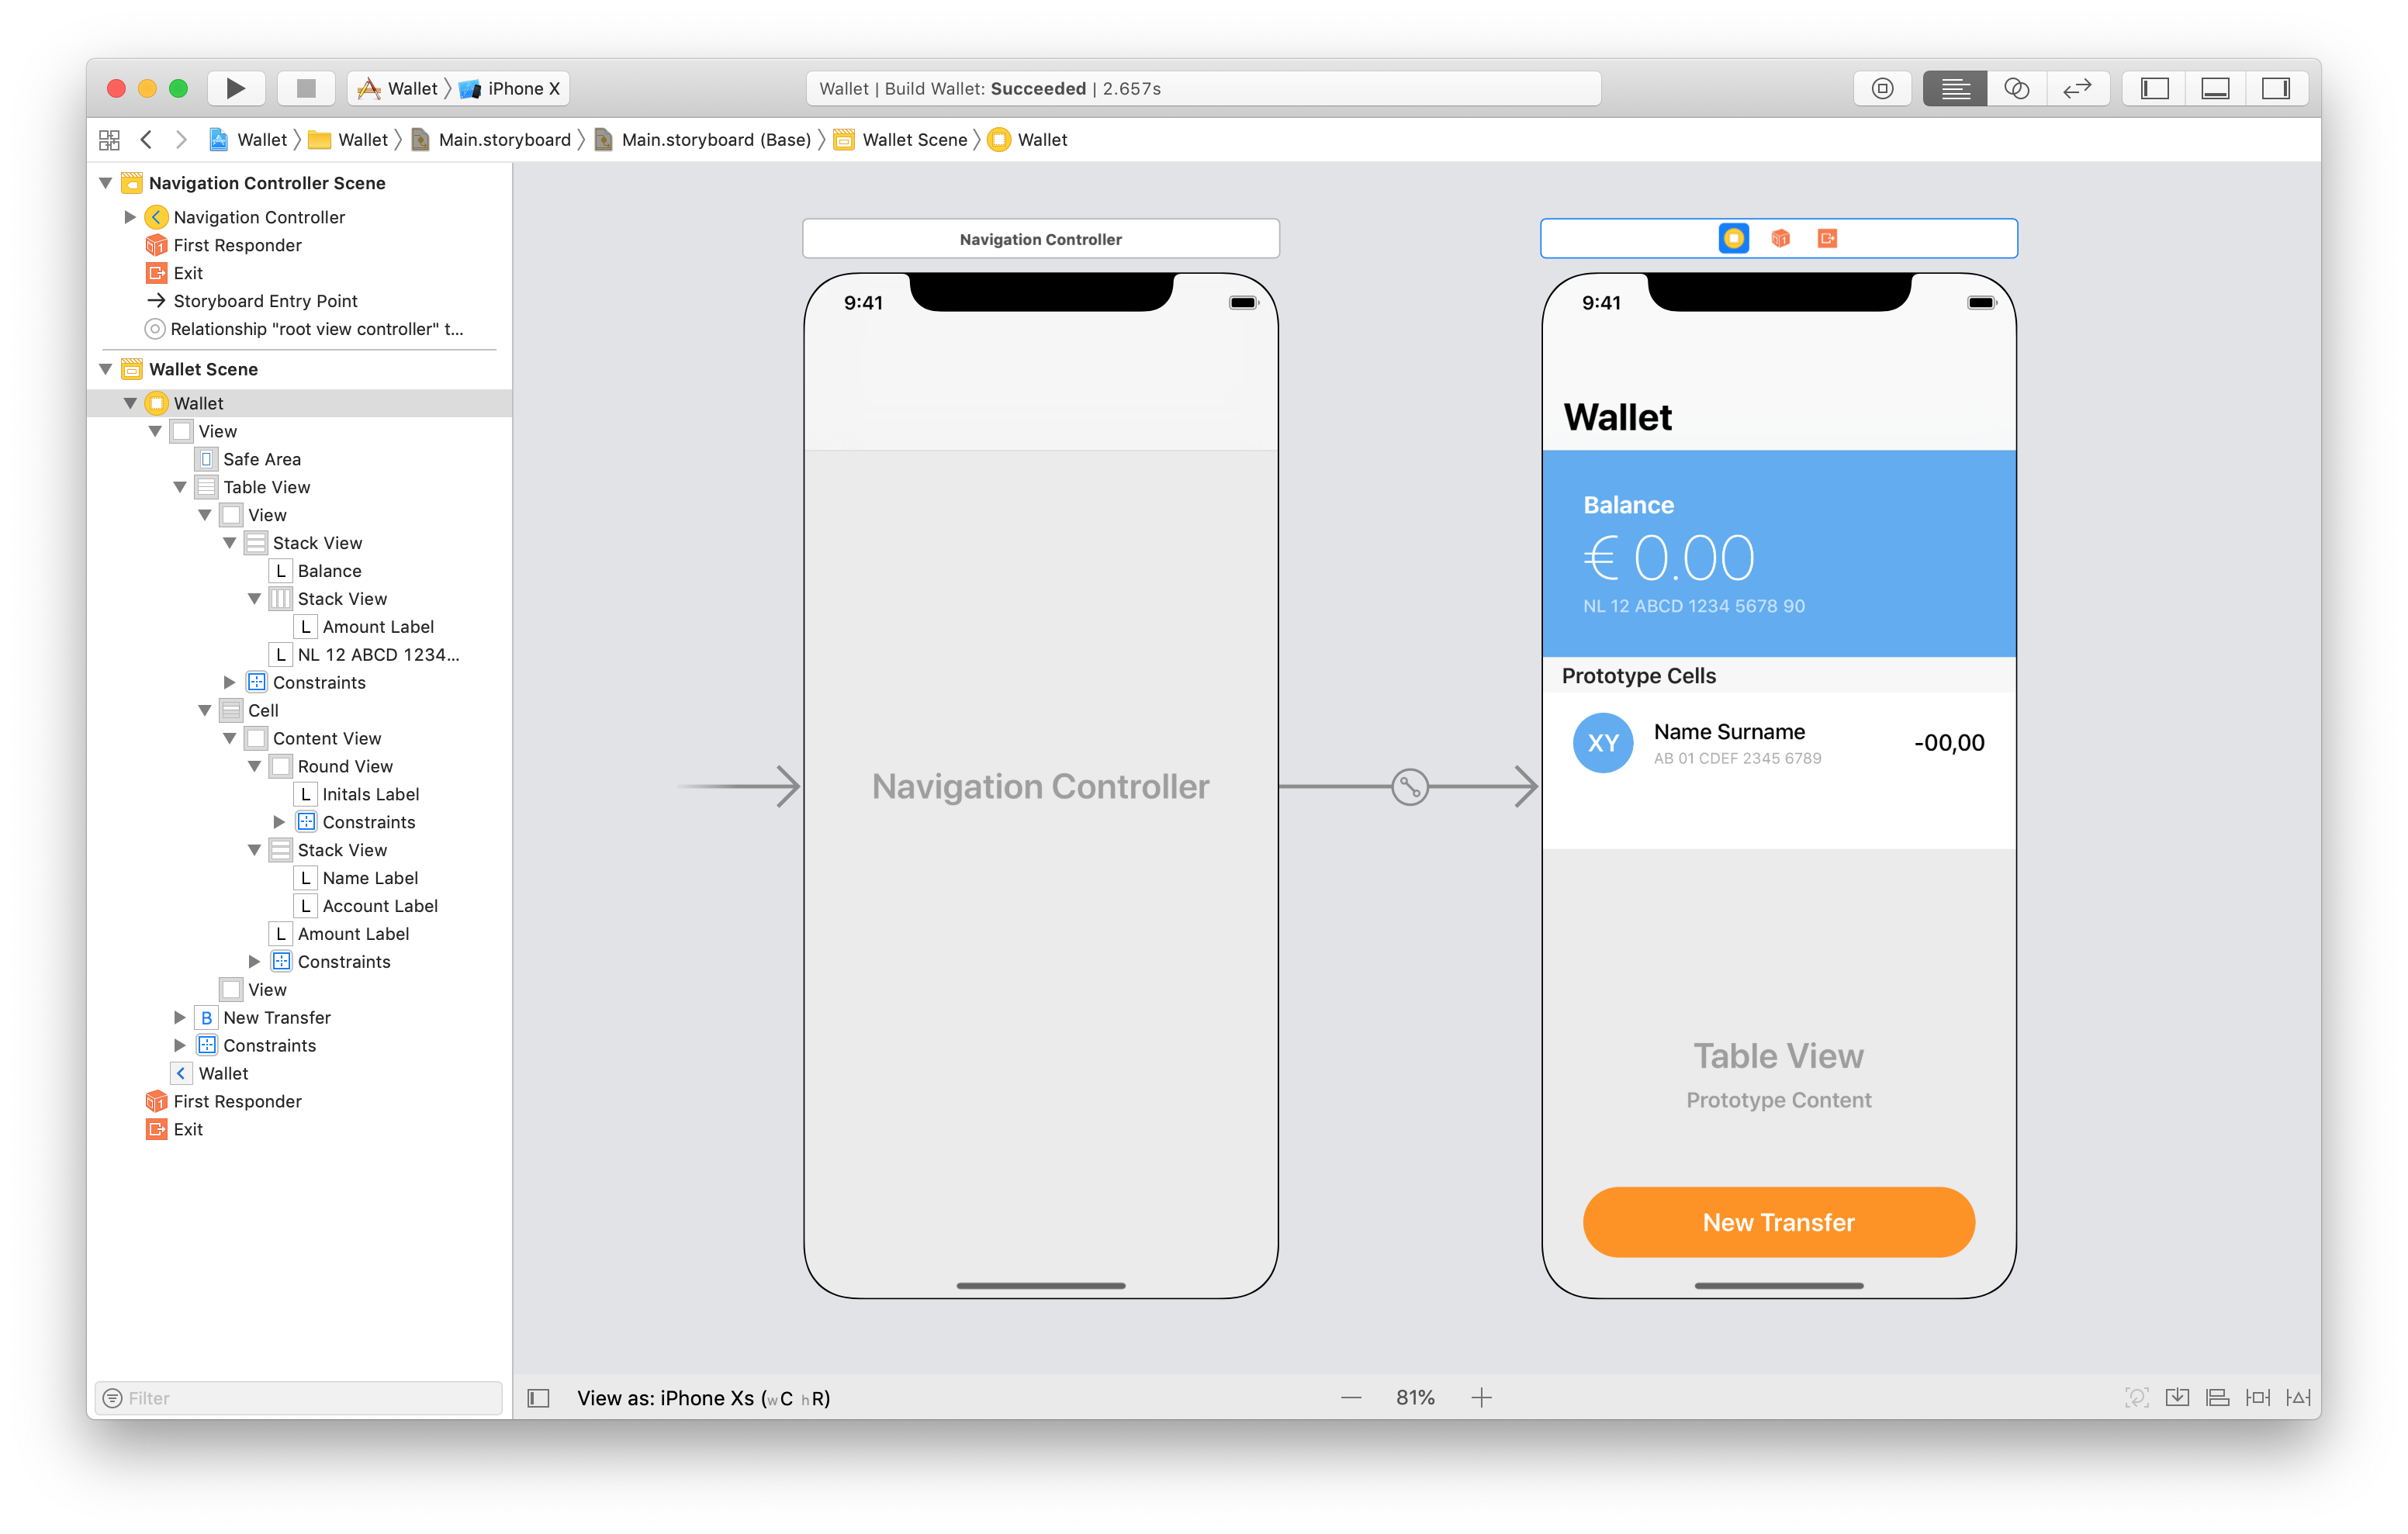
The interface of this view controller is made of a table view with a single cell prototype. I used simple Auto Layout constraints to position all views.
To keep the code for the table view simple, I put the balance in the table view header, so we don’t have to mess around with different cell prototypes. This also allows us to update the balance using an outlet.
class WalletViewController: UIViewController {
	@IBOutlet weak var amountLabel: UILabel!
	@IBOutlet weak var tableView: UITableView!

	var balance: Int = 543201

	override func viewWillAppear(_ animated: Bool) {
		super.viewWillAppear(animated)
		amountLabel.text = balance.moneyAmount
	}
}

extension Int {
	var moneyAmount: String {
		let formatter = NumberFormatter()
		formatter.numberStyle = .currency
		formatter.currencySymbol = "€ "
		return formatter.string(from: NSNumber(value: Float(self) / 100))!
	}
}
Why is the balance is an Int and not a Float?
It is common in apps that deal with money to represent amounts in cents. Floating point numbers like Float and Double have rounding errors that don’t work well with currencies and other precise values.
To format currency amounts, you should use a NumberFormatter. Since this is code we will reuse in other places, I put it into an extension for the Int type.
Notice also that I used a plain UIViewController and not a UITableViewController. Table view controllers use a table view as their main view, to which you can’t add other subviews. To have the New Transfer button hover over the table view, we need to use a standard view controller.
We can now add a storyboard scene for the view controller with the contacts. We present this view controller modally when the user taps on the New Transfer button.
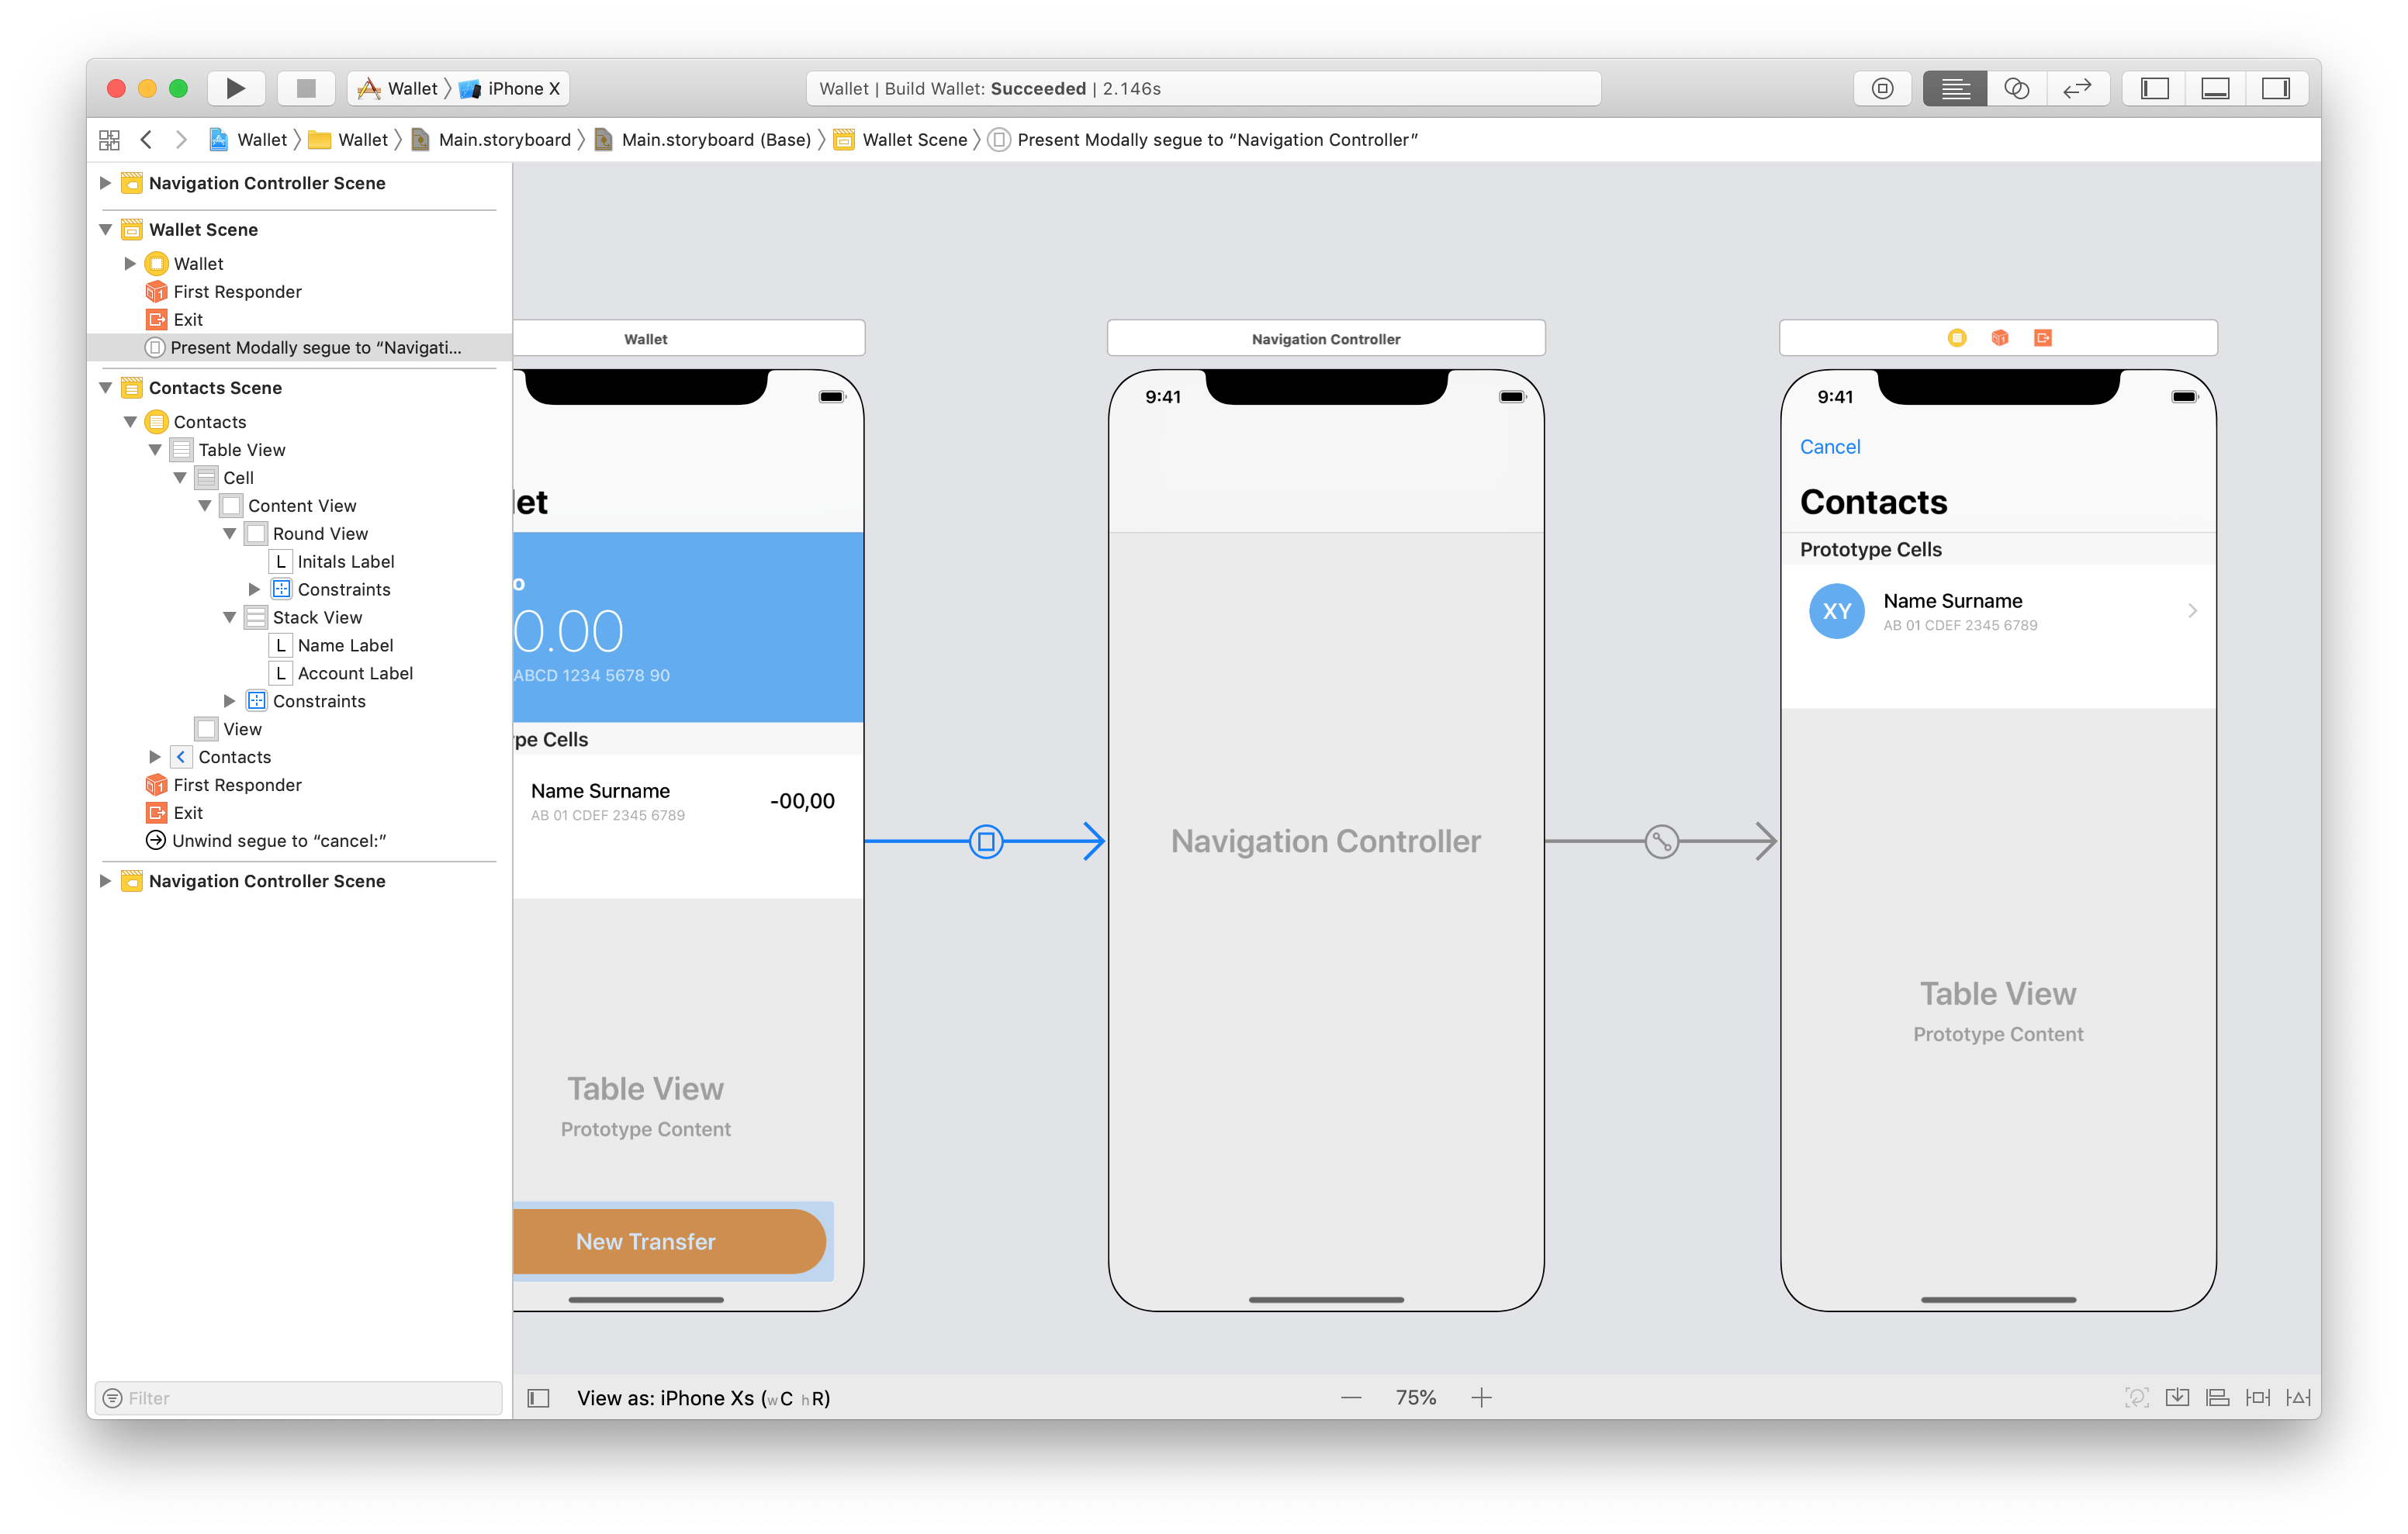
This time, I used a table view controller with a single cell prototype.
To populate the table view, we need some data. For that, we need a model type.
struct Contact {
	let name: String
	let surname: String
	let account: String

	var initials: String {
		return "\(name.first!)\(surname.first!)"
	}
}
Then, we need a class for our UITableView cell, to populate its interface.
class Cell: UITableViewCell {
	@IBOutlet weak var initalsLabel: UILabel!
	@IBOutlet weak var nameLabel: UILabel!
	@IBOutlet weak var accountLabel: UILabel!

	var contact: Contact? {
		didSet {
			if let contact = contact {
				initalsLabel.text = contact.initials
				nameLabel.text = contact.name + " " + contact.surname
				accountLabel.text = contact.account
			}
		}
	}
}
And finally, we create some data in the view controller and populate the table view.
class ContactsViewController: UITableViewController {
	let contacts = [
		Contact(name: "Alan", surname: "Johnson", account: "NL 34 EFGH 9876 5432"),
		Contact(name: "Brian", surname: "Freeman", account: "NL 56 XYWZ 1357 2468"),
		Contact(name: "Heather", surname: "Morgan", account: "NL 98 QWER 0864 9753"),
		Contact(name: "John", surname: "Appleseed", account: "NL 81 POIU 3157 8064"),
		Contact(name: "Julia", surname: "Henry", account: "NL 62 MBCZ 5674 8769")
	]

	override func tableView(_ tableView: UITableView, numberOfRowsInSection section: Int) -> Int {
		return contacts.count
	}

	override func tableView(_ tableView: UITableView, cellForRowAt indexPath: IndexPath) -> UITableViewCell {
		let cell = tableView.dequeueReusableCell(withIdentifier: "Cell", for: indexPath) as! Cell
		cell.contact = contacts[indexPath.row]
		return cell
	}
}
For simplicity, I used the view controller as the data source, but this is not a good practice. In a real app, it’s better to have a separate object act as the UITableView data source.
Tapping on the New Transfer button now presents the list of contacts modally.
Dismissing a modal view controller with an unwind segue
We now want to go back to the previous screen when the user taps on the Cancel button in the Contacts screen.
This is where we set our first unwind segues.
Unwind segues are not set like other segues. If you control-drag from the Cancel button to the previous view controller, you will create an action segue. Instead of going back, you will bring a new instance of WalletViewController on screen.
To connect an unwind segue, you first need to mark the destination view controller with an unwind action.
Like other action methods, unwind actions are marked with the @IBAction keyword, but they get a UIStoryboardSegue as a parameter and not a sender.
Unfortunately, you can’t create an unwind action directly in a storyboard, as you would do for outlets and standard actions. You need to create the unwind action in code first and then make the connection in the storyboard.
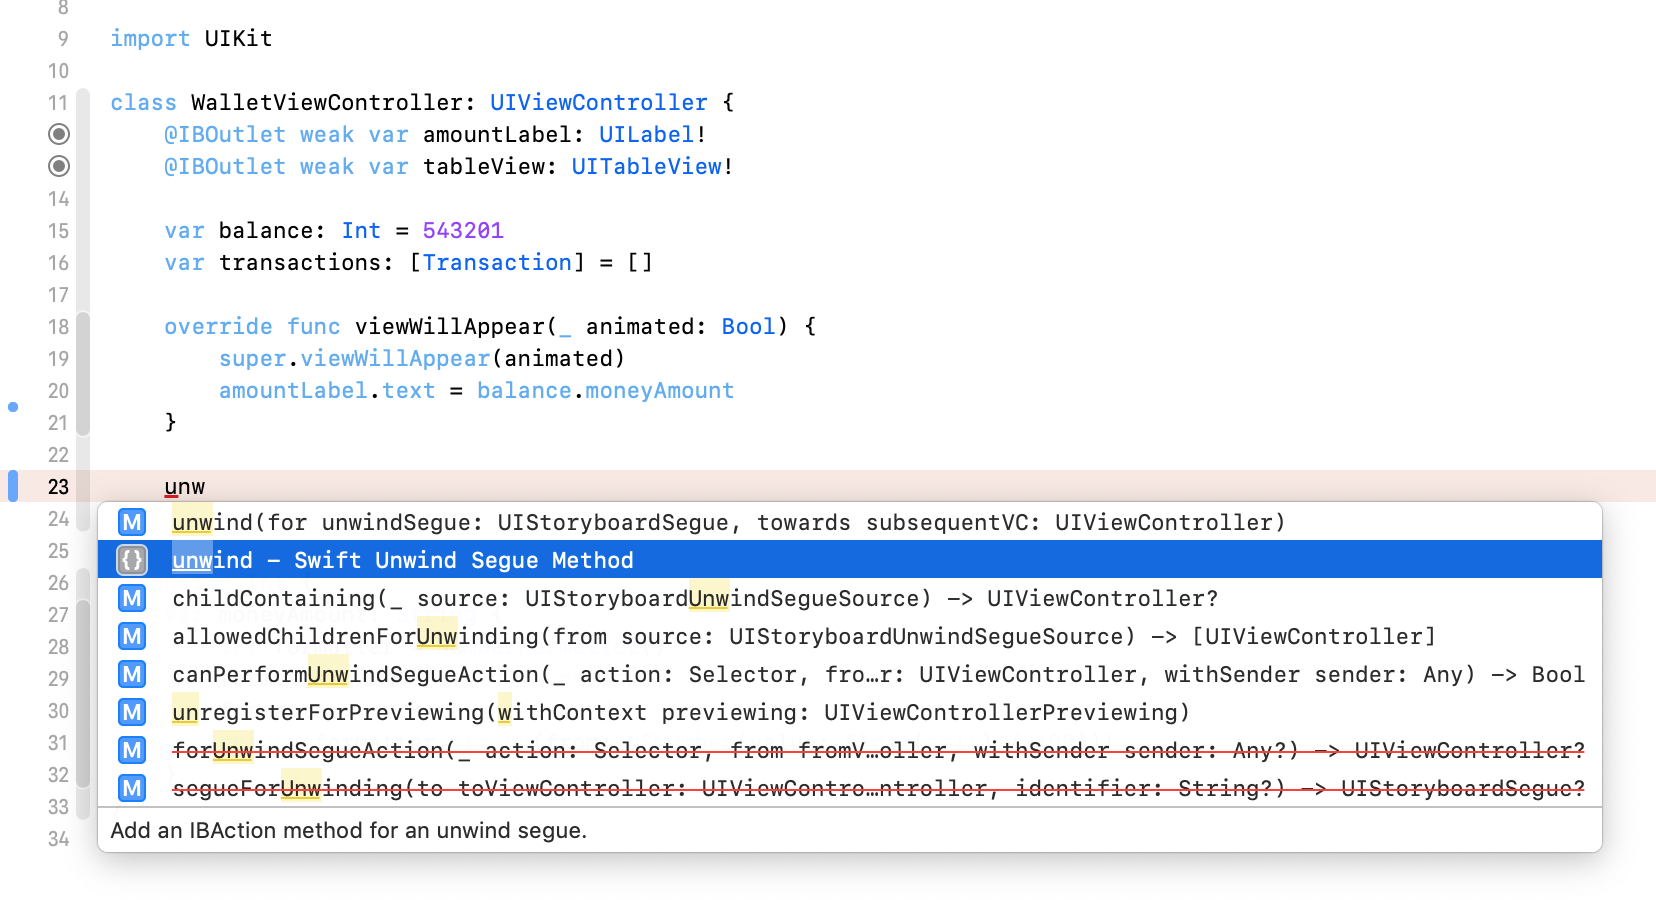
Luckily, Xcode comes with a code snippet for unwind actions for when, like me, you forget the correct method signature. Just start typing unwind in a view controller, and you will find it in the autocompletion menu.
Beware that, unlike all other actions, unwind action needs to go into the class for the destination view controller.
If you search on Google for “unwind segue not working” the most common mistake is putting the action in the view controller where the unwind segue originates.
The confusion stems from the fact that actions are usually in the same view controller as the control, e.g., a button, that triggers them. Unwind actions instead go into a different view controller.
In our app, the destination is the WalletViewController, so that’s where we put our unwind action.
class WalletViewController: UIViewController {
	@IBOutlet weak var amountLabel: UILabel!
	@IBOutlet weak var tableView: UITableView!

	var balance: Int = 543201
	var transactions: [Transaction] = []

	override func viewWillAppear(_ animated: Bool) {
		super.viewWillAppear(animated)
		amountLabel.text = balance.moneyAmount
	}

	@IBAction func cancel(_ unwindSegue: UIStoryboardSegue) {}
}
That’s it. As you can see, there is no need to put any code in the action method (although, later, we will). Its presence is enough to mark the view controller as a destination.
We can now connect the Cancel button to the unwind action. We do that by control-dragging from the button to the Exit placeholder at the top of the storyboard scene.
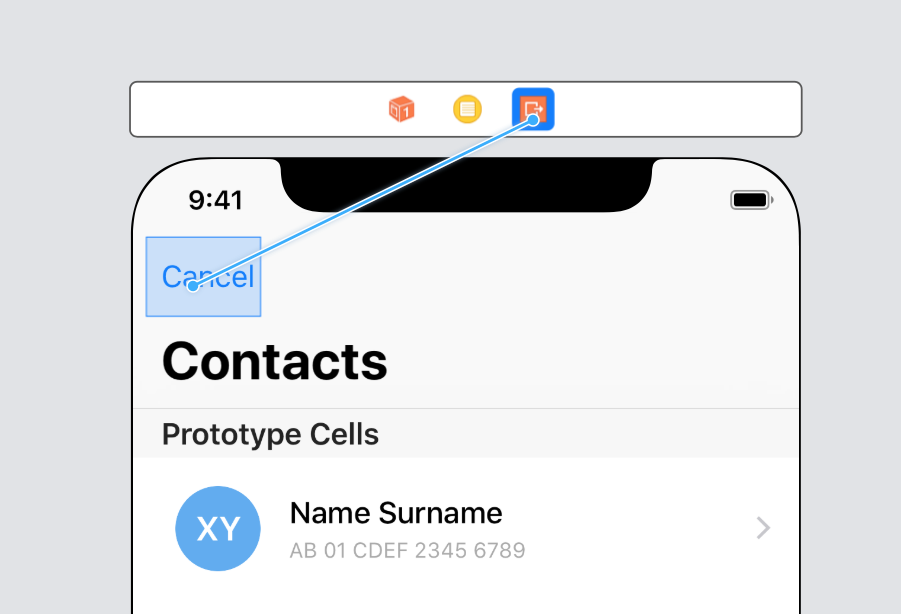
When you release the dragging, you will see the unwind action in the pop-up menu.
Notice how we are still not dragging to the destination view controller. That is because there might be more than one view controller with the same unwind action.
The destination is not predetermined, and that’s why we connect unwind segues to the generic Exit placeholder of a scene. The unwind process will then determine which view controller is the destination.
That said, most of the time you have one destination, like in this example. Marking it with an unwind action and connecting the unwind segue is enough.
Jumping back more than one view controller in a navigation stack
The next view controller is going to show better the advantages of using unwind segues.

This is again a simple view controller, with a text field where the user can type the amount of money he wants to send.
class TransactionViewController: UIViewController {
	@IBOutlet weak var amountTextField: UITextField!
	@IBOutlet weak var contactNameLabel: UILabel!

	var contact: Contact?

	override func viewWillAppear(_ animated: Bool) {
		super.viewWillAppear(animated)
		amountTextField.becomeFirstResponder()
		if let contact = contact {
			contactNameLabel.text = "\(contact.name) \(contact.surname)"
		}
	}
}
This view controller gets the selected Contact from the previous view controller when the forward segue is triggered.
class ContactsViewController: UITableViewController {
	let contacts = [
		Contact(name: "Alan", surname: "Johnson", account: "NL 34 EFGH 9876 5432"),
		Contact(name: "Brian", surname: "Freeman", account: "NL 56 XYWZ 1357 2468"),
		Contact(name: "Heather", surname: "Morgan", account: "NL 98 QWER 0864 9753"),
		Contact(name: "John", surname: "Appleseed", account: "NL 81 POIU 3157 8064"),
		Contact(name: "Julia", surname: "Henry", account: "NL 62 MBCZ 5674 8769")
	]

	override func tableView(_ tableView: UITableView, numberOfRowsInSection section: Int) -> Int {
		return contacts.count
	}

	override func tableView(_ tableView: UITableView, cellForRowAt indexPath: IndexPath) -> UITableViewCell {
		let cell = tableView.dequeueReusableCell(withIdentifier: "Cell", for: indexPath) as! Cell
		cell.contact = contacts[indexPath.row]
		return cell
	}

	override func prepare(for segue: UIStoryboardSegue, sender: Any?) {
		guard let row = tableView.indexPathForSelectedRow?.row else {
			return
		}
		let selectedContact = contacts[row]
		if let transactionViewController = segue.destination as? TransactionViewController {
			transactionViewController.contact = selectedContact
		}
	}
}
When the user taps on the Send button, we need to jump back to the WalletViewController. But now there are two other view controllers on our way: the ContactsViewController and a navigation controller.
But that does not matter. Unwind segues still work the same.
First, we add a new unwind action to the WalletViewController:
class WalletViewController: UIViewController {
	@IBOutlet weak var amountLabel: UILabel!
	@IBOutlet weak var tableView: UITableView!

	var balance: Int = 543201
	var transactions: [Transaction] = []

	override func viewWillAppear(_ animated: Bool) {
		super.viewWillAppear(animated)
		amountLabel.text = balance.moneyAmount
	}

	@IBAction func cancel(_ unwindSegue: UIStoryboardSegue) {}

	@IBAction func sendTransaction(_ unwindSegue: UIStoryboardSegue) {}
}
And then we connect an unwind segue to the Send button, as we did for the Cancel button.
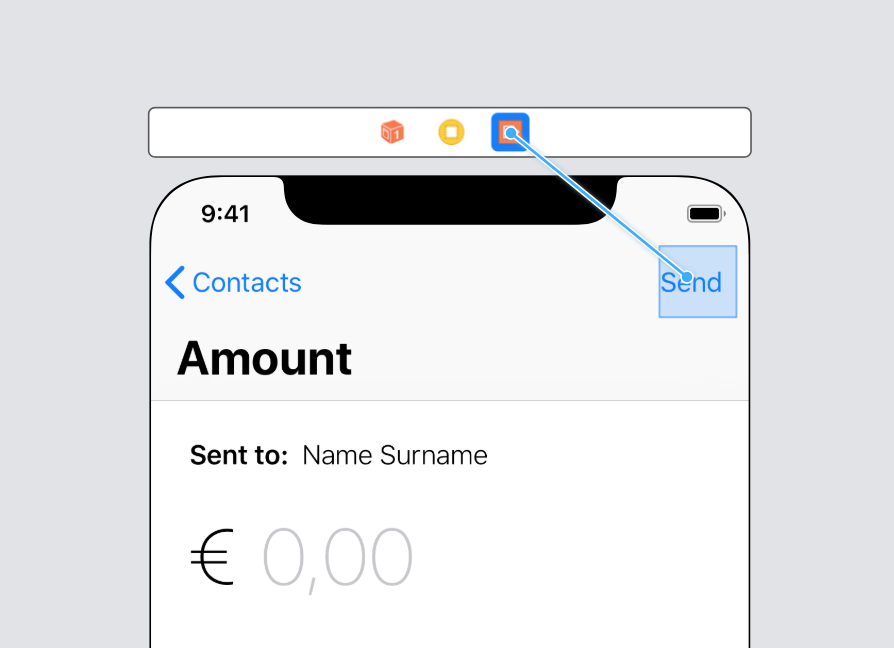
Even if the destination is now three view controllers away, the unwinding process will identify it correctly. No extra code or reasoning needed.
By the way, you can also unwind to another storyboard. It does not matter how you reach a view controllers, or from which storyboard it comes from. Unwinding still works the same even with multiple storyboards.
Passing data to a previous view controller in an unwind segue
Both our unwind segues go back to the same destination. We could have used the same unwind action for both, but I created a second one.
The reason is that in the second unwind segue we need to pass some data back to the WalletViewController, to update the balance and add the transaction to the table view.
For that, we will need to add some code to the unwind action. Using the same one for both segues requires some extra if statement to understand which unwind segue was triggered. Better to use two distinct actions instead.
First of all, we need a model type to contain the data of a transaction.
struct Transaction {
	let amount: Int
	let contact: Contact
}
Since the text field returns a String and not an Int, we also need some extra code to make the transformation.
We use a number formatter again:
extension String {
	var amount: Int? {
		let formatter = NumberFormatter()
		formatter.numberStyle = .decimal
		guard let number = formatter.number(from: self) else {
			return nil
		}
		return Int(number.doubleValue * 100)
	}
}
How do we pass a transaction from the TransactionViewController to the WalletViewController?
An unwind segue is still a segue. That means that the prepare(for:sender:) method still gets called in the TransactionViewController before the segue happens.
We could use dependency injection again, as we did for the forward segue.
But recall that in an unwind segue, the destination is uncertain. In this simple app we only have one, but in a more complex app more view controllers might implement the sendTransaction(_:) method.
It’s not the TransactionViewController that decides where to go, so we can’t write code in prepare(for:sender:) for every single possible case. That’s not practical and it introduces too much coupling between view controllers.
Instead, in the prepare(for:sender:) method we store the transaction in a stored property.
class TransactionViewController: UIViewController {
	@IBOutlet weak var amountTextField: UITextField!
	@IBOutlet weak var contactNameLabel: UILabel!

	var contact: Contact?
	var transaction: Transaction?

	override func viewWillAppear(_ animated: Bool) {
		super.viewWillAppear(animated)
		amountTextField.becomeFirstResponder()
		if let contact = contact {
			contactNameLabel.text = "\(contact.name) \(contact.surname)"
		}
	}

	override func prepare(for segue: UIStoryboardSegue, sender: Any?) {
		if let amount = amountTextField.text?.amount,
			let contact = contact {
			transaction = Transaction(amount: amount, contact: contact)
		}
	}
}
It is then the WalletViewController that reads the transaction property. It does so in the unwind action, which gets executed after the prepare(for:sender:) method of the TransactionViewController.
class WalletViewController: UIViewController {
	@IBOutlet weak var amountLabel: UILabel!
	@IBOutlet weak var tableView: UITableView!

	var balance: Int = 543201
	var transactions: [Transaction] = []

	override func viewWillAppear(_ animated: Bool) {
		super.viewWillAppear(animated)
		amountLabel.text = balance.moneyAmount
	}

	@IBAction func cancel(_ unwindSegue: UIStoryboardSegue) {}

	@IBAction func sendTransaction(_ unwindSegue: UIStoryboardSegue) {
		guard let transactionViewController = unwindSegue.source as? TransactionViewController,
			let transaction = transactionViewController.transaction else {
				return
		}
		transactions.append(transaction)
		balance -= transaction.amount
		tableView.reloadData()
	}
}
For simplicity, since the cells in both our table views look the same, we can reuse the Cell class in the WalletViewController. We need some code to configure it with a Transaction.
class Cell: UITableViewCell {
	@IBOutlet weak var initalsLabel: UILabel!
	@IBOutlet weak var nameLabel: UILabel!
	@IBOutlet weak var accountLabel: UILabel!
	@IBOutlet weak var amountLabel: UILabel!

	var transaction: Transaction? {
		didSet {
			guard let transaction = transaction else {
				return
			}
			amountLabel.text = "-\(transaction.amount.moneyAmount)"
			set(contact: transaction.contact)
		}
	}

	var contact: Contact? {
		didSet {
			if let contact = contact {
				set(contact: contact)
			}
		}
	}

	private func set(contact: Contact) {
		initalsLabel.text = contact.initials
		nameLabel.text = contact.name + " " + contact.surname
		accountLabel.text = contact.account
	}
}
A better way would be to create a view model for the cell.
Then, we populate the table view.
extension WalletViewController: UITableViewDataSource {
	func tableView(_ tableView: UITableView, numberOfRowsInSection section: Int) -> Int {
		return transactions.count
	}

	func tableView(_ tableView: UITableView, cellForRowAt indexPath: IndexPath) -> UITableViewCell {
		let cell = tableView.dequeueReusableCell(withIdentifier: "Cell", for: indexPath) as! Cell
		cell.transaction = transactions[indexPath.row]
		return cell
	}
}
This code is practically the same we wrote in the ContactsViewController. This shows that it would be better to create a separate data source class to reuse this code.
Performing an unwind segue programmatically
There are cases in which you might want to trigger an unwind segue programmatically. This is common, for example, after asynchronous tasks like network requests.
For example, if our app was connected to a remote API, a few seconds pass between the user tapping on the Send button and the response from the API.
In that case, we would not want to jump back immediately. The network request might fail, and the user might have to try again.
That changes our view controller implementation. Tapping on the button now needs to start a network request. The request callback would then trigger the unwind segue.
This means that we have to trigger the unwind segue from our code.
So, we can’t connect the unwind segue to the Send button anymore.
To what should we connect it, then?
The view controller.
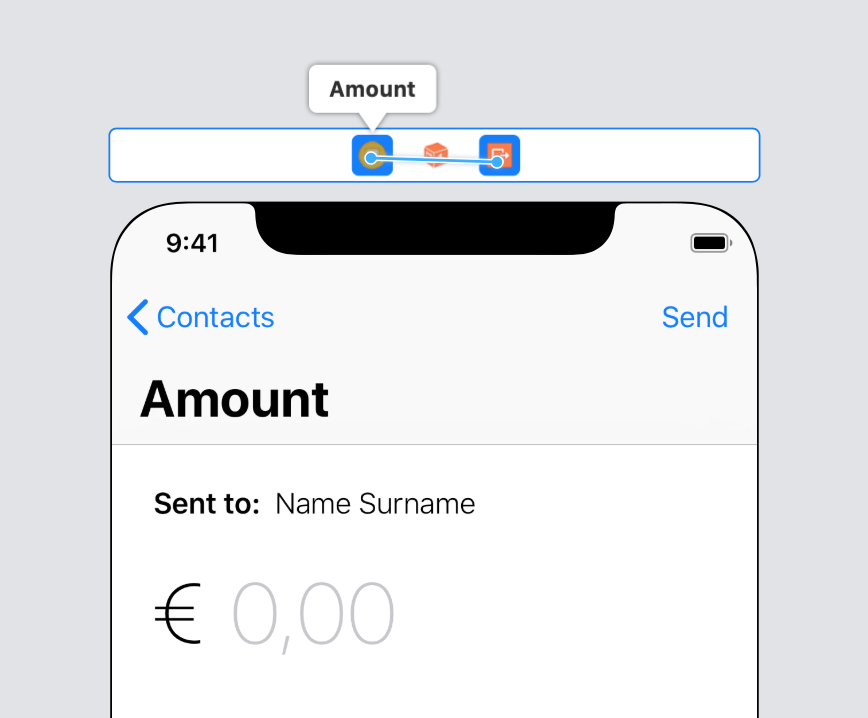
We do that by control-dragging from the view controller placeholder at the top of the storyboard scene.
(Don’t forget to disconnect the previous segue from the Send button)
To trigger an unwind segue programmatically (or any other segue), we need to give it an identifier in the storyboard.
There is no arrow in a storyboard for unwind segues. To select one, you have to find it in the document outline on the left side of Interface Builder. Then, you can set the identifier in the Attributes inspector on the right side.

Then, we connect the Send button to a simple action, in which we start a network request. In its callback, we trigger the unwind segue using the performSegue(withIdentifier:sender:) method.
class TransactionViewController: UIViewController {
	@IBOutlet weak var amountTextField: UITextField!
	@IBOutlet weak var contactNameLabel: UILabel!

	var contact: Contact?
	var transaction: Transaction?

	override func viewWillAppear(_ animated: Bool) {
		super.viewWillAppear(animated)
		amountTextField.becomeFirstResponder()
		if let contact = contact {
			contactNameLabel.text = "\(contact.name) \(contact.surname)"
		}
	}

	@IBAction func send(_ sender: Any) {
		Timer.scheduledTimer(withTimeInterval: 2.0, repeats: false) { _ in
			self.performSegue(withIdentifier: "SendTransactionSegue", sender: nil)
		}
	}

	override func prepare(for segue: UIStoryboardSegue, sender: Any?) {
		if let amount = amountTextField.text?.amount,
			let contact = contact {
			transaction = Transaction(amount: amount, contact: contact)
		}
	}
}
(I just used a Timer to simulate the time it takes to perform a network request).
All the rest stays the same. View controller communication still happens in the same way, since this is still a segue. The only difference is that it gets triggered from code.
The flexibility of unwind segues
This article covers most of the most common aspects of unwind segues. Often you don’t need much more than this in your apps.
Sometimes though you need to jump back to a previous view controller in any complex navigation structure. In those cases, other view controllers and containers take part in the decision process to determine the destination of an unwind segue.
If that’s the case in your app, you can read this technical note from Apple that covers the unwind process and the responsibilities of container view controllers.
In the documentation for the UIViewController class there is also a section called Interacting with Storyboards and Segues. There you can find the list of methods you can add to a view controller to have more fine-grained control of unwind segues.
A particularly interesting one is shouldPerformSegue(withIdentifier:sender:). This method gets called before any segue is executed and gives the view controller a chance to decide if it wants to unwind or not.
This works for any segue, but it’s more commonly used in unwind segues. For example, you might prevent unwinding when the user input is wrong.
If you want to use SwiftUI in your apps instead of UIKit, at the time of writing there is no equivalent to unwind segues. But architecting apps correctly is still important. Find out why in my free guide below.
Architecting SwiftUI apps with MVC and MVVM
It's easy to make an app by throwing some code together. But without best practices and robust architecture, you soon end up with unmanageable spaghetti code. In this guide I'll show you how to properly structure SwiftUI apps.
Matteo has been developing apps for iOS since 2008. He has been teaching iOS development best practices to hundreds of students since 2015 and he is the developer of Vulcan, a macOS app to generate SwiftUI code. Before that he was a freelance iOS developer for small and big clients, including TomTom, Squla, Siilo, and Layar. Matteo got a master’s degree in computer science and computational logic at the University of Turin. In his spare time he dances and teaches tango.
Great article! Thanks for sharing :)
Hi Matteo, great article. I have a question. I tried doing the unwind programmatically (I’m going back 2 screens) and it unwinds but all I see is black. I opened the view hierarchy in xcode and I can see the layers of my home screen but in the simulator, all I’m seeing is a black screen. Any idea on what I’m doing wrong? I compared the view hierarchy of the homeVC and after the unwind. I see that in the original homeVC, my VC has a view(background) but after the unwind, it doesn’t have that although the other layers (collectionview, labels, etc) are all there. I only have this code added in my homeVC: @IBAction func deleteAction(_ unwindSegue: UIStoryboardSegue) {} but its not connected to anything. Would appreciate your help on this.
It’s hard to say what is really going on without seeing the whole code.
You said you are going back two screens, but the navigation stack counts. Is it two screens in a navigation controller? Two screens presented modally? A mix of the two?
I have a navigation controller then VC1. VC1 goes to VC2 via UIViewControllerAnimatedTransitioning then VC2 presents VC3 modally. I need to unwind from VC3 to VC1 and followed your blog but I’m getting a black screen everytime I unwind.
Your code worked perfectly and your explanation was just so well crafted, kind, and clear. Thank you Matteo!
<3
Excellent, excellent article. Many thanks Matteo!
Hi Matteo, I have a use case for shouldPerformSegue(withIdentifier:sender:) using in an unwind segue called programmatically but I’m not sure how.. does it mean instead of unwind I will have only to call shouldPerformSegue?
The
shouldPerformSegue(withIdentifier:sender:)is not a method you should call in your code.To trigger an unwind segue programmatically, you use the
performSegue(withIdentifier:sender:)method. Then the system callsshouldPerformSegue(withIdentifier:sender:)where you decide if the segue should be performed returningtrueorfalse.Okay, so I should have both and shouldPerformSegue would have the condition to be satisfied or not for perfornSegue to be executed.
Thx!